Full HD up-scaling (1080p) (Go to page 8) DVD RECEIVER OWNER’S MANUAL Home theater Speaker ez Set-up (Go to page 19) USB Direct Recording (Go to page 20~21) Model : HT924SF HT855SF HT855PF Portable In (Go to page 18) Before connecting, operating or adjusting this product, please read this instruction booklet carefully and completely. As an ENERGY STAR ® Partner, LG has determined that this product or product models meet the ENERGY STAR ® guidelines for energy efficiency. ENERGY STAR ® is a U.S.
Dear Customer Thank You for Purchasing the LG DVD Player. After going through the instruction manual , you will be able to enjoy all the features and functions of the Product . CAUTION RISK OF ELECTRIC SHOCK DO NOT OPEN CAUTION : TO REDUCE THE RISK OF ELECTRIC SHOCK DO NOT REMOVE COVER (OR BACK) NO USER-SERVICEABLE PARTS INSIDE REFER S E RV I C I N G TO Q UA L I F I E D S E RV I C E PERSONNEL.
Welcome to your new DVD Receiver Contents Types of Playable Discs . . . . . . . . . . . . . . . . . . . . . . . . . 6 Main Unit . . . . . . . . . . . . . . . . . . . . . . . . . . . . . . . . . . . . .7 Remote control . . . . . . . . . . . . . . . . . . . . . . . . . . . . . . . . .7 Speaker Setting up . . . . . . . . . . . . . . . . . . . . . . . . . . . . . 9 Hooking up the unit . . . . . . . . . . . . . . . . . . . . . . . . . . . 8~9 Initial Setting the Area Code . . . . . . . . . . . . . . . . . . . .
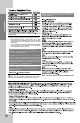
Place a disc inside when not in use It is recommended to remove any disc from the player while moving the set CD-G CD-G Discs " Always keep a disc inside the player to prevent optical lens damage due to dust " 5
Manufactured under license from Dolby Laboratories. “Dolby” and the double-D symbol are trademarks of Dolby Laboratories. Introduction Regional Codes This unit has a regional code printed on the rear of the unit. This unit can play only DVD discs labeled same as the rear of the unit or “ALL”. • Most DVD discs have a globe with one or more numbers in it clearly visible on the cover. This number must match your unit’s regional code or the disc cannot play.
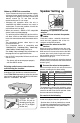
Main Unit 1 2 11 3 4 5 6 7 8 10 9 1 Power ( ) Turns the unit on and off. 2 3 4 5 6 7 8 Volume (VOLUME) Controls the volume when using any function. 9 PORT. (Portable) IN port DVD/CD Disc Drawer You can enjoy music from portable device on your unit. Open/Close ( ) 10 USB port Play/Pause ( ) You can play video, image and sound files by connecting the device. Stop ( ) 11 MIC 1/ MIC 2 TUNING (-/+) ( ), Skip / Search Connect a microphone to MIC 1 or MIC 2 to both Function (F) sockets.
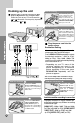
Hooking up the unit Audio In connection The unit’s Audio jacks are colour coded (red for right audio and white for left audio). If your TV has only one output for audio (mono), connect it to the left (white) white audio jack on the unit. Connect jacks on the unit and your TV (DVD player or Digital Device etc.) using the cables. Check the jacks of your TV, and choose the , or connection. Picture quality improves to .
Notes on HDMI Out connection • If your TV does not accept your resolution setting, abnormal picture appears on the screen. (“TV do not support” will appears in screen). Please read owner’s manual for TV, and then set the resolution that your TV can accept. Speaker Setting up • Changing the resolution when the unit is connected with HDMI connector may result in malfunctions. To solve the problem, turn off the unit and then turn it on again.
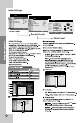
Initial Settings AUDIO 5.1 Speaker Setup DRC Vocal HD AV Sync AUDIO Off On Oms On Semi Karaoke 5.1 Speaker Setup DRC Vocal HD AV Sync Off On Oms On Semi Karaoke AUDIO Speaker Front L Size Small o Volume 0.3(1) Distance Prev. m(ft) off Test First Level dB Move Move Select Return Second Level Third Level Initial Settings a b 9 to 15. 23 -Refer to the turn ON/OFFsubtitle.
c AUDIO a b d AUDIO 5.1 Speaker Setup DRC Vocal HD AV Sync Semi Karaoke Off On Oms On Move e d c HD AV Sync - Sometimes Digital TV encounters a delay between picture and sound. If this happens you can compensate by setting a delay on the sound so that it effectively ‘waits’ for the picture to arrive: this is called HD AV Sync. Use Select e a AUDIO Speaker Size Volume Distance Test Front L Small o 0.
Displaying Disc Information on-screen Displaying Disc Information more you can do You can select an item by pressing Problem No power No picture There is little or no sound The DVD picture quality is poor A DVD/CD will not play Humming noise heard while a DVD or CD is playing Radio stations can’t be tuned in properly The remote control doesn’t work well / at all 3 12 Cause The power cord is disconnected. The TV is not set to receive the DVD signal. The vid eo cables are not connecte d securely.
General features DVD, Divx disc: 5 steps, Video CD: 4 steps, MP3, WMA, Audio CD, 3 steps RETURN ( ) Press to move backwards in the menu or exit the menu. REC. FUNC. Press this key to record directly in USB. RESOLUTION Press this key change/select output resolution. Press to change/select the function and input source. Press this key select the AUX output directly. TV" HTSPK Press this key to listen improved sound at lower volumes.
OTHERS a OTHERS DivX (R) VOD Move a b four digit c 23 on page No 10 Rec bitrate: 3 14 * Select
Enjoying a pre-programmed sound field This system has a number of pre-set surround sound fields. You can select a desired sound mode by using SPECIAL EQ/ NIGHT. You can change the SPECIAL EQ/ NIGHT using BASE EQ / INDIA EQ Indian Music Optimised sound effect. / / (i.e. 2 Channel Sources) into Note : Auto EQ and MP3 OPT works only with MP3 / WMA disc only.
Selecting a subtitle language During playback, press SUBTITLE ( ) repeatedly to select a desired subtitle language.
Creating your own program You can play the contents of a disc in the order you want by arranging the order of the musics on the disc. To add a music(s) on the program list, press. PROG/MEMO to enter the program edit mode ( mark appears on the menu). Select a desired music on the [List] by using the then press ENTER to add the music to the program list. Select music from the program list then press ENTER to start programmed playback.
Note : This feature is not available with USB.
Listening to the radio - more you can do Looking for radio stations automatically Press and hold TUN.-/ TUN.+ for more than a second. The tuner will scan automatically and stop when it finds a radio station. Deleting all the saved stations Press and hold PROG./MEMO. for two seconds. ERASE ALL will flash up on the DVD receiver display. Press PROG./MEMO. to erase all saved radio stations.
Using an USB device 1 Connect the USB device to the USB port of the unit. 2. Select the USB function 3 Select a file you want to play FUNCTION Compatible USB Devices • MP3 Player : Flash type MP3 player. • USB Flash Drive : Devices that support USB2.0 or USB1.1. • The USB function of this unit does not support all USB devices. USB device requirement • Devices which require additional program installation when you have connected it to a computer, are not supported. Look out for the follows.
All tracks recording If the recording button is pressed at the CD stop, all tracks/ files would be recording. - The files in the sub-folders are not recorded during all track recording. - If you want to all tracks recording during playback, press stop twice. check the “ ” on the screen.
Amplifier HT924SF HT855PF Reference Stereo mode 175 W + 175 W (4W at 1 kHz, THD 10%) Surround mode 175 W + 175 W (THD 10%) Center* 175 W Surround* 175 W + 175 W (4W at 1 kHz, THD 10%) Subwoofer* 325 W (3W at 30 Hz, THD 10%) Speaker Stereo mode 136 W + 136 W (4W at 1 kHz, THD 10%) Surround mode 136 W + 136 W (THD 10%) Center* 136 W Surround* 136 W + 136 W (4W at 1 kHz, THD 10%) Subwoofer* 170 W (3W at 30 Hz, THD 10%) Front/Rear Speaker 22 Model Impedance Rated Input Power Max.