WD-3274RHD WD-3276RHD Washing Machine OWNER'S MAINUAL Pleasereadthismanualcarefully, itprovides instructions onsafeinstallation use,andmaintenance. Retainitforfuturereference. Record themodelandsedalnumbers ofyourmachine. Quotethisinformation toyourdealerifyourequireservice. e Lave-UngeAutomaitque LG. II contient, rutiliseitonet 3 sedemier. num6rodes6riedulave-linge.
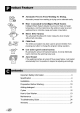
Automatic Process From Washing To Drying. Automaticprocessfrom washing to drying can be selectedeasily, More economical by Intelligent Wash System Intelligent Wash System detects the amount of load and water temperature, and then determines the optimum water level and washing time to minimize energy and water consumption. Direct Drive System The advanced Brush[ess DC motor rotates the drum directly without belt and pulley.
READ ALL INSTRUCTIONS BEFORE USE Foryoursafety,theinformation inthismanual mustbefonowed tominimize theriskoffire orexplosion, electric shock,ortopreventproperty damage,personalinjury,orlossoflife. IMPORTANT SAFETY INSTRUCTIONS WARNING : To reduce the risk of fire, electric shock, or injury to persons when using the washer, follow basic precautions, locluding the following: • Read all instructions before using the washer.
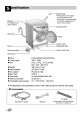
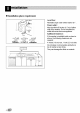
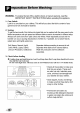
f_:_ Drawer (For detergent end fabric softener) Power plug olf the supply cord is damaged, it must be replaced bythe manufactureror its serviceagents or a similarly qualifiedpersonin orderto avoid a hazard. _, Control panel Drainhos Drum Lower cover Adjustable feet Drain pump flit Lowercovercap Drain plug. • Name • Power supply • Size • • • • Weight Wash capacity Dry capacity Max.
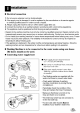
Install or store where it will not be exposed to temperatures below freezing or exposed to the weather. Properly ground washer to conform with all governing codes and ordinances. The base opening must not be obstructed by carpeting when the washing machine is installed on a carpeted floor. In countries where there are areas which may be subject to infestation by cockroaches or other vermin_ pay particular attention to keeping the appliance and its surroundings in clean condition all times.
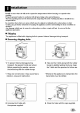
• Installation place requirement Drain Hose Level floor : Allowable slope under entire washer is 1_. Power outlet : / Laundry Tub approx. Must be within 60 inches(1.5 m) of either side of the washer. Do not overload the outlet with more than one appliance. Additional Clearance : If the washer is installed inside a closet or alcove, the following clearances are required: 4 inches (10 cm) rear, 1 inch (2.5 cm) side Do not place or store laundry products on top of washer at any times.
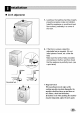
• Electrical connection 1. Do not usean extensioncord or double adapter. 2. If the supply cord is damaged,it must be replacedby the manufactureror its serviceagents or similarlyqualifiedperson in order to avoid a hazard. 3. Always unplug the machine and turn off the water supply after use. 4. Connectthe machine to an earthed socket in accordancewith currentwiring regulations. 5. The appliancemust be positionedso that the plug is easily accessible.
This equipment is not designed for maritime use or for use mobile installations such as caravans, aircraft etc. Turn off the stopcock if the machine is to be left for any length of time (e.g. holiday), especially if there is no floor drain(gully) in the immediate vicinity. When disposing of the appliance, cut off the mains cable, and destroy the plug Disable the door lock to prevent young children being trapped inside. Packaging material (e.g. Films, Styrofoam) can be dangerous for children.
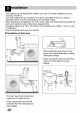
• Level adjustment 1. Levelinga the washing machine properly preventsexcessivenoise and vibration. Installthe applianceon a solid and level floor surface, preferablyin a corner of the room. 2. If the floor is uneven,adjust the adjustablefeet as required.(Do not insert pieces of wood, etc. under the feet) Make sure that all four feets are stable and restingon the floor and then check that the applianceis perfectly level.
WARNING - To reduce the risk of fire, electric shock, or injury to persons, read the IMPORTANT SAFETY INSTRUCTIONS before operating this appliance. 1. Care Labels Look for a care label on your clothes. This will tell you about the fabric content of your garment and how it should be washed. 2. Sorting To get the bestresults,Sortclothesintoloadsthat can be washedwith thesame wash cycle. Watertemperatureand spin speedand differentfabricsneedto be washedin differentways.
• Adding detergent 1. The Dispenser and fabric softener Drawer 3. The liquid bleach drawer. • Do not open the detergentdrawer during water fill cycle. • Bleachwill be dispensed automatically after the detergent has had time to work. • Do not fill past MAX indicator. Detergent for wash Fabric sotlener Uquid BIeadl 2. Adding Fabric Softener 4. Detergent usage • The detergent should be used according to the instruction of the detergent mam4Jhcture. • Do not exceed the maximumfill line.
• Recommended WASH SANITARY courses according to the laundry type First check if laundryis machine washable. HOT/COLD white cotton, linen WASH/ towel and DRY sheets...) WASH Color fast gaments Jeans, Tshirts, Shorts,pajamas..,) Wash EXTRARINSE Ibs. (7.0kg) EXTRAWASH 152/5 WaehlDry 84/5 Ibs. (4.0kg) WASH PERM, TAPCOLD/COLD WASH/DRY WASH RINSE + SPiN If you wish to rinse more,theExtra Rinsefunction will removeany trace WASH/ of detergents.
• To start, press the POWER button. • To start, press the POWER button. • Press the START/PAUSE button. • Initial condition - Wash Main Wash Only - Rinse 3 times - Spin 800 rpm - Temp. - Program Warm/Cold(Wash/Rinse) Cotton • Select the conditions which you want to use, by pressing each button. For selecting the correct _cle, please refer to pages 14 ~ 20. • Press the START/PAUSE button. • The Beep On/Off function can be set by pressing and holding the OPTION and DRY button simultaneonly.
(1) (2) (3) (4) (5) (6) (7) (8) (9) (1) BUTTON : OPTION (4) CHILD LOCK (7) BUTTON : START/PAUSE (2) BUTTON : WATER TEMP. (3) BUTTON : SPIN (5) BUTTON : TIME DELAY (6) BUTTON : DRY (8) DIAL : PROGRAM (9) BUTTON : POWER OPTION • By pressing the OPTION button, the wash type can be selected. - EXTRA RINSE - EXTRA WASH - EXTRA RINSE +EXTRA WASH - DR Y ONL Y[WASH/DR Y] • If the laundry is heavily soiled, "EXTRA WASH" course is effective.
• Press TEMP, to cycle through the temperature choices, • Select a water temperature based on the type of load you are washing. Use the warmest water safe for fabrics, Follow garment label instructions. • Warm dnses leave the loads • By pressing the SPIN button, the spin rpm can be chosen, -RINSE HOLD _ w,_v_ w_oLo _ Tec_._u_ - NO SPIN SPIN TEMe - 400 - 800 -1000 -1400 dryer than cold rinses, Warm rinses increase wrinkling, In cold climates, a warm rinse makes the load mere comfortable to handle.
If you choose to lock the buttonson the control assemblyto preventtampering,this functionmay be selected. •ChildLockcanbe setby pressingandholdingthe SPINbuttonandTIMEDELAYbutton simultaneousl SPIN T_MEDEALY Preparingwashing beJorestarting "Time Delay" - Turnon the water tap. - Load laundryand close the door. - Placethe detergent and fabric softenerin the drawer. • Howto set "TIME Whenchildlock is set,all buttonsare inoperable.
• This washer-dryer's automatic process from washing to drying can be selected easily. A,_O _y t_E_Y o_ • For most even drying, make sure all articles in the clothes load are similar in material and thickness. • Do not overload dryer by stuffing too many articles into drum, Items must be able to tumble freely. • If you open door and remove load before dryer has finished its cycle, remember to press the START/PAUSE button. • Your dryer can handle a load of up to 84/5Ibs.(4kg) dry weight of articles.
START/PAUSE • This START/PAUSE button is used to start wash cycle or pause the wash cycle • 9 programs are available according to the laundry type • Lamp will light up to indicate selected program • If temporary stop of wash cycle is needed, press the START/PAUSE button • When in Pause, the power is turned off automatically after 4 minutes • When START/PAUSE button is pressed, the Cotton program is automatically selected • NB.
• When washing cycle is completed, "End "is displayed on the "Multi display'. • When child lock is selected, the ,,t.t. r _ ,, is displayed. • When time delay is selected, it shows the remaining times to finish the selected program. • During washing cycle, the remaining washing time is displayed. • Recommended program by manufacturer. [WASH] - SANITARY : Approx.1 hourand37 minutes • If the washer encounters a fault during operation, the associated fault will be displayed.
• Whendryingcycleis completed, "Cd" [COOLDOWN]is displayedontheMulti display. • The COOL DOWN is setting automatically when a drying cycle is complete. • When you are not remove a load of clothes from the dryer as soon as it stops, wrinkles can form. • The COOL DOWN operating periodically tumbles, rearranges and fluffs the load to avoid wrinkles without heat for up to 4 hours. • The "Cd " message will continue to display until the clothes are removed or the START/PAUSE button is pressed.
-_ Beforecleaningthe washerinterior,unplugthe electrical powercordto avoid electricalshock to avoid electricalshock hazards. ÷ When disposingof the appliance,cut offthe mainscable, anddestroythe plug Disablethe door lockto preventyoung childrenbeingtrappedinside. • The water inlet filter -"/E "error message will blink on the control panel when water does not enter the detergent drawer. - If your water is very hard or contains traces of lime deposit, the water inlet filter may become clogged.
• Dispenser drawer After a while detergents and fabric softeners leave a deposit in the drawer. • It should be cleaned from time to time with a jet of running water. • If necessary it can be removed completely from the machine by pressing the catch downward and by pulling it out. • To facilitate cleaning, the upper part of the fabric softener compartment can be removed. • The drawer recess Detergent can also accumulate insidethe recess which should be cleaned occasionally with an old toothbrush.
• Cleaning your washer 1. Exterior Proper care of your washer can extend its life. The outside of the machinecan be cleanedwith warm water and a neutralnon abrasive householddetergent. Immediatelywipe off any spills. Wipe with damp cloth. Try not to hitsurface with sharpobjects. ÷ IMPORTANT:Do not use methylatedspirits, diluents or similar products. 2. Interior Dry aroundthe washer door opening,flexible gasket and door glass. Run washer througha completecycle using hot water. Repeat processif necessary.
÷ Thiswashingmachineis equippedwith automaticsafetyfunctions which detectanddiagnosefaults at an early stage andreactappropriately. Whenthe machinedoes notfunction properlyor doesnotfunctionat all, checkthe followingpoints beforeyoucontactyour serviceprovider. Rattling and clanking noise • Foreign objects such as coins or safety pins maybe in drum or pump. Stop washer and check drum and drain filter. If noise continues after washer is restarted, call your authorized service centre.
Washer does notstart •Electrical power cordmaynot beplugged inorconnection maybeloose. •House fuseblown, circuit breaker tripped,or apower outage hasoccurred. •Water supply tapisnotturned Make sure plug fits tightly in wall outlet. Reset circuit breakeror replacefuse Do not increasefuse capacity If problemis a circuitoverload, have it correctedby a qualified electrician Turn on water supply tap on.
• Water supply is not adequate in area • Water supply taps are not completely open, • Water inlet hose(s) are kinked, • The filter of the inlet hose(s) are clogged. Check another tap in the house, Fully open tap. • Drain hose is kinked or clogged, • The drain filter is clogged. Clean and straighten the drain hose, Clean the drain filter, • Load is too small, • Load is out of balance. Add 1 or 2 similar items to help balance the load. • The appliance has an unbalance detection and correction system.
O P/No.: 3828ER3021A LG Electronics Inc.