Installation instructions Combined fridge-freezer for integrated use, door-on-door 140114 7085634 - 01 (S)IC.../ (S)ICB.../ ICU... ...
General safety information Contents 2 Transporting the appliance 1 General safety information................................... 2 2 Transporting the appliance................................... 2 3 Installing the appliance......................................... 2 4 Appliance dimensions........................................... 3 5 Recess dimensions............................................... 3 6 Unit door.................................................................
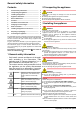
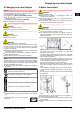
Appliance dimensions q The installation area of your appliance must demonstrate, per 8 gof refrigerant R 600a, a volume of 1 m3 according to the EN 378 standard. If the installation area is too small, an inflammable gas-air mixture may arise as a result of a leakage in the refrigeration circuit. Information as to the refrigerant amount can be found in the type plate on the inside of the appliance.
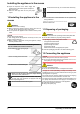
Unit door 7 Ventilation of the kitchen unit u In the case of Side-by-Side installation, two appliances next to one another, build the appliances into separate kitchen units. u Check the wall thickness of the adjoining cabinets: it must be min. 16 mm. u Only install the appliance in robust, stable kitchen units. Secure the units against tipping. u Align the kitchen unit using a spirit level and marking square and if necessary compensate with shims.
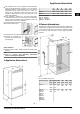
Changing over door hinges 8 Changing over door hinges NOTICE Risk of condensation damage for Side-by-Side appliances! Certain appliances can be set up as Side-by-Side combinations (two appliances next to each other). If your appliance is a Side-by-Side (SBS) appliance: u Set up the SBS combination in accordance with the enclosed document. If the positioning of the devices is stipulated: u Do not change the door hinges over.
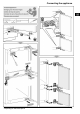
Installing the appliance in the recess u Open the stopcock of the water supply and check that the entire water system is leakproof. Before initial use: u Have the water pipe bled of air by the proper expert. Loosen the screws only, do not undo them all the way. Check the screws and tighten if necessary. 10 Installing the appliance in the recess u Please take note of the information in the symbols key during installation.
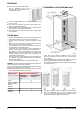
Connecting the appliance * Depending on model and options 7
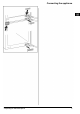
Connecting the appliance 8 * Depending on model and options
Connecting the appliance * Depending on model and options 9
Connecting the appliance 10 * Depending on model and options
Connecting the appliance * Depending on model and options 11
Connecting the appliance 12 * Depending on model and options
Connecting the appliance * Depending on model and options 13
Connecting the appliance 14 * Depending on model and options
Connecting the appliance * Depending on model and options 15
Liebherr Hausgeräte Ochsenhausen GmbH * Memminger Strasse 77-79 * 88416 Ochsenhausen * Deutschland * www.liebherr.