
Installation Guide
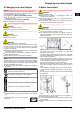
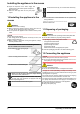


8 Changing over door hinges
NOTICE
Risk of condensation damage for Side-by-Side appliances!
Certain appliances can be set up as Side-by-Side combina-
tions (two appliances next to each other).
If your appliance is a Side-by-Side (SBS) appliance:
u
Set up the SBS combination in accordance with the
enclosed document.
If the positioning of the devices is stipulated:
u
Do not change the door hinges over.
CAUTION
Risk of injury if soft stop contracts!
u
Carefully remove the soft stop mechanism.
CAUTION
Risk of injury if hinges fold!
u
Leave hinges open.
WARNING
Risk of injury due to the door dropping out!
If the fastening parts are not screwed into place firmly enough,
the door may drop out. This may lead to severe injuries. What
is more, the door may not close and therefore the appliance
may fail to cool properly.
u
Screw the hinges and the ball journal of the soft stop mecha-
nism firmly into place, with 4 Nm.
u
Screw the holder of the soft stop mechanism firmly into
place, with at least 3 Nm.
u
Check all of the screws and retighten if necessary.
Note
The door hinges can only be changed over if there is sufficient
space towards the top to pull out the hinge mounting bracket
and to mount it again on the other side. This is generally not the
case after installation in the recess.
u
Change the hinges over before the appliance is installed in
the recess.
There is a risk of injury during this stage! Please
observe the safety instructions!
The instructions apply to several models. Only carry
out this step if it is relevant for your appliance.
Choose between the alternatives given.
Loosen the screws only, do not undo them all the way.
Check the screws and tighten if necessary.
u
While changing over the door hinges, observe the safety
instructions above and also the information in the symbols
key.
Change the hinges over as shown at the end
of the book.
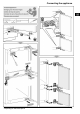
9 Water connection*
WARNING
Danger of electric shock!
u
Disconnect the appliance by unplugging it before you
connect it to the water line.
u
Shut off the water supply before you connect the water feed
lines of the IceMaker.
u
The connection to the drinking water system may be carried
out only by a qualified gas fitter and plumber.
WARNING
Risk of poisoning!
u
The water quality has to comply with the drinking water ordi-
nance of the respective country (e.g. 98/8
u
The IceMaker serves exclusively for making ice cubes in
household quantities and has to be operated with water suit-
able for the purpose.
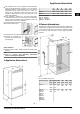
Fig. 5
- The water pressure has to be between 0.15 MPa and
0.6 MPa (1.5 bar - 6 bar).
- The water supply to the appliance must be via a cold water
pipe which withstands the operating pressure and complies
with the hygiene regulations.
Use the accompanying stainless steel hose (1.5 m). Do not
reuse old hoses. A 3 m hose is available from the customer
service department and has to be fitted by an expert.
In the hose connecting piece is a sieve with seal.
- Between the hose and the domestic water connection there
has to be a stopcock to interrupt the water supply in case of
need.
- All the fixtures and fittings used for water supply have to
comply with the applicable regulations of the respective
country.
- Do not damage or kink the water inlet pipe when installing
the appliance.
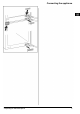
Fig. 6
The solenoid valve is at the bottom back of the appliance. It
has a metric R3/4 connecting thread.
u
Connect the straight part of the stainless steel hose to the
solenoid valve.
u
Fix the stainless steel hose to the housing with the locking
hook.
Changing over door hinges
* Depending on model and options 5