Operating instructions Combined fridge-freezer for integrated use, door-on-door 140114 7085454 - 01 ICN/ SICN/ ICNP ...
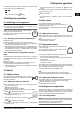
Appliance at a glance Contents 1 Appliance at a glance 1 1.1 1.2 1.3 1.4 Appliance at a glance............................................ Description of appliance and equipment.................. Range of appliance use............................................ Conformity................................................................ Saving energy.......................................................... 2 2 2 3 3 2 General safety information................................... 3 3 3.1 3.
General safety information Use the appliance solely as is customary within Information for testing institutes: In order to determine the standard energy consumption a domestic environment. All other types of use and the storage time during malfunction, the cold are inadmissible. The appliance is not suitable storage accumulators must be arranged in accordance with for storing and cooling medicines, blood the manufacturer's loading plan.
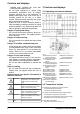
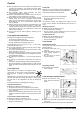
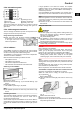
Controls and displays leakage area. Ventilate the room well. 3 Controls and displays Notify the after-sales service. - Do not store explosives or sprays using 3.1 Operating and control elements combustible propellants such as butane, propane, pentane, etc. in the appliance. To identify these spray cans, look for the list of contents printed on the can, or a flame symbol. Gases possibly escaping may ignite due to electrical components.
Putting into operation The following displays indicate malfunction. Possible causes and corrective action (see Malfunction). - F0 to F9 - FE* - The power failure symbol shines. 4 Putting into operation 4.1 Switching on the appliance Note u To switch on the entire appliance it is necessary only to switch on the freezer compartment. Switch on the appliance approx. 2 hours before adding frozen food for the first time. Do not load food to be frozen before the temperature display reads -18 °C. 4.1.
Control u Store perishable food such as ready-to-serve dishes, meat products and sausages in the coldest zone. Place butter and preserves in the upper area and in the door (see Appliance at a glance). u Use recyclable plastic, metal, aluminium and glass containers and cling film for wrapping. u Always store liquids and food which is subject to odour or taste transfer in closed containers or cover them.
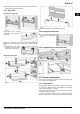
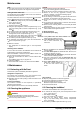
Control u The glass plate (1) with pull-out stops must be at the front so that the stops (3) face downwards. 5.4.7 Door racks Moving the storage rack Fig. 6 Fig. 4 The boxes can be removed and placed on the table as a single unit. Either one or both the boxes can be used. If particularly tall bottles are to be stored, hang only a single box above the bottle rack. u Re-positioning the boxes: Lift them for removal and reposition them as required. u The door racks can be dismantled for cleaning. 5.4.
Control CAUTION Risk of injury due to broken glass! Bottles and cans containing drinks may burst when being frozen. This applies particularly to sparkling drinks. u Do not freeze bottles and cans containing drinks! In order that the food is rapidly frozen through to the core, do not exceed the following quantities per pack: - Fruit, vegetables up to 1 kg - Meat up to 2.5 kg u Pack the food in portions in freezer bags, reusable plastic, metal or aluminium containers. 5.5.
Control 5.5.8 Information system If large quantities of ice cubes are needed, the complete IceMaker drawer can be exchanged for the adjacent drawer. When the drawer is closed, the IceMaker automatically recommences production. Once the IceMaker has been switched on for the first time, it may take up to 24 hours until the first ice cubes are produced. Fig.
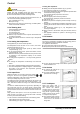
Maintenance Note u The water reservoir has to be slid all the way into the bracket provided for the purpose in the refrigerator compartment! Setting the water intake time* The opening time of the IceMaker valve can be set to affect the size of the ice cubes produced. The water intake time can be set in stages from E1 (short intake time) to E8 (long intake time). The intake is preset at E3. u To activate the setting mode: press the SuperFrost button Fig. 2 (13) for about 5 s. w The display indicates c.
Malfunction u Using the Up setting button, freezer compartment Fig. 2 (11)/ Down setting button, freezer compartment Fig. 2 (12) select Ic. u To confirm: press the SuperFrost button Fig. 2 (13). w The IceMaker moves into the cleaning position and switches off. u To deactivate the setting mode: press the On/Off button, freezer compartment Fig. 2 (9). w The temperature is indicated again in the temperature display. u Remove the drawer. u Clean the ice cube tray and drawer with warm water.
Decommissioning The temperature display indicates power failure . The warmest temperature reached during the power failure appears in the temperature display. → The freezer temperature rose too high over the last hours or days due to a power failure or power interruption. When the power interruption is over, the appliance will continue to operate in the last temperature setting. u To cancel the display of the warmest temperature: press alarm button Fig. 2 (15). u Check the quality of the food.
Disposing of the appliance u Leave the door open to prevent odour. 9 Disposing of the appliance The appliance contains some reusable materials and should be disposed of properly - not simply with unsorted household refuse. Appliances which are no longer needed must be disposed of in a professional and appropriate way, in accordance with the current local regulations and laws.
Liebherr Hausgeräte Ochsenhausen GmbH * Memminger Strasse 77-79 * 88416 Ochsenhausen * Deutschland * www.liebherr.