CLUB SERIES RECUMBENT LIFECYCLE® EXERCISE BIKE (CSLR) OPERATION MANUAL M051-00K39-A196
CORPORATE HEADQUARTERS 5100 River Road Schiller Park, Illinois 60176 • U.S.A. 847.288.3300 • FAX: 847.288.3703 800.735.3867 (Toll-free within U.S.A., Canada) Global Website: www.lifefitness.com INTERNATIONAL OFFICES AMERICAS North America Life Fitness Inc. 5100 N River Road Schiller Park, IL 60176 U.S.A Telephone: (847) 288 3300 Fax: (847) 288 3703 Service Email: commercialservicereply@lifefitness.com Sales/Marketing Email:commercialsales@lifefitness.
TABLE OF CONTENTS Section Description 1. 1.1 1.2 Getting Started . . . . . . . . . . . . . . . . . . . . . . . . . . . . . . . . . . . . . . . . . . . . . . . . . . . . . . . . . . . . . . . . .5 Important Safety Instructions . . . . . . . . . . . . . . . . . . . . . . . . . . . . . . . . . . . . . . . . . . . . . . . . . . . . . .5 Setup . . . . . . . . . . . . . . . . . . . . . . . . . . . . . . . . . . . . . . . . . . . . . . . . . . . . . . . . . . . . . . . . . . . . . . . .7 2. 2.1 2.2 2.
Before using this product, it is essential that this ENTIRE operation manual and ALL installation instructions be read. It describes equipment setup and instructs owners on how to use it correctly and safely. Avant toute utilisation de ce produit, il est indispensable de lire ce manuel d'utilisationdans son INTÉGRALITÉ, ainsi que TOUTES les instructions d'installations. Ce manuel explique comment installer l'équipement et comment l'utiliser correctement et sans danger.
This Operation Manual describes the functions of the following product: Club Series Recumbent Lifecycle® Exercise Bike (CSLR) See "Specifications" in this manual for product specific features. Statement of Purpose: The Life Fitness Lifecycle exercise bike is a machine that simulates the movements of riding a bicycle at various speeds and levels of resistance.
1 GETTING STARTED 1.1 IMPORTANT SAFETY INSTRUCTIONS SAFETY WARNING: The safety of the product can be maintained only if it is examined regularly for damage and wear. See Preventive Maintenance section for details. • Use the Life Fitness Lifecycle exercise bike only as directed in this manual. • If a Lifecycle exercise bike does not function properly after it has been dropped, damaged, or even partially immersed in water, contact Life Fitness Customer Support Services for assistance.
1 POINT DE DÉPART 1.1 CONSIGNES DE SÉCURITÉ IMPORTANTES CONSIGNE DE SÉCURITÉ : pour un emploi sûr, le produit doit être inspecté régulièrement afin de s'assurer qu'il n'est pas usé ni endommagé. Consultez la section de Maintenance préventive pour obtenir de plus amples informations. • Si un vélo d'exercice Life Cycle ne fonctionne pas correctement après avoir subi une chute, des dommages ou une immersion même partielle dans l'eau, contactez le service d'assistance clientèle de Life Fitness.
1.2 SETUP Read the entire Operation Manual before setting up the Lifecycle exercise bike. WHERE TO PLACE THE LIFECYCLE EXERCISE BIKE Following all safety instructions in Section 1.1, move the bike to the location in which it will be used. See Section 7, titled Specifications, for the dimensions of the footprint. Allow a distance of 16 inches, or 41 centimeters, between the widest part of the bike and other objects on either side.
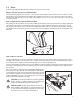
HOW TO ADJUST THE PEDAL STRAPS The bike pedal straps keep the user’s shoes on the pedals during a workout. The straps should fit comfortably, but they also should be tight enough to prevent shoes from slipping at any point in the pedaling rotation. Before working out, a user should test and adjust the tightness of the straps. The safety straps on the foot pedals can be adjusted to fit a variety of shoe sizes. The straps are held in place by two knobs that extend from either side of each pedal.
SERVICE ACCESS PORT The two interchangeable type RJ45 networking ports (A) are located on the back of the display console and are enclosed by a removable cover. See figure below. Any use of the ports for other than their intended purpose could void the product warranty.
2 CONSOLE OVERLAY 2.1 CONSOLE OVERLAY OVERVIEW The computerized display console allows the user to tailor a workout to personal fitness abilities and goals and to monitor progress. With this easy-to-use console, the user can track fitness improvement from one workout to the next. B C D E Display Lock A Workouts Plus Change Workouts G Bike Mode Constant Cal/Hr iPod ® Q F H I Begin pedaling. Select workout or press Quick Start.
2.2 CONSOLE OVERLAY DESCRIPTIONS A. WORKOUT PROFILE window: This window displays shapes, made of columns of lights, that represent the levels of intensity in a workout-in-progress. The height of the first column on the left side of the window is proportional to the current level of intensity.
K. COOL DOWN key: Workout programs end automatically in a Cool Down mode, which lowers the intensity level. Press the COOL DOWN key at any desired point during a workout to go immediately into Cool Down mode. In this phase of a workout the body begins to remove lactic acid and other accumulated by-products of exercise, which build up in muscles during a workout and contribute to muscle soreness. The console automatically adjusts each workout’s Cool Down level according to the individual user’s performance.
IPOD KEYPAD R U S T R. MUTE: Press this key to turn off the sound. S. PLAY / PAUSE: Use this key to Play or Pause the current track. T. UP AND DOWN ARROW KEYS: Use these keys to select the next track and previous track. U. LOWER AND HIGHER VOLUME KEYS: Use these key to increase or decrease the volume.
2.3 READING RACK AND BOTTLE HOLDER The water bottle holder (A) is available to hold water bottles and/or personal objects. Additionally, an integrated reading rack (B) for supporting a book or magazine is located at the base of the upper panel of the console.
3 3.1 HEART RATE ZONE TRAINING® WHY HEART RATE ZONE TRAINING® EXERCISE? Research shows that maintaining a specific heart rate while exercising is the optimal way to monitor the intensity of a workout and to achieve maximum results. That is the idea behind the Life Fitness Heart Rate Zone Training® approach to exercise. Zone Training identifies an exerciser's ideal heart rate range, or zone, for burning fat or increasing cardiovascular fitness.
3.2 HEART RATE MONITORING THE LIFEPULSETM DIGITAL HEART RATE MONITORING SYSTEM The patented Lifepulse system sensors are the built-in heart rate monitoring system on the Life Fitness Bike. For the most accurate reading possible, during a workout: • Grasp the sensors (A) firmly. • Hold each sensor at the vertical midpoint. • Keep hands steady and in place. The console displays the heart rate within 10 to 40 seconds after the user grasps the sensors.
THE OPTIONAL POLAR® TELEMETRY HEART RATE CHEST STRAP The Lifecycle Bike is equipped with Polar® telemetry, a heart rate monitoring system in which electrodes, pressed against the skin, transfer heart rate signals to the console. These electrodes are attached to a Polar telemetry heart rate chest strap that the user wears during the workout. The Polar telemetry heart rate chest strap is optional. Contact Life Fitness Customer Support Services to order.
4 THE WORKOUTS 4.1 WORKOUT OVERVIEWS The following workouts are pre-programmed for the Lifecycle Bike. ► QUICK START is the fastest way to begin exercising. After the QUICK START key is pressed, a constant-level workout begins. The intensity level does not change automatically. ► MANUAL is a constant effort workout in which the user can change the intensity level at any time. ► RANDOM is an interval training workout of constantly changing intensity levels that occur in no regular pattern or progression.
The following workouts are accessed by pressing the WORKOUTS PLUS key. ► AROUND THE WORLD is an interval-training workout in which the hills resemble scenes of various geographical areas. ► CASCADES is a two-peak workout in which intensity levels gradually increase and decrease. ► FOOTHILLS is a rolling hill workout with low intensity levels. ► INTERVAL is a HILL workout in which intensity levels rise and fall. The higher levels gradually incline toward a peak and then gradually decline.
4.2 USING THE WORKOUTS Different Bike workouts require different setup steps. See the chart at the end of this section for a quick glance at the steps for setting up any workout program. This section provides details on the steps themselves. TO BEGIN A WORKOUT Start pedaling and press START, or simply start pedaling to activate the console. The MESSAGE CENTER displays the prompt: “SELECT WORKOUT USING ARROW KEYS OR PRESS QUICK START”. If it displays a different message, press the CLEAR key twice rapidly.
SELECTING AND ADJUSTING THE INTENSITY LEVEL When prompted by the MESSAGE CENTER, use the ARROW keys to increase or decrease the displayed intensity level or target heart rate to the desired value and press ENTER. Adjust the level as needed or desired during the workout. • Intensity level: The Bike provides a selection of 20 intensity levels. The intensity level appears in the WORKOUT PROFILE window as rows of lights arranged in columns. Selecting a low intensity level at first is recommended.
STEPS TO SETUP EACH WORKOUT QUICK START Press QUICK START Begin workout INTERVAL Press WORKOUTS PLUS repeatedly until INTERVAL appears; press ENTER Enter time Select level Begin workout EXTREME HEART RATETM Press ARROW keys repeatedly until EXTREME HEART RATE appears; press ENTER Enter time Enter age Accept/Enter target heart rate Begin workout SPORT TRAINING Press ARROW keys repeatedly until SPORT TRAINING appears; press ENTER Enter time Select level Begin workout MANUAL Select MANUAL Enter time Select
4.3 WORKOUT DESCRIPTIONS QUICK START QUICK START is the fastest way to begin exercising and bypasses the steps of selecting a specific workout program. The intensity level for the workout is set automatically and remains the same unless manually changed. To change the level, use the ARROW keys to enter a higher or lower level number. MANUAL The MANUAL program sets an intensity level that does not change automatically.
HILL The Life Fitness-patented HILL workout offers a variety of configurations for interval training. Intervals are periods of intense cardiovascular exercise separated by regular periods of lower-intensity exercise. The WORKOUT PROFILE window represents these high and low intervals as columns of illuminated LEDs, which together have the appearance of hills and valleys.
HEART RATE HILLTM This program combines the standard HILL workout profile with the concept of Heart Rate Zone Training. The default target heart rate is calculated as 80% of the theoretical maximum (HRmax), but the user can adjust the target rate during the workout setup. All hills and valleys are percentages of HRmax. The workout consists of three hills that target three heart rate goals: • The first hill brings the heart rate to 70% of HRmax. • The second hill increases the rate to 75% of HRmax.
HEART RATE INTERVALTM 80% HRmax Warm-up Hill Hill Hill This program also combines the standard HILL workout profile with the concept of Heart Rate Zone Training. The default target heart rate is calculated as 80% of the theoretical maximum (HRmax), but the user can adjust the target rate during the workout setup. The workout alternates between a hill, which brings the heart rate up to the target rate of 80% of HRmax, and a valley which brings the heart rate down to 65% of HRmax.
EXTREME HEART RATETM This intense, varied workout is designed to help more experienced users to break through fitness improvement plateaus. The workout alternates between two target heart rates as quickly as possible. The effect is similar to that of running sprints. The user must wear a Polar telemetry heart rate chest strap or grip the LifepulseTM sensors throughout the workout. When setting up the workout, the user enters a target heart rate.
WATTS This workout targets a rate of effort equal to a certain number of Watts. A Watt is a unit of power that measures the amount of mechanical work required to operate a device, such as a Lifecycle exercise bike. It is roughly equal to .25 calories per hour. The workout program automatically alters the intensity level to maintain the appropriate rate of effort. By default, this workout is turned off. For information on making it available, see Section 5, titled System Menu.
FIT TEST The Life Fitness Fit Test program is another exclusive feature of this product. The Fit Test workout estimates cardiovascular fitness and can be used to monitor improvements in endurance every four to six weeks. The user must grasp the Lifepulse hand sensors when prompted or wear a heart rate chest strap, as the test score calculation is based on a heart rate reading. The workout duration will be five minutes at the chosen resistance level.
If you make an error when entering any Fit Test data, you can correct it by pressing CLEAR, inputting the correct information and pressing ENTER. It is important for you to take the Fit Test under similar circumstances each time.
MILITARY FITNESS TEST The Lifecycle® Exercise Bike features an Air Force Physical Readiness Tests (PRT). This test is similar to the fit test workout, except that it does not have a preset time goal. To begin an Air Force PRT: l l l l l l Press the WORKOUTS PLUS button repeatedly until the AIR FORCE PRT appears in the message center and press ENTER to select the AIR FORCE PRT option. The message center will prompt for a user weight (ENTER WEIGHT).
EDITING SETTINGS FOR WORKOUTS SAVED UNDER MY WORKOUTS Use the following steps to change settings for a stored workout or to change a workout name. 1. When the MESSAGE CENTER displays the prompt “SELECT WORKOUT USING ARROW KEYS OR PRESS QUICK START,” press the CHANGE WORKOUTS key. 2. Scroll through the user names displayed in the MESSAGE CENTER by pressing the ARROW keys. 3. When the desired name appears, press the ENTER key. 4.
5 SYSTEM MENU A special system menu is available to equipment owners and other authorized personnel to allow access to certain information, diagnostics tests and configuration settings. 5.1 ENTERING AND USING THE SYSTEM MENU The System Menu consists of 3 submenus including the Information submenu, Diagnostic submenu and Configuration submenu. To enter the System Menu press and hold down the ‘5’ key on the numeric keypad then press the CLEAR key twice.
5.2 SYSTEM CONFIGURATION (OPTIONAL SETTINGS) Setting Default Value Maximum Workout Duration 60 Minutes English / Metric Units This option sets the measurement unit type for weight, distance, and speed. This sets the maximum time during which a workout can remain in pause mode. (Available on externally powered units ). Pause Timeout 5 Minutes WATTS Display Off (International: On) If this option is enabled, the MESSAGE CENTER displays the Watts equivalent of the pedal rate.
6 SERVICE AND TECHNICAL DATA 6.1 PREVENTIVE MAINTENANCE TIPS The Life Fitness exercise bike is backed by the engineering excellence and reliability of Life Fitness and is one of the most rugged and trouble-free pieces of exercise equipment on the market today. Commercial Life Fitness products are among the most popular of aerobic trainers in health clubs, colleges and military facilities the world over.
6.
6.3 TROUBLESHOOTING THE OPTIONAL POLAR® TELEMETRY HEART RATE CHEST STRAP Malfunction Heart rate reading is initially detected and functioning normally but then is lost. Probable Cause Use of personal electronic devices, such as cell phones and portable MP3 players, causes external noise interference. Equipment is in close proximity to other sources of noise such as audio/ video equipment, fans, two way radios, and high voltage/high current power lines.
TROUBLESHOOTING THE OPTIONAL POLAR® TELEMETRY HEART RATE CHEST STRAP (CONTINUED) Malfunction Probable Cause Corrective Action Belt transmitter electrodes are not wet enough to pick up accurate heart rate readings. Wet the belt transmitter electrodes (see Section 3.2). Belt transmitter electrodes are not laying flat against the skin. Ensure the belt transmitter electrodes are laying flat against the skin (see Section 3.2). Belt transmitter needs cleaning.
6.4 TROUBLESHOOTING THE iPOD® Malfunction Cannot control iPod using console keypad controls. Probable Cause Corrective Action iPod is not fully connected due to interference with after market iPod protective cases. Remove after market iPod protective case and reconnect. iPod paused. Use iPod keypad controls on console to play a selection. Mute key is pressed. Press Mute key to unmute iPod source. Headphones are plugged into iPod instead of console headphone jack.
TROUBLESHOOTING THE iPOD® (CONTINUED) Malfunction Probable Cause Cannot navigate iPod menus. Use of console keypad controls to navigate iPod menus. Use iPod controls to navigate menus and select playlists. Use console keypad controls to Play/Pause and to change volume and tracks. Cannot control iPod volume using iPod slider ring. Use of iPod slider ring controls to adjust iPod volume when headphones are plugged into the console jack. Use console volume arrow keys to control volume.
6.5 TROUBLESHOOTING THE LIFEPULSE SYSTEM SENSORS If the heart rate reading is erratic or missing, do the following: • Dry the hands if necessary to prevent slipping. • Apply hands to both sensors;one in each hand. • Grasp the sensors firmly. • Apply constant pressure around the sensors. 6.6 HOW TO OBTAIN PRODUCT SERVICE / SERIAL NUMBER LOCATION 1. Verify the symptom and review the operating instructions. The problem may be unfamiliarity with the product and its features and workouts. 2.
7 SPECIFICATIONS 7.
7.2 WARRANTY INFORMATION WARRANTY COVERAGE: CSLR BIKE NOTE - Warranty coverage begins at the original date of sale. WHAT IS COVERED: This Life Fitness consumer exercise equipment (“Product”) is warranted to be free of all defects in material and workmanship. WHO IS COVERED: The original purchaser or any person receiving the Product as a gift from the original purchaser.