
Installation Guide


1 HOMEDEPOT.COM/LIFEPROOF
May 1, 2023 Please contact 1-866-843-8453 for further assistance.
RIGID CORE LUXURY VINYL PLANK FLOORING
PLANK AND TILE INSTALLATION INSTRUCTIONS
Product Description
Plank and Tile
Grade Levels
Above Grade / On Grade
/ Below Grade
Installation Method
Floating - Easy Drop and Lock
Lifeproof
™
is intended for interior use only and is suitable for above
grade, on grade, and below grade applications. DO NOT install in any
outside areas, saunas, seasonal porches, camping trailers, boats, lanais,
or rooms that are prone to flooding. SKUs with a ≥ 22mil wear layer can
be installed in sunrooms/solariums.
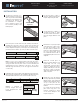
Lifeproof
™
is a floating floor and should be allowed to expand and
contract freely. It must not be glued, nailed, or fastened to the subfloor in
any way. Permanent cabinets, vanities, islands and similar items should
be installed first. Then, install Lifeproof
™
around them, leaving the proper
expansion gap. Lifeproof
™
can be installed under vanities with legs.
Lifeproof
™
can be installed under toilets; leave proper expansion space
around flange and use a premium waterproof 100% silicone caulk. Do
not anchor toilet through the material.
Lifeproof
™
is a waterproof floating floor, but it should not be used to
seal an existing floor from moisture. It cannot inhibit the growth of mold
or prevent structural problems associated with, or caused by flooding,
excessive moisture, alkalis in the subfloor, or conditions arising from
hydrostatic pressure. Regardless of location, always remove standing
water, urine and other liquids promptly. Job site moisture issues should
be addressed and corrected prior to installation. Fill expansion spaces
around potential wet areas only with premium waterproof 100% silicone
caulk.
Long-term exposure to direct sunlight can potentially cause damage
to Lifeproof
™
, including discoloration, fading, and buckling. Protect
Lifeproof
™
from exposure to direct sunlight via the use of window-
treatments or UV-tinting on windows. Lifeproof
™
flooring is a floating
system and is not recommended for areas subject to heavy rolling or
static loads.
If the flooring is to be installed by a third party, then it is suggested
that the homeowner be present during the installation for consultation/
direction. The owner and installer should discuss installation and layout
to maximize satisfaction. If this is not possible, consultation should
occur prior to installation. The owner/installer assumes all responsibility
for quality of completed installation.
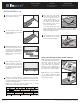
Tools for Installation:
Utility Knife Straight Edge
Measuring Tape ¼" (6mm) Spacers
Pencils Profiled Tapping Block
Pull Bar Eye Protection
Soft-Faced Hammer Broom
Felt or Nylon Pads
Optional: Jig Saw, Table Saw, Miter Saw, Circular Saw, Hole Saw,
Moisture Meter (wood, concrete, or both)*
*Tools may be available for rent at The Home Depot.
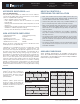
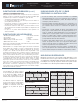
Overage Allowances
Order approximately 10% more flooring than
square footage to account for cuttings and
waste
Subfloor Flatness
Tolerances
¼" in 10ft., Slope not more than 1" per 6 ft.
(6mm in 3m, Slope not more than 25mm
per 1.8m).
No abrupt height differences. High spots
should be sanded or ground down and low
areas should be filled
Vapor Barrier (6 mil
polyfilm)
Not Required. Recommended in basements
with concrete if prone to moisture or if there
have been moisture issues.
Should Underlayment
(pad) be used?
Lifeproof™ includes a pre-attached
sound mitigating pad. If an additional
underlayment is required, the Lifeproof™
Universal Underlayment (SKU 1006262709)
has been tested and approved to be used
with Lifeproof™ vinyl flooring. All other
underlayments require you to check with the
manufacturer of the underlayment on their
warranty policy.
Acclimation
Requirements
No acclimation required. See Page 2
Transition
Requirements
Required when installing Lifeproof
™
in an
area that is larger than 100 linear ft. (30.5m)
in any direction or when transitioning
between different floor-covering types
Installation On Stairs Voids Warranty
Installation On Vertical
Surfaces (walls)
Voids Warranty
Installation Over
Existing Ceramic Tile
Floors
Filling Grout Lines Not Required
(Follow Subfloor Flatness Tolerances)
Glue Down
Installation
Voids Warranty
Subfloor RH/MVER
Recommendations
85% Relative Humidity / 8 lbs. MVER
(Moisture Vapor Emission Rating)
Radiant Heat Approved - See page 3
Expansion Gap
Requirements
¼" (6mm) around perimeter walls & heavy
fixed objects such as cabinetry or baths
Required Interior
Environmental
Conditions
-25ºF – 155ºF (-31.7ºC – 68.3ºC)
KEY INSTALLATION CONSIDERATIONS