
Installation Guide


4 HOMEDEPOT.COM/LIFEPROOF
May 1, 2023 Please contact 1-866-843-8453 for further assistance.
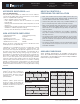
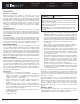
Grade Levels
Above Grade / On Grade
/ Below Grade
Installation Method
Floating - Easy Drop and Lock
Product Description
Plank and Tile
INSTALLATION
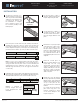
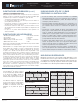
1/4 in. / 6mm
Spacers
GrooveTongue
1
Set spacers a minimum of ¼"
(6mm) around the perimeter to
allow for product and building
expansion and contraction. Do
not remove the spacers until
the installation is complete;
these expansion spaces will
be covered by molding in the
finishing steps.
tongue
groove
4
Lay the first piece of Row 1
along the starting wall with the
tongue-edge facing the wall.
5
Cut the first piece of Row 2 to
one-third it’s length or make
sure there will be at least an 8"
(20.3cm) stagger between end
joints.
6
Interlock the long tongue-edge
of the first piece of Row 2 into
the long groove-edge of the
first piece of Row 1. Make sure
there are no gaps and tap along
the long groove-edge using
the soft-faced hammer with a
profiled tapping block to ensure
a tight fit.
7
Install the second piece of
Row 2 by interlocking the long
tongue-edge into the long
groove-edge of the first piece
of Row 1. Angling the pieces
slightly, slide the piece into the
first piece of Row 2 until the
edges align and drop the piece
down in to place.
8
Engage the joints by tapping
the long edge with the profiled
tapping block and soft-faced
hammer. Next, lightly tap down
on top of the piece at the
short joint with the soft-faced
hammer.
Do not tap the short end into
place if the long joint is not
properly engaged, as doing
so can cause damage to the
tongue and groove.
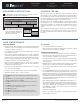
2
Place full pieces end-to-end along the starting wall, without
engaging the end joints, until you cannot place another full
piece. If the remaining space is less than 8", (20.3cm) you may
need to adjust the length of your first piece to avoid having any
pieces that are less than 8" (20.3cm) on either end of the room.
8 plg.
Note: To cut a piece, simply measure and mark the piece.
Using a straight edge and utility knife, score and snap the piece
along your mark. You may also need to cut the attached pad
underlayment from the underside of the piece. (If you have
difficulty using this method, you can use a jig saw, circular saw
or miter saw.)
3
Installation will move from left to right, beginning in the left corner
while facing the starting wall. The installation will alternate back
and forth between Rows 1 and 2, for the first two rows only.
Mínimo
de 8 plg
1 4 6 8
2 3 5 7
Maintain a minimum 8"
(20.3cm) stagger from row-
to-row throughout the entire
installation.