
Installation Guide


6 HOMEDEPOT.COM/LIFEPROOF
May 1, 2023 Please contact 1-866-843-8453 for further assistance.
Grade Levels
Above Grade / On Grade
/ Below Grade
Installation Method
Floating - Easy Drop and Lock
Product Description
Plank and Tile
DAILY MAINTENANCE
• Regularly sweep, dust, damp mop, or vacuum (without beater bar)
your floor to remove any particles that could cause abrasions or
scratches to appear on your floor.
• Use a damp mop or steam mop to remove spots and soil. Use any
pH neutral floor cleaner.
• The following products are approved for use with Lifeproof™
vinyl flooring: Lifeproof™ Hard Surface Floor Cleaner, Lifeproof™
Resilient Floor Low Gloss Polish, Lifeproof™ Hard Surface Polish
Remover. Lifeproof™ Microfiber Spray Mop with 2-Spray modes.
For lightly soiled areas, clean with distilled water.
• When the cleaning cloth/mop becomes soiled, rinse or replace it
with a clean one. Following up with a clean, dry cloth will remove
residual streak-marks and spots.
• Avoid spills of acidic products (juice, soft drinks, wine, etc.) on the
floor. Clean spots immediately.
• Promptly remove any standing water, pet urine or other liquids.
• Avoid spills of paints, dyes, or harsh chemicals.
• DO NOT
vacuum with a beater bar or power rotary brush
head.
• DO NOT
use any cleaning agents containing wax or oil.
Leftover residue will form a dull film.
• DO NOT
use steel wool or scouring pad, as they will scratch
the floor.
• DO NOT
use any dust cleaners, as they may cause your floor
to become slick or damage the finish.
• DO NOT
use vinegar.
• DO NOT
use any All-Purpose or Multi-Purpose cleaners.
• DO NOT
use wet sweeper pads. Dry sweeper pads can be
used.
FLOOR REPAIR
• Use a melamine pad to remove scuffs.
• Deep scratches may require the replacement of planks. A plank
replacement video is available on YouTube.
PREVENTATIVE MAINTENANCE
• Protect your floor when using a dolly to move furniture or appliances.
Protective sheets and/or plywood may be needed. Never slide or
roll heavy furniture or appliances across the floor.
• Use flat floor protectors (nylon or felt) on all furniture legs. Periodically
clean protectors to remove grit that may become embedded and
cause scratching.
• Minimize abrasive material and dirt by placing mats on both sides
of exterior doors and by using area rugs in high-traffic areas.
• Use protective mats beneath rolling chairs and keep furniture
casters clean.
• Use NON-RUBBER backed mats that are labeled “colorfast” by
the manufacturer. Non-staining, vinyl-backed mats or woven rugs
should be used at all entrances to avoid discoloration from asphalt
driveways and to prevent dirt and grit from being tracked onto your
floor. Rubber and latex-backed mats use a chemical (antioxidant) to
keep the backing from becoming brittle; it is this chemical that can
permanently stain your floor.
• Light, rolling furniture should be outfitted with broad-surface, non-
staining casters that have been engineered for hard surface floors.
Such casters should be a minimum of 1" (2.5cm) wide and at least
2" (5.1cm) in diameter. We recommend the use of a hard surface
(non-studded), non-rubber chair mat to protect your floor from
office chairs with casters
• Keep pets’ nails trimmed.
• Remove shoes with cleats, spikes or exceptionally pointy heels
before walking on the floor.
CARE & MAINTENANCE
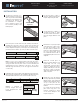
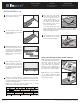
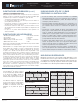
1
To disassemble the floor, slowly lift the outermost row at an
angle until the long-side lock is disengaged.
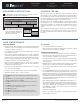
DISASSEMBLY INSTRUCTIONS FINISHING THE JOB
Remove spacers and cover expansion spaces with quarter round or
other trim. Be sure not to fasten or restrict the flooring, nails should go
into the walls and not the floor. Fill any expansion spaces that cannot be
covered by moldings (such as around metal door jambs, tubs, exposed
pipes, etc.) with premium waterproof 100% silicone caulk.
Remember, the use of coordinating T-Molds is required when installing
this flooring in a room or area that is larger than 100 linear feet (30.5
meters) in any direction, so that the floor is separated into sections
that are no larger than 100ft. x 100ft. (30.5 meters x 30.5 meters) per
section.
Save and protect any leftover pieces and store them laying flat. Do not
discard, as they are color matched (by dye-lot) to your floor. They can
be used for replacement in the event you need to replace a piece in
the future.
2
To disengage two planks on the
short-end joint, place both planks
on the ground and slide them in
opposite directions parallel to
the locking mechanism.