
Installation Guide


Installation Instructions
lifeproof™ Waterproof Rigid Core
Luxury Vinyl Tile Flooring
For Assistance, Call: 1-866-843-8453
www.homedepot.com
Product Description
6.5 mm thick x 16 in. x 32 in.
Rigid Core Vinyl Tiles
Grade Levels
Above Grade / On Grade
Below Grade
Installation Method
Floating - Drop and Lock
3 HOMEDEPOT.COM/LIFEPROOF
Revised 1/16/2017 Please contact 1-866-843-8453 for further assistance.
Helpful Pointers
GENERAL TIPS
□ Make sure your work area is well lit. Good visibility ensures that color is consistent and that visually defective tiles are detected and removed.
□ The minimum length of the first and last tile is 8 in.. If the last tile will be less than 8 in., adjust the length of the first tile. The remainder of the last tile can
be used as a starter board on the following rows.
□ Using a shorter piece at undercut door jams will help when fitting flooring in place.
□ Never hit the flooring directly with the tapping block and be careful not to fracture floor edges.
CUTTING THE LAST ROW TO WIDTH
□ Most often the entire length of the last row will need to be cut so that it is narrow enough to fit the remaining space.
□ Measure the distance between the floor face edge (exclude the tongue) to the wall. Subtract 1/4 in. from this measurement for expansion gap. Draw a line.
Cut through the line. Discard the excess piece. Proceed with the installation.
Preparing for Installation
□ Ensure subfloors are clean.
□ Lay out several cartons. Randomly rack tiles to ensure good color and shade mixture
and end joint spacing. Minimum end stagger is 8 in. Inspect tile quality and grading.
□ Lay out trim moldings in advance and find tiles whose shade closely matches. Set
these aside for future use.
□ Remove the existing base, shoe molding or threshold carefully. They can be used to
cover the 1/4 in. expansion gap left around the edge of the room.
□ Undercut doors and casings using a handsaw laid flat on a piece of scrap flooring.
Never undercut metal door casings.
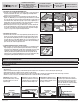
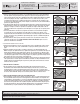
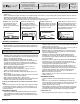
1. INSTALLING THE FIRST ROW
a. First, lay a row of loose tiles (i.e. without securing them to each other; Figure 1.1) to
determine if you need to adjust the length of the first tile to avoid a small piece (less
than 8 in.) on the opposite wall from where you started. Alternatively, measure the
length of the room and divide by the length of one tile. If the remainder is less than
8 in., calculate ½ of the remainder and trim this amount off the first tile. The last tile
should be the same length as the first one. To cut a tile, simply measure and mark the
tile. Then, use a straight edge and utility knife to score and snap.
b. Installation should start in a corner (left hand) and proceed from the wall with the
tongue facing the wall (Figure 1.2). Allow a minimum gap of 1/4 in. (6 mm) for subfloor
movement or product expansion, which should be covered by molding. Set 1/4 in.
spacers to create the required expansion space.
c. Lay the first row in a straight line and interlock the short ends by inserting each tongue
into the groove of the adjoining tile (Figure 1.3). Install each sequential tile on the short
end and be sure to line up evenly. Use a soft faced hammer to tap down on the short
seam of the tiles to ensure a tight fit (Figure 1.4). This is crucial for a good installation.
d. Stagger the rows so that the short-edge seams are not aligned in a straight, uniform
manner. Refer to the “PREPARING FOR INSTALLATION” section for recommended
installation patterns.
Installation
8
1.1
1/4 in. / 6mm
tongue
groove
1.2
1.3
1.4