
Installation Guide


Installation Instructions
lifeproof™ Waterproof Rigid Core
Luxury Vinyl Tile Flooring
For Assistance, Call: 1-866-843-8453
www.homedepot.com
Product Description
6.5 mm thick x 16 in. x 32 in.
Rigid Core Vinyl Tiles
Grade Levels
Above Grade / On Grade
Below Grade
Installation Method
Floating - Drop and Lock
4 HOMEDEPOT.COM/LIFEPROOF
Revised 1/16/2017 Please contact 1-866-843-8453 for further assistance.
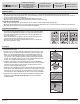
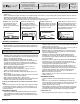
2. INSTALLING THE SECOND AND REMAINING ROWS
a. Start the second row with the tile cut half the length, or for desired pattern;
measure and mark the tile. Then, use a straight edge and utility knife or
shears to score and snap the tile.
b. Attach the first tile of Row 2 by connecting the long side to the first row
(Figure 2.1). Maintain your ¼ in. expansion gap. Then, attach the second tile
by connecting the long side to the first row and sliding it up to the short end
of the first tile. Then, drop and lock (Figure 2.2). To ensure a tight fit, use a
tapping block and soft faced hammer on the long seams (Figure 2.3), then,
tap down on top of the tile at the short seams (Figure 2.4).
c. When cutting a tile to start a row, you will need to cut off the end with the
groove. The remaining piece can then be used on the opposite side of the
room, at the end of that row (if layout permits; Figure 2.5). Refer to Figure
2.6 for a close-up of the end-joint locking mechanism.
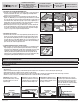
3. INSTALLING THE LAST ROW
a. Cut the first tile of the last row to length (following desired pattern). Place
directly on top of the previously installed row. Then, take another tile and
place against the wall (allowing for 1/4 in. (6 mm) expansion gap) and on
top of the tile to be cut for width. Mark the tile, score and snap (Figure 3.1).
Continue this method for the remainder of the tiles in the last row. Always
place the cut end of the tile against the wall.
4. FITTING AROUND IRREGULARLY SHAPED OBJECTS
a. Make a pattern out of heavy paper to fit around pipes or irregularly shaped
objects (Figure 4.1). Place the pattern upon the tile and trace. Cut along
trace lines using a utility knife or sharp shears, and lay tile. Be sure to leave
a minimum of 1/4 in. (6 mm) expansion space around all fixed objects,
cabinetry, and metal door jambs. Undercut wooden door jambs. Fill any
expansion spaces around potentially wet areas (such as refrigerators, tubs,
and appliances) with premium, waterproof, 100% silicone caulk.
NOTE: Rooms larger than 1500 sq. ft. (50 ft. x 30 ft.) require the use of coordinating T-molding transitions. Doorways and archways less than 4 ft wide also
require the use of T-molding transitions.
NOTE: Save any leftover planks. Do not discard as they are color matched (dye-lot) to your floor. They can be used for replacement in the event you need to
replace a plank in the future.
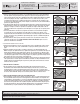
Accessories
Pictures are for general illustrative purposes only. Actual products may differ from pictures.
□ Clean the floor.
□ Install or reinstall all wall trim pieces. Nail them through the wall, but not to the subfloor to avoid restricting the expansion gap.
□ Install transition trim pieces. Nail them to the subfloor, not the flooring.
□ At doorways, transitions should be used to protect the edges of the floor and to provide a decorative transition from one floor type to another.
□ If the floor is to be covered, use a breathable material such as cardboard. Do not cover with plastic.
T-Molding: Used to create a
transition between floor coverings
of similar heights or to cover an
expansion gap.
Stair Nose: Used in conjunction
with flooring installed on stair steps
or finished edges of a higher level
floor like in a sunken living room.
Hard Surface Reducer: Used
to transition to another hard surface
flooring of different heights such as
tile, vinyl, or concrete.
Quarter Round: Used to cover the
expansion space between the wall base
and your flooring. It can also be used to
make smooth transitions between the
floor and cabinetry. It can be used with or
without wall base molding.
FLOORING STAIR NOSE
RISER
STAIR TREAD
T-MOULDING
FLOORING
FLOORING
HARD SURFACE
REDUCER
RESILIENT
FLOOR
FLOORING
FLOORING
QUARTER ROUND
WALL
2.1 2.2
2.4 2.5
2.3
2.6
3.1
4.1