
Installation Guide

GENERAL INSTALLATION TOOLS
STEP ONE - ESTABLISH A STARTING POINT
1.1. Remove any existing wall base, shoe molding, quarter round or doorway threshold.
1.2. Prior to installing ooring, roll out 6mil poly-lm with seams overlapped 8 in. Fasten seams every 18 in. -24 in. with duct tape or poly tape. Run the outside edges of lm up the perimeter of wall 4 in. (trim after ooring
installation is complete).
1.2.1. If installation is above grade, poly-lm is recommended but not necessary.
1.3. Determine the longest, straightest wall to begin installation; this is usually an exterior wall.
1.4. Measure the total width of the ooring (including the tongue), plus ¼ in. for expansion. Measure out this distance in at least 2 places from the starting wall and 12 in. from the corners. Then, snap a chalk line parallel to the
starting wall.
STEP TWO - LAY OUT
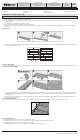
2.1. Chose the longest and straightest boards and align the plank’s tongue with the working line. Cut the last plank to the proper length leaving a ¼ in. from the end wall. Repeat this step for the second row, making sure to stagger
the joints. The minimum end stagger is 6 inches.
STEP THREE – RACK THE FLOOR
3.1. Once the rst row is in place, continue to lay out the planks. Remain working from at least four open cartons. Be sure to blend the planks and stagger the end joints a minimum of 6 in. apart to ensure a favorable appearance.
STEP FOUR - INSTALLATION OF FLOORING
4.1. Once enough of the planks have been racked out, begin installing the planks by tting the short side of the click system into the long side of the click system. Make sure that the click system is engaged evenly, any gapping
can compromise the integrity of the installation. To ensure a tight t, use a tapping block and rubber mallet on the long seams and tap down on the top of the plank at the short seams. Continue installing planks across the
room ending at the far wall.
4.2. It may be necessary to rip the last row to allow for the ¼ in. expansion. If the last row is 2 in. or less click the pieces to the last full uninstalled row and install them together. If needed, use a light rubber mallet to make the
remaining rows tight to the installed planks.
STEP FIVE - SEALING THE PERIMETER
5.1. Once install is complete, use 100% silicone sealant around the perimeter of the installed ooring. Fill the expansion gap with compressable PE foam backer rod and cover with 100% silicone sealant.
STEP SIX - COMPLETING THE JOB
5.1. Clean the oor with a prenished hardwood cleaner such as; Bona®, Woodwise® or Glitsa®.
5.2. Install transition pieces -i.e. – stair nose, reducer, end cap, t-molding and base shoe. Please follow manufacturer’s installation guidelines for transitions.
5.3. Inspect nal oor for nicks and or minor gaps – ll with appropriate color wood putty/ller.
5.4. Any unused material should be stored in a dry place in case future repairs are needed. We recommend saving at least 2 boxes.
FLOATING INSTALLATION INSTRUCTIONS
□ Moisture Meter
□ Tape Measure
□ Pencil
□ Chalk Line
□ Hand Saw or Power Saw
□ Utility Knife
□ Tapping block
□ Crow Bar or Pry Bar
□ Wood or Plastic Spacers (¼ in.)
□ Hammer or Rubber Mallet
□ 100% silicon & PE Foam Backer Rod
NOTE: Please refer to www.homedepot.com for latest updates
2a 2b 2c
4a 4b 4c
4d 4e 4f
HOMEDEPOT.COM
Please contact 1-800-956-8538 for further assistance.
Installation Instructions
Wood-SPC Engineered Flooring Plank
For Assistance, Call: 1-800-956-8538
www.HomeDepot.com
Grade
Levels
Above Grade / On Grade
Below Grade
Installation
Method
Floating
Product Description
7 mm T x 5.2 in. W x 36.22 in. L
Waterproof Engineered Click Bamboo Flooring
(15.45 sq. ft./case)
MFG Model #
2019-VSPC-MB16 / YYVS2003 / 2019-VSPC-DB13
2019-VSPC-DB06 / YY-VSPC-18M22 / YYVS2002 / YYVS2001
YY-VSPC-MB14 / YY-VSPC-GR10 / YYVSPC-GC18
YY-VSPC-DG02 / YYVSPC-FY08
AVOID “H” JOINTS
STAGGER END JOINTS