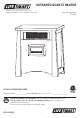
INFRARED QUARTZ HEATER lifesmart® is a registered trademark of Supply Chain Sources LLC., All Rights Reserved. Customer Number: HT11255 ATTACH YOUR RECEIPT HERE Purchase Date ____________Serial Number (located on back of unit) __________________ Questions, problems, missing parts? Contact technical support department at 657-341-0362, 9:00 a.m. - 5 p.m., PST, Monday - Friday or visit us online at www.lifesmartcomfort.
TABLE OF CONTENTS Package Contents. . . . . . . . . . . . . . . . . . . . . . . . . . . . . . . . . . . . . . . . . . . . . . . . . . . . . . . . . . . . . . . . 3 Safety Information . . . . . . . . . . . . . . . . . . . . . . . . . . . . . . . . . . . . . . . . . . . . . . . . . . . . . . . . . . . . . . . 4 Frequently Asked Questions . . . . . . . . . . . . . . . . .
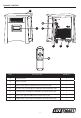
PACKAGE CONTENTS A E C F PART DESCRIPTION G H QUANTITY A Infrared Heater 1 B Remote Control 1 C Control Panel (preassembled to Infrared Heater (A)) 1 D Master Power Switch (preassembled to Infrared Heater (A)) 1 E 3-prong Power Cord (preassembled to Infrared Heater (A)) 1 F Filter Cover (preassembled to Infrared Heater (A)) 1 G Temperature Sensor (preassembled to Infrared Heater (A)) 1 3
SAFETY INFORMATION Please read and understand this entire manual before attempting to assemble, operate, or install the product. IMPORTANT SAFETY INSTRUCTIONS WARNING: POTENTIAL ELECTRICAL HAZARD IF NOT ADHERED TO. When using electrical appliances, basic precautions should always be followed to reduce the risk of fire, electric shock, and injury to persons, including the following: • • • • • • • • • • • • • • • • • • • • This heater must be plugged into a 120 V, 15 amp (or more) circuit of its own.
SAFETY INFORMATION Child Lock Safety Feature Press and hold the child lock button located on the control panel for 5 seconds or remote control for 3 seconds. Locking is confirmed when a buzzer rings and the control panel displays “CL”. When locked, the control panel and remote control (if provided) will not function. To unlock the control panel or remote (if provided), repeat this procedure. Unlocking is confirmed when a buzzer rings and the lock indication disappears.
FREQUENTLY ASKED QUESTIONS Please review these frequently asked questions on the next few pages prior to using your heater. Q. My heater emits a strange odor when I first open the box and when I turn the heater on for the first time. Why is this happening? A. This is normal. This heater is treated with a special heat safe/resistant coating. This odor will sometimes be present when the box is opened.
FREQUENTLY ASKED QUESTIONS Q. The temperature on my heater does not match the temperature display on my wall, or external thermostat. Why? A. This is completely normal. The temperature display on your heater may vary from the temperature display on another thermostat (like the one mounted to your wall or a purchased external thermostat). This is because the temperature sensor on the heater reads the temperature directly around the heater.
PREPARATION Place the heater on a firm, level surface and plug into a grounded 120 V, 60 Hz power outlet and turn on the power switch on the rear of the unit. Only operate heater in upright position. Insert two AAA batteries into the remote control before using (batteries not included). *(Not all products will include a remote control.) Please note that infrared heaters do not heat like a traditional space heater. You should not expect infrared heaters to blow hot air like a traditional space heater.
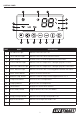
CONTROL PANEL 1 2 3 4 5 16 15 6 14 13 PART 12 11 10 NAME 9 8 7 DESCRIPTION 1 Fan Indicator Light Indicates when the Fan is on 2 Timer Indicator Light Indicates when the timer function is active 3 Digital Display Readout of the set room temperature or timer value 4 Celsius Indicator Light Indicates that the temperature is being displayed in Celsius 5 Fahrenheit Indicator Light Indicates that the temperature is being displayed in Fahrenheit 6 Power Indicator Light Indicates
REMOTE CONTROL 1 6 2 3 4 5 PART NAME DESCRIPTION 1 Temp Up Button Increases the set temperature value 2 Mode Button Toggles between the three heat modes available 3 Temp Down Button Decreases the set temperature value 4 Power Button Powers the heater on or off 5 Ambient/Lock Button Short press: Shows Ambient temperature. 6 Timer Button Engages the on/off timer Long press for 3 seconds to activate lock function.
OPERATING INSTRUCTIONS 1 1. Turn the heater on or off by pressing the Power button on the control panel (C) or by pressing the ON/OFF button on the remote control (B). Once the power is off, heating elements will stop working first. The fan will continue working for up to 90 seconds to dispense residual heat inside the heater. This is a normal function. 2.
OPERATING INSTRUCTIONS 4 4. To set the timer to power off the heater, start the unit and press the Timer button on the control panel (C) or remote control (B). B C Note: The timer-power-off function can only be set when the heater is in power-on mode. The digital display on the control panel (C) changes from the set temperature readout to a time value for the timer. Press the Timer button repeatedly to change the number value between a range of 0 to 12 hours (in 1-hour intervals).
CARE AND MAINTENANCE WARNING: Before performing any maintenance task, turn off the power switch in the rear of the unit, unplug the unit, and allow it to cool completely. 1. To keep the heater clean, clean the outer shell with a soft, damp cloth. Use a mild detergent if necessary. After cleaning, dry the unit with a soft cloth. CAUTION: DO NOT let liquid enter the heater. 2. DO NOT use alcohol, gasoline, abrasive powders, furniture polish, or rough brushes to clean the heater.
ONE-YEAR LIMITED WARRANTY The manufacturer warrants this heater against defects in materials and workmanship on functional parts, for a period of 1 year from the original date of purchase. Your sales receipt showing the date of purchase of the product is your proof of purchase. Keep it in a safe place for future reference. This warranty is subject to personal use only, commercial or rental applications will not be covered.
PLEASE REMEMBER TO REGISTER YOUR WARRANTY: web: www.lifesmartcomfort.com email: cs@scsources.com Printed in China lifesmart® is a registered trademark of Supply Chain Sources LLC., All Rights Reserved.
CALENTADOR DE CUARZO INFRARROJOS lifesmart® es una marca registrada de Supply Chain Sources LLC., Todos los derechos reservados. modelo #HT1125 ADJUNTE SU RECIBO AQUÍ Fecha de compra ____________Número de serie (ubicado en la parte trasera de la unidad) __________________ ¿Preguntas, problemas, piezas faltantes? Llame a nuestro Departamento de Servicio al Cliente al 657-341-0362 de lunes a viernes de 9 a.m. a 5 p.m., hora estándar del Centro, y www.lifesmartcomfort.
ÍNDICE Contenido del paquete. . . . . . . . . . . . . . . . . . . . . . . . . . . . . . . . . . . . . . . . . . . . . . . . . . . . . . . . . . . 19 Información de seguridad . . . . . . . . . . . . . . . . . . . . . . . . . . . . . . . . . . . . . . . . . . . . . . . . . . . . . . . 20 Preguntas frecuentes . . . . . . . . . . . . . . . . . . . . . . . . . . . . . . . .
CONTENIDO DEL PAQUETE A E C F PART DESCRIPTION G H QUANTITY A Calentador Infrarrojo 1 B Control Remoto 1 C Panel de control (preensamblado en el calentador infrarrojo (A)) 1 D Interruptor de encendido principal (preensamblado en el calentador infrarrojo (A)) 1 E Cable de alimentación de 3 patas (preensamblado en el calentador infrarrojo (A)) 1 F Cubierta del filtro (preensamblado en el calentador infrarrojo (A)) 1 G Sensor de temperatura (preensamblado en el calentador infrarroj
INFORMACIÓN DE SEGURIDAD Lea y comprenda completamente este manual antes de intentar ensamblar, usar o instalar el producto. INSTRUCCIONES IMPORTANTES DE SEGURIDAD ADVERTENCIA: POSIBILIDAD DE RIESGO ELÉCTRICO SI NO SE CUMPLEN LAS ADVERTENCIAS.
INFORMACIÓN DE SEGURIDAD Característica de bloqueo de seguridad infantil Pulse y mantenga pulsado el botón de bloqueo para niños se encuentra en el panel de control durante 3 segundos o mando a distancia durante 3 segundos. El bloqueo se confirma cuando suena una señal acústica y el panel de control muestra “ CL “. Cuando está bloqueado , el panel de control y el mando a distancia (si la hay) no funcionarán. Repita este procedimiento para desbloquear el panel de control y el control remoto.
PREGUNTAS FRECUENTES Consulte las preguntas frecuentes en las próximas páginas antes de usar su calentador. P. Mi calentador emite un olor extraño al abrir la caja por primera vez y al encenderlo por primera vez. ¿Por qué ocurre esto? R. Esto es normal. Este calentador está tratado con un recubrimiento especial resistente al calor. Este olor a veces puede sentirse al abrir la caja. Cuando el recubrimiento se expone al calor, produce este olor particular durante las primeras horas de funcionamiento.
PREGUNTAS FRECUENTES P: La temperatura en mi calentador no coincide con la temperatura que se muestra en mi termostato de pared o externo. ¿Por qué? R. Esto es completamente normal. La temperatura que se muestra en su calentador puede ser distinta de aquella que aparece en otro termostato (por ejemplo, uno montado en la pared o uno externo). Esto sucede porque el sensor de temperatura en el calentador lee la temperatura de su entorno directo.
PREPARACIÓN Coloque el calentador en una superficie firme y nivelada y conectarse a una conexión a tierra 120 V, 60 Hz toma de corriente y encienda el interruptor de alimentación en la parte posterior de la unidad. Sólo opere el calentador en posición vertical. Inserte dos pilas AAA en el mando a distancia antes de usar (baterías no incluidas). (*No todos los productos incluirán un mando a distancia.) Tenga en cuenta que las estufas infrarrojas no calientan como los calefactores ambientales tradicionales.
PANEL DE CONTROL 1 2 3 4 5 16 15 6 14 13 PIEZA 12 11 10 DESIGNAR 9 8 7 DESCRIPCIÓN 1 luz de la indicación del temporizador 2 Pantalla Digital Lectura de la temperatura ambiente ajustada o el valor del temporizador 3 Celsius Luz indicadora Indica que la temperatura se muestra en grados Celsius 4 Fahrenheit Luz indicadora Indica que la temperatura se visualiza en grados Fahrenheit 5 Luz indicadora de encendido Indica cuando la unidad está recibiendo alimentación de la toma de par
CONTROL REMOTO 1 6 2 3 4 5 PIEZA DESIGNAR DESCRIPCIÓN 1 Temperatura Botón Arriba Aumenta el valor de temperatura de consigna 2 H/L/E Botón Alterna entre los tres modos de calor disponibles 3 Temperatura de Down Botón Disminuye el valor de temperatura de consigna 4 Botón de encendido Poderes del calentador dentro o fuera 5 Ambient / botón de bloqueo Muestra la temperatura ambiente y cerradura de seguridad 6 Botón Timer Participa en el temporizador de encendido / apagado 26
INSTRUCCIONES DE FUNCIONAMIENTO 1. Encienda el calentador encendido o apagado pulsando el botón de encendido en el panel de control ( C ) o pulsando el botón de encendido del mando a distancia (B). 1 Una vez que el equipo está apagado , elementos de calefacción se dejan de funcionar por primera vez. El ventilador continuará trabajando para un máximo de 90 segundos para distribuir el calor residual en el interior del calentador. Esta es una función normal. C 2.
INSTRUCCIONES DE FUNCIONAMIENTO 4. Para ajustar el temporizador para apagar el calentador , arrancar la unidad y presione el botón del temporizador en el panel de control (C) o el control remoto (B) . 4 B C Note: La función de apagado con temporizador solo puede configurarse cuando el calentador está encendido. La pantalla digital en el panel de control (C) cambia de la lectura de la temperatura configurada al valor de hora del temporizador.
CUIDADO Y MANTENIMIENTO ADVERTENCIA: Antes de realizar cualquier tarea de mantenimiento, desenchufe la unidad y permita que se enfríe por completo. 1. Para mantener limpio el calentador, limpie la cubierta exterior con un paño suave humedecido. Utilice un detergente suave si es necesario. Después de limpiar la unidad, séquela con un paño suave. PRECAUCIÓN: NO permita que ingrese líquido al calentador. 2.
UN AÑO DE GARANTÍA LIMITADA El fabricante garantiza este calentador contra defectos en los materiales y la mano de obra en las piezas funcionales por un período de un 1 año, a contar de la fecha de compra original. Su prueba de compra es el recibo de venta que muestra la fecha de compra del producto. Almacénelo en un lugar seguro para referencia futura. Esta garantía está sujeta a uso personal, no serán cubiertos aplicaciones comerciales o de alquiler.
POR FAVOR RECUERDE REGISTRAR SU GARANTÍA: sitio: www.lifesmartcomfort.com email: cs@scsources.com Impreso en China lifesmart® es una marca registrada de Supply Chain SourcesLLC., Reservados Todos Los Derechos.