3-060-817-13 (1) DSR-PD150 Digital Camcorder Operating Instructions Before operating the unit, please read this manual thoroughly, and retain it for future reference. Owner’s Record The model and serial numbers are located on the bottom. Record the serial number in the space provided below. Refer to these numbers whenever you call upon your Sony dealer regarding this product. Model No. DSR-PD150 Model No. AC- Serial No. Serial No.
Welcome! Congratulations on your purchase of this Sony Digital camcorder. With your Digital camcorder, you can capture life’s precious moments with superior picture and sound quality. Your Digital camcorder is loaded with advanced features, but at the same time it is very easy to use. You will soon be producing home video that you can enjoy for years to come. WARNING To prevent fire or shock hazard, do not expose the unit to rain or moisture. For the customers in the U.S.A.
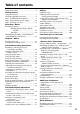
Table of contents Quick Start Guide ............................................... 4 Getting started Using this manual ............................................... 6 Checking supplied accessories ......................... 8 Step 1 Installing the microphone ..................... 9 Step 2 Preparing the power supply .............. 10 Step 3 Inserting a cassette ............................... 15 Recording – Basics Recording a picture ..........................................
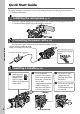
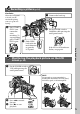
Quick Start Guide This guide introduces you to the basic way of recording/playback. See the pages in parentheses “( )” for more information. Installing the microphone (p. 9) Install the supplied microphone with the model name (ECM-NV1) facing upward. Be sure to connect the microphone plug to the INPUT1 connector. to INPUT1 Connecting the power cord (p. 14) Quick Start Guide Use the battery pack when using your camcorder outdoors (p. 10).
Recording a picture (p. 16) Viewfinder When the LCD panel is closed, use the viewfinder placing your eye against its eyecup. 2 Remove the hood cap. Set the POWER switch to CAMERA while pressing the small green button. POWER VCR 3 VCR If the ND1 or ND2 indicator flashes, see page 46. Monitoring the playback picture on the LCD screen (p. 26) POWER MEMORY OFF CAMERA (CHG) Set the POWER switch to VCR while pressing the small green button.
— Getting started — Using this manual As you read through this manual, buttons and settings on your camcorder are shown in capital letters. e.g. Set the POWER switch to CAMERA. When you carry out an operation, you can hear a beep or a melody sound to indicate that the operation is being carried out. Note on cassette memory Your camcorder is based on the DVCAM/DV format. We recommend that you use a tape with cassette memory .
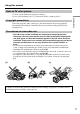
Using this manual Note on TV color systems TV color systems differ from country to country. To view your recordings on a TV, you need an NTSC system-based TV. Television programs, films, video tapes, and other materials may be copyrighted. Unauthorized recording of such materials may be contrary to the provision of the copyright laws. Getting started Copyright precautions Precautions on camcorder care •The LCD screen and the viewfinder are manufactured using high-precision technology.
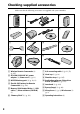
Checking supplied accessories Make sure that the following accessories are supplied with your camcorder. 1 2 3 4 5 6 7 8 9 qa qs qd 1 Wireless Remote Commander (1) (p. 167) 7 A/V connecting cable (1) (p. 31, 72) 8 Hood cap (1) (p. 16) 2 AC-L10A/L10B/L10C AC power adaptor (1), Power cord (1) (p. 11) 9 Shoulder strap (1) (p. 165) 3 NP-F330 battery pack (1) (p. 10, 11) 0 Application software: PictureGear 4.1Lite (CD-ROM) (1) (p. 131) 4 Size AA (R6) battery for Remote Commander (2) (p.
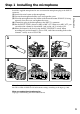
Step 1 Installing the microphone Install the supplied microphone. Be sure to connect the microphone plug to the INPUT1 connector. 1 2 3 4 5 6 REC CH SELECT CH1•CH2 CH1 INPUT LEVEL LINE MIC MIC ATT INPUT1 INPUT LEVEL +48V ON OFF LINE MIC +48V ON OFF MIC ATT REC CH SELECT CH1•CH2 CH1 INPUT LEVEL LINE MIC MIC ATT INPUT2 INPUT1 INPUT LEVEL +48V ON OFF LINE MIC Getting started (1) Attach the wind screen to the microphone. (2) Loosen the microphone holder screw and open the cover.
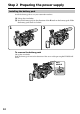
Step 2 Preparing the power supply Installing the battery pack Install the battery pack to use your camcorder outdoors. (1) Lift up the viewfinder. (2) Insert the battery pack in the direction of the V mark on the battery pack. Slide the battery pack until it is locked. 2 1 To remove the battery pack Lift up the viewfinder. Slide the battery pack out in the direction of the arrow while pressing BATT RELEASE down.
Step 2 Preparing the power supply Charging the battery pack Use the battery pack after charging it. Your camcorder operates only with the “InfoLITHIUM” battery pack (L series). Getting started (1) Open the DC IN jack cover and connect the AC power adaptor supplied with your camcorder to the DC IN jack with the plug’s v mark facing toward the LCD panel side. (2) Connect the power cord to the AC power adaptor. (3) Connect the power cord to a wall outlet. (4) Set the POWER switch to OFF (CHG).
Step 2 Preparing the power supply Notes •Prevent metallic objects from coming into contact with the metal parts of the DC plug of the AC power adaptor. This may cause a short-circuit, damaging the AC power adaptor. •Keep the battery pack dry. •When the battery pack is not to be used for a long time, charge the battery pack once fully, and then use it until it fully discharges again. Keep the battery pack in a cool place.
Step 2 Preparing the power supply Playing time Battery pack NP-F330 (supplied) NP-F530 NP-F550 NP-F730 NP-F730H/F750 NP-F930 NP-F950 NP-F960 Playing time on LCD screen 75 (65) 120 (110) 150 (135) 265 (240) 315 (275) 410 (365) 475 (430) 575 (515) Playing time with LCD closed 85 (75) 145 (130) 180 (160) 295 (265) 365 (325) 460 (415) 550 (495) 660 (590) Getting started Numbers in parentheses “( )” indicate the time using a normally charged battery.
Step 2 Preparing the power supply Connecting to a wall outlet When you use your camcorder for a long time, we recommend that you power it from a wall outlet using the AC power adaptor. (1) Open the DC IN jack cover and connect the AC power adaptor to the DC IN jack on your camcorder with the plug’s v mark facing toward the LCD panel side. (2) Connect the power cord to the AC power adaptor. (3) Connect the power cord to a wall outlet.
Step 3 Inserting a cassette 3,4 2 Window Getting started (1) Install the power source (p. 10). (2) While pressing the small blue button on the EJECT switch, slide it in the direction of the arrow. After the cassette lid is opened, the cassette compartment automatically opens. (3) Push the middle portion of the back of the cassette to insert it. Insert the cassette in a straight line deeply into the cassette compartment with the window facing out and the write-protect tab facing upward.
— Recording – Basics — Recording a picture Your camcorder automatically focuses for you. (1) Remove the hood cap and pull the hood cap string to fix it. (2) Install the power source and insert a cassette. See “Step 2” and “Step 3” for more information (p. 10 to 15). (3) Set the POWER switch to CAMERA while pressing the small green button. Your camcorder is set to the standby mode. (4) Slide OPEN in the direction of the B mark to open the LCD panel.
Recording a picture Note on the recording format Your camcorder records and plays back both in the DVCAM format and in the DV format SP mode. Select the format in the menu settings. Note on the progressive mode If you intend to use the images on your PC or play the images back as still images, we recommend that you set PROG. SCAN to ON in the menu settings before shooting (p. 104). The picture quality may improve in this mode, but if you shoot a moving subject, the image may shake when it is played back.
Recording a picture Adjusting the LCD screen The LCD panel is opened up to 90 degrees and it rotates about 90 degrees to the viewfinder side and about 180 degrees to the lens side. If you turn the LCD panel over so that it faces the other way in standby or recording mode, the indicator appears on the LCD screen and in the viewfinder (Mirror mode). 180° 90° OPEN To close the LCD panel, set it vertically and swing it into the camcorder body until it clicks.
Recording a picture Adjusting the brightness of the LCD screen Recording – Basics LCD BRIGHT To adjust the brightness of the LCD screen, press LCD BRIGHT + or –. The battery life is longer when the LCD panel is closed. Use the viewfinder instead of the LCD screen to save the battery power. To brighten To darken On the LCD screen backlight You can change the brightness of the backlight. Select LCD B.L. in the menu settings (p. 104).
Recording a picture After recording (1) (2) (3) (4) Set the POWER switch to OFF (CHG). Close the LCD panel. Eject the cassette. Remove the battery pack. Adjusting the viewfinder If you record pictures with the LCD panel closed, check the picture with the viewfinder. Adjust the viewfinder lens to your eyesight so that the indicators in the viewfinder come into sharp focus. Lift up the viewfinder and move the viewfinder lens adjustment lever. To adjust the brightness of the viewfinder screen, use the VF B.
Recording a picture Using the zoom feature To zoom with the zoom lever T W T T W Recording – Basics Press the power zoom lever a little for a slower zoom. Press it deeper for a faster zoom. Using the zoom function sparingly results in better-looking recordings.
Recording a picture Using the digital zoom – Zoom greater than 12× Zoom greater than 12× is performed digitally, if you set D ZOOM to 24× or 48× in the menu settings. The digital zoom function is set to OFF as a default setting (p. 104). If you use the digital zoom function, the picture quality deteriorates. W T The right-ended portion of the bar shows the digital zooming zone. The digital zooming zone appears when you set D ZOOM to 24× or 48×. You cannot use the digital zoom: – When you set PROG.
Recording a picture Time code The time code indicates the recording or playback time, “00:00:00:00” (hours : minutes : seconds : frames). You cannot rewrite only the time code. You can preset the time code. The time code can be preset or be reset during recording (p. 89). You can select the drop frame or non-drop frame system using the menu. Remaining tape indicator The indicator may not be displayed accurately depending on the tape.
Recording a picture Spot light This function prevents people’s faces, for example, from appearing excessively white when shooting subjects lit by strong light, such as in the theater. Press SPOT LIGHT in standby, recording, or memory mode. The indicator appears on the LCD screen or in the viewfinder. To cancel, press SPOT LIGHT again.
Checking the recording – END SEARCH / EDITSEARCH / Rec Review You can use these buttons to check recorded pictures or shoot so that the transition between the last recorded scene and the next scene you record is smooth. Recording – Basics END SEARCH EDITSEARCH Searching the end point of the recording — END SEARCH You can easily go to the end of the last recorded portion. Press END SEARCH in standby mode.
— Playback – Basics — Playing back a tape You can monitor the playback picture on the LCD screen. If you close the LCD panel, you can monitor the playback picture in the viewfinder. You can also control playback using the Remote Commander supplied with your camcorder. (1) Install the power source and insert the recorded tape. (2) Set the POWER switch to VCR while pressing the small green button. The video control buttons light up. (3) Slide OPEN in the direction of the B mark to open the LCD panel.
Playing back a tape When monitoring on the LCD screen You can turn the LCD panel over and move it back to the camcorder body with the LCD screen facing out. Playback – Basics When you close the LCD panel You cannot monitor the sound from the speaker. However, when the LCD panel is turned over to view on the LCD screen, you can monitor the sound from the speaker. To control the display of the screen indicators Press DISPLAY on the camcorder or on the Remote Commander supplied with your camcorder.
Playing back a tape Using the data code function Your camcorder automatically records not only images on the tape but also the recording data (date/time or various settings when recorded) (Data code). Press DATA CODE on the camcorder or on the Remote Commander supplied with your camcorder in playback mode.
Playing back a tape Various playback modes To operate video control buttons, set the POWER switch to VCR. To view a still picture (playback pause) Press X during playback. To resume normal playback, press N or X. To advance the tape Press M in stop mode. To resume normal playback, press N. Press m in stop mode. To resume normal playback, press N. To change the playback direction Press on the Remote Commander during playback to reverse the playback direction. To resume normal playback, press N.
Playing back a tape Note on DV-formatted tapes You can play back DV-formatted tapes on this camcorder if the tape is recorded in SP mode. “DV SP” appears on the LCD screen or in the viewfinder during playback. You cannot play back DV-formatted tapes recorded in LP mode. If you insert the cassette recorded in a PAL system The camcorder automatically identify the system, and playback starts. You can only view the picture only on the LCD screen or in the viewfinder of your camcorder.
Viewing the recording on TV Connect your camcorder to your TV or VCR with the A/V connecting cable supplied with your camcorder to watch the playback picture on the TV screen. You can operate the video control buttons in the same way as when you monitor playback pictures on the LCD screen. When monitoring the playback picture on the TV screen, we recommend that you power your camcorder from a wall outlet using the AC power adaptor (p. 14). Refer to the operating instructions of your TV or VCR.
— Advanced Recording Operations — Recording a still image on a tape – Tape Photo recording You can record still images on tapes with all the pixels in the progressive mode. See page 34 for details. This mode is useful when you print images using a video printer (not supplied). Besides the operation described here, your camcorder can record still images on a “Memory Stick” (p. 118). (1) In standby mode, keep pressing PHOTO lightly until a picture freezes. The CAPTURE indicator appears.
Recording a still image on a tape – Tape Photo recording Printing the still image You can print a still image by using a video printer (not supplied). Connect with the video printer using the A/V connecting cable supplied with your camcorder. Connect the yellow plugs of the cable to the video input of the video printer and the VIDEO jack on your camcorder. Refer to the operating instructions of the video printer as well.
Shooting with all the pixels – PROG. SCAN When you handle the digital images on your PC, set PROG. SCAN to ON before shooting. You can record the images on a tape with higher resolution. Since the image taken in progressive mode would be stabilized even in pause mode, it is especially useful when you analyze high-speed actions such as sports scenes. (1) (2) (3) (4) (5) 1 5 Press MENU to display the menu in standby mode. , then press the dial.
Using the guide frame You can easily make the picture be on a horizontal line using the guide frame. The guide frame is not recorded. (1) (2) (3) (4) (5) MENU 2-4 LCD / VF SET LCD B. L. LCD COLOR VF B. L. GU I DEFRAME LCD / VF SET LCD B. L. LCD COLOR VF B. L. GU I DEFRAME OFF [MENU] : END ON RETURN LCD / VF SET LCD B. L. LCD COLOR VF B. L. GU I DEFRAME ON [MENU] : END RETURN 5 MENU Advanced Recording Operations 1 Press MENU to display the menu in standby, recording, or memory mode.
Using the wide mode You can record a 16:9 wide picture to watch on a 16:9 wide-screen TV (16:9WIDE). Black bands appear on the LCD screen or in the viewfinder during recording in 16:9WIDE mode [a]. The picture during playback on a normal TV [b] or on a widescreen TV [c] is compressed in the widthwise direction. If you set the screen mode of the wide-screen TV to the full mode, you can watch pictures of normal images [d].
Using the fader function You can fade the picture in or out to give your recording a professional appearance. [a] STBY REC FADER Advanced Recording Operations OVERLAP* WIPE* DOT* (Random) * Fade in only [b] STBY REC MONOTONE When fading in, the picture gradually changes from black-and-white to color. When fading out the picture gradually changes from color to black-and-white.
Using the fader function (1) When fading in [a] In standby mode, press FADER until the desired fader indicator flashes. When fading out [b] In recording mode, press FADER until the desired fader indicator flashes. The indicator changes as follows: FADER t MONOTONE t OVERLAP t WIPE t DOT t no indicator The last selected fader mode is indicated first. (2) Press START/STOP. After the fade in/out is carried out, your camcorder automatically returns to the normal mode.
Using special effects – Digital effect You can add special effects to recorded pictures using the various digital functions. The sound is recorded normally. STILL You can record a still image so that it is superimposed on a moving picture. FLASH (FLASH MOTION) You can record still images successively at constant intervals. TRAIL You can record the picture so that an incidental image like a trail is left. OLD MOVIE You can add an old movie type atmosphere to pictures.
Using special effects – Digital effect (1) In standby or recording mode, press DIGITAL EFFECT. The digital effect indicator appears. (2) Turn the SEL/PUSH EXEC dial to select the desired digital effect mode. The digital effect indicator changes as follows: STILL y FLASH y LUMI. y TRAIL y OLD MOVIE (3) Press the SEL/PUSH EXEC dial. The indicator lights up and the bar appears. In STILL and LUMI. modes, the still image is stored in memory. (4) Turn the SEL/PUSH EXEC dial to adjust the effect.
Using special effects – Digital effect Notes •The following functions do not work in digital effect mode: – Fader – Tape Photo recording – Shutter speed (1/30 or smaller) adjustment •The following functions do not work in old movie mode: – Wide mode – Spot light mode – Shutter speed adjustment Advanced Recording Operations When you turn the power off The digital effect will be automatically canceled.
Shooting with manual adjustment Under normal conditions, this unit automatically makes various adjustments as it shoots. However, you can adjust the following functions manually to suit your preference.
Shooting with manual adjustment Adjusting the iris Adjust the iris manually depending on the depth of field. 2 1 AUTO LOCK •IRIS HOLD F2.8 Advanced Recording Operations (1) Set the AUTO LOCK selector to the center (auto lock release) position while the camcorder is in standby, recording, or memory mode. (2) Press IRIS. The iris indicator appears on the LCD screen or in the viewfinder. (3) Turn the IRIS dial to adjust the iris. As you turn the dial, the F value changes as follows: F1.6 y ...
Shooting with manual adjustment Adjusting the gain (1) Set the AUTO LOCK selector to the center (auto lock release) position while the camcorder is in standby, recording, or memory mode. (2) Press GAIN. The gain indicator appears on the LCD screen or in the viewfinder. (3) Turn the SEL/PUSH EXEC dial to adjust the gain. As you turn the dial the gain value changes between 0 dB and 18 dB.
Shooting with manual adjustment Adjusting the shutter speed 1 AUTO LOCK 2 SHUTTER SPEED 60 HOLD Advanced Recording Operations (1) Set the AUTO LOCK selector to the center (auto lock release) position while the camcorder is in standby, recording, or memory mode. (2) Press SHUTTER SPEED. The shutter speed indicator appears on the LCD screen or in the viewfinder. (3) Turn the SEL/PUSH EXEC dial to select the desired speed.
Shooting with manual adjustment Using the ND filter Using the ND filter (the ND filter 1 setting corresponds to 1/4 of the quantity of light and the ND filter 2 setting corresponds to 1/32 of the quantity of light), you can record a picture clearly by adjusting light amounts, even if you shoot under too bright conditions. When the ND1 or ND2 indicator flashes on the LCD screen or in the viewfinder The ND filter is necessary.
Shooting with manual adjustment Shooting with the zebra pattern You can set the camcorder to display a zebra pattern (diagonal stripes) in the portion of the picture on the LCD screen or in the viewfinder with a subject whose brightness exceeds a certain level. When the ZEBRA selector is set to 100, the portion of the picture where zebra pattern appears is an area of high brightness and overexposure. You can check the picture level of a subject by displaying the zebra pattern.
Shooting with manual adjustment Releasing the SteadyShot function When the SteadyShot function is working, the camcorder compensates for camerashake. You can release the SteadyShot function when you do not need to use it. The indicator appears on the LCD screen or in the viewfinder. Do not use the SteadyShot function when shooting a stationary object with a tripod. (1) (2) (3) (4) (5) Press MENU to display the menu in standby or memory mode. Turn the SEL/PUSH EXEC dial to select , then press the dial.
Shooting with manual adjustment Adjusting the AE shift You can adjust the AE shift in accordance with shooting conditions and a subject. (1) Press AE SHIFT in standby, recording, or memory mode. The AE shift indicator appears on the LCD screen or in the viewfinder. (2) Turn the SEL/PUSH EXEC dial to adjust the brightness. AE SHIFT 0 2 Advanced Recording Operations 1 To deactivate AE shift Set the AE shift value to 0, or press AE SHIFT.
Adjusting the white balance White balance adjustment makes white subjects look white and allows more natural color balance for camera recording. Normally, white balance is automatically adjusted. You can obtain better results by adjusting the white balance manually when lighting conditions change quickly or when recording outdoors: e.g., neon signs, fireworks. (1) Set the AUTO LOCK selector to the center (auto lock release) position while the camcorder is in standby, recording, or memory mode.
Adjusting the white balance If you have selected in step 3 When you set the white balance to one-push white balance mode, the setting is locked and maintained even if lighting conditions change. You can achieve recording with natural colors without the image being affected by ambient light. (With the indicator on the screen) (1) Shoot a white object such as paper fully. (2) Press the SEL/PUSH EXEC dial. The indicator flashes quickly.
Adjusting the recording level manually – Sound recording level You can adjust the recording sound level. Use headphones to monitor the sound when you adjust it. You can adjust the channel 1 and channel 2 separately. Selecting the channel to be adjusted manually (1) (2) (3) (4) (5) (6) Set the POWER switch to CAMERA or VCR. Press MENU to display the menu. , then press the dial. Turn the SEL/PUSH EXEC dial to select Turn the SEL/PUSH EXEC dial to select AUDIO SET, then press the dial.
Adjusting the recording level manually– Sound recording level To adjust the recording level automatically Set AGC CH1 to ON when you automatically adjust the recording level of the channel 1. And set AGC CH2 to ON when you automatically adjust the recording level of the channel 2. When the recording level is adjusted manually The recording level indicator appears at the lower-right on the LCD screen or in the viewfinder.
Connecting an optional external microphone You can get your desired audio quality, connecting multiple microphones or an optional microphone to your camcorder. (1) (2) (3) (4) Loosen the microphone holder screw and open the cover. Detach the supplied microphone and unplug the cable from the camcorder. Connect the microphone (not supplied) to the INPUT1 or INPUT2 connector. Select the channel to be used, using the REC CH SELECT switch.
Connecting an optional external microphone When the wind is blowing hard Set CH1 or CH2 of WIND to ON in the menu settings according to the input (p. 104). We recommend that you set MIC NR to OFF in the menu settings in the following cases: •When you use the external microphone at a distance from the camcorder. •When the REC CH SELECT switch is set to CH1 and you will not record any audio via the INPUT2 connector. •When you set the INPUT LEVEL selector to LINE.
Presetting the adjustment for picture quality – Custom preset You can preset the camcorder to record the picture with the desired picture quality. When presetting, adjust the picture by shooting a subject and checking the picture displayed on a TV using the menu settings. (1) Press CUSTOM PRESET to display the CUSTOM PRESET menu in standby or memory mode. (2) Press the SEL/PUSH EXEC dial. (3) Turn the SEL/PUSH EXEC dial to select SET, then press the dial.
Presetting the adjustment for picture quality Items to be adjusted Item COLOR LVL Meaning Color intensity SHARPNESS WB SHIFT AGC LIMIT RESET Sharpness White balance Auto Gain-limit Sets items above to the default settings. Adjustment value Decreases color intensity y Increases color intensity Softer y Sharper Bluish y Reddish 6 dB/12 dB/OFF Select OFF in step 4, then press the SEL/PUSH EXEC dial.
Focusing manually You can gain better results by manually adjusting the focus in the following cases: •The autofocus mode is not effective when shooting – subjects through glass coated with water droplets – horizontal stripes – subjects with little contrast with backgrounds such as walls and sky •When you want to change the focus from a subject in the foreground to a subject in the background •Shooting a stationary subject when using a tripod (1) Slide FOCUS down to MANUAL.
Interval recording You can make a time-lapse recording by Example setting the camcorder to automatically record 1s and standby sequentially. You can achieve an 9 min 59 s [a] excellent recording for flowering, emergence, etc., with this function. [b] 10 min [a] Recording time [b]Waiting time 1 9 min 59 s [a] [b] 10 min Press MENU to display the menu in standby mode. , then press the dial. Turn the SEL/PUSH EXEC dial to select Turn the SEL/PUSH EXEC dial to select INT. REC, then press the dial.
Interval recording (6) Turn the SEL/PUSH EXEC dial to select ON, then press the dial. (7) Press MENU to erase the menu display. The interval recording indicator flashes. (8) Press START/STOP to start interval recording. The interval recording indicator lights up. POWER VCR 8 MEMORY OFF CAMERA (CHG) 6 7 CAMERA SET D ZOOM 16 : 9W I DE STEADYSHOT FRAME REC I NT. REC ON W I ND RETURN I NTERVAL MENU [MENU] : END To cancel the interval recording •Set INT. REC to OFF in the menu settings.
Frame by frame recording – Cut recording You can make a recording with a stop-motion animated effect using cut recording. To create this effect, alternately move the subject a little and make a cut recording. We recommend that you use a tripod, and operate the camcorder using the Remote Commander after step 6. (1) (2) (3) (4) (5) 1 6,7 MENU POWER VCR MEMORY OFF CAMERA (CHG) 2-4 Advanced Recording Operations Press MENU to display the menu in standby mode. , then press the dial.
Superimposing the date and time on a picture You can superimpose the date/time indication directly on the picture, besides the date/ time display as data code. (1) (2) (3) (4) (5) 1,5 Press MENU to display the menu in standby mode. Turn the SEL/PUSH EXEC dial to select , then press the dial. Turn the SEL/PUSH EXEC dial to select DATE REC, then press the dial. Turn the SEL/PUSH EXEC dial to select ON, then press the dial. Press MENU to erase the menu display.
Marking an Index If you mark an index at the scene you want to search for, you can easily search for the scene later (p. 64). [a] Advanced Recording Operations In recording mode [a]: Press INDEX MARK. The “INDEX MARK” indicator appears on the LCD screen or in the viewfinder for seven seconds and the index is marked after the indicator disappears. In standby mode [b]: Press INDEX MARK. The “INDEX STBY” indicator appears on the LCD screen or in the viewfinder.
— Advanced Playback Operations — Searching for a recording by index – Index search You can automatically search for the point where an index is marked and start playback from that point (Index search). Use a tape with cassette memory for convenience. Use the Remote Commander for this operation. Use this function to check where indexes are marked or to edit the tape at each sequence where the index is marked.
Searching for a recording by index – Index search In the mark •The bar in the •The mark in the mark indicates the present point on the tape. indicates the actual point you are trying to search for. If a tape has a blank portion between recorded portions The index search function may not work correctly. If you mark an index onto an external input signal “LINE” appears in the CH column. Searching for the index point without using cassette memory (1) Set the POWER switch to VCR.
Searching the boundaries of recorded tape by title – Title search If you use a tape with cassette memory, you can search for the boundaries of recorded tape by title (Title search) (p. 142). Use the Remote Commander for this operation. (1) Set the POWER switch to VCR. to ON in the menu settings (p. 104). The default setting (2) Set CM SEARCH in is ON. (3) Press SEARCH MODE on the Remote Commander repeatedly, until the title search indicator appears.
Searching a recording by date – Date search You can automatically search for the point where the recording date changes and start playback from that point (Date search). Use a tape with cassette memory for convenience. Use the Remote Commander for this operation. Use this function to check where recording dates change or to edit the tape at each recording date. Searching for the date using cassette memory You can use this function only when playing back a tape with cassette memory (p. 142).
Searching a recording by date – Date search Note If one day’s recording is less than two minutes, your camcorder may not accurately find the point where the recording date changes. In the mark •The bar in the •The mark in the mark indicates the present point on the tape. indicates the actual point you are trying to search. If a tape has a blank portion between recorded portions The date search function may not work correctly.
Searching for a photo – Photo search/ Photo scan You can search for a still picture you have recorded on a tape (photo search). You can also search for still pictures one after another and display each picture for five seconds automatically regardless of cassette memory (photo scan). Use the Remote Commander for these operations. Use this function to check or edit still pictures. Searching for a photo using cassette memory You can use this function only when playing back a tape with cassette memory (p.
Searching for a photo – Photo search/Photo scan Searching for a photo without using cassette memory (1) Set the POWER switch to VCR. (2) Set CM SEARCH in to OFF in the menu settings (p. 104). (3) Press SEARCH MODE on the Remote Commander repeatedly, until the photo search indicator appears. The indicator changes as follows: INDEX SEARCH t DATE SEARCH t PHOTO SEARCH t PHOTO SCAN t no indicator (4) Press . or > on the Remote Commander to select a photo for playback. Each time you press .
Playing back a tape with digital effects During playback, you can process a scene using the digital effect functions: STILL, FLASH, LUMI. and TRAIL. (1) In playback or playback pause mode, press DIGITAL EFFECT and turn the SEL/PUSH EXEC dial until the desired digital effect indicator (STILL, FLASH, LUMI. or TRAIL) flashes. (2) Press the SEL/PUSH EXEC dial. The digital effect indicator lights up and the bars appear. In STILL or LUMI.
— Editing — Dubbing a tape Using the A/V connecting cable Connect your camcorder to the VCR using the A/V connecting cable supplied with your camcorder. Recording quality by analog input, however, is not satisfying for professional use. Before a dubbing Set DISPLAY to LCD in the menu settings. (Default setting is LCD.) Set the input selector on the VCR to LINE, if available. (1) Insert a blank tape (or a tape you want to record over) into the VCR, and insert the recorded tape into your camcorder.
Dubbing a tape Connect using an S video cable (not supplied) to obtain high-quality pictures With this connection, you do not need to connect the yellow (video) plug of the A/V connecting cable. Connect an S video cable (not supplied) to the S video jacks of both your camcorder and the VCR. This connection produces higher quality DVCAM/DV format pictures.
Dubbing only desired scenes – Digital program editing You can duplicate selected scenes (programs) for editing onto a tape without operating the VCR. Scenes can be selected by frame. To use this function, an i.LINK cable (DV connecting cable) (not supplied) will be required. [a] [a] [b] [a] Undesired frame [b]Moves the scene Before operating the digital program editing Preparation 1 Connecting the VCR. (p. 73) Preparation 2 Adjusting the synchronization of the VCR (p. 75).
Dubbing only desired scenes - Digital program editing Preparation 2: Adjusting the synchronization of the VCR You can adjust the synchronization of your camcorder and the VCR. Remove the cassette from the camcorder beforehand. We recommend that you prepare a pen and paper for notes. When you connect to a Sony VCR using an i.LINK cable (DV connecting cable), the setup below is not necessary. (1) Insert a recordable tape into the VCR. (2) Set the POWER switch to VCR. (3) Press MENU to display the menu.
Dubbing only desired scenes - Digital program editing (10)Turn the SEL/PUSH EXEC dial to select “CUT-IN,” then press the dial. (11)Turn the SEL/PUSH EXEC dial to select the average numerical value of CUT-IN, then press the dial. The calculated start position for recording is set. (12)Turn the SEL/PUSH EXEC dial to select “CUT-OUT,” then press the dial. (13)Turn the SEL/PUSH EXEC dial to select the average numerical value of CUT-OUT, then press the dial. The calculated stop position for recording is set.
Dubbing only desired scenes - Digital program editing Operation 1: Making Programs (1) Insert the tape for playback into your camcorder, and insert a tape for recording into the VCR. (2) Press MENU to display the menu. (3) Turn the SEL/PUSH EXEC dial to select , then press the dial. (4) Turn the SEL/PUSH EXEC dial to select VIDEO EDIT, then press the dial. (5) Search for the beginning of the first scene you want to insert using the video control buttons, then pause playback (p. 29).
Dubbing only desired scenes - Digital program editing (6) Press the SEL/PUSH EXEC dial, or MARK on the Remote Commander. The CUT-IN point of the first program is set, and the top part of the program mark changes to light blue. (7) Search for the end of the first scene you want to insert using the video operating buttons, then pause playback (p. 29). (8) Press the SEL/PUSH EXEC dial, or MARK on the Remote Commander.
Dubbing only desired scenes - Digital program editing Erasing all programs (1) Select VIDEO EDIT in the menu settings. Turn the SEL/PUSH EXEC dial to select ERASE ALL, then press the dial. (2) Turn the SEL/PUSH EXEC dial to select EXECUTE, then press the dial. All the program marks flash, then the settings are canceled. To cancel erasing all programs Select RETURN in step 2, then press the SEL/PUSH EXEC dial. To cancel a program you have set Press MENU.
Using with an analog video unit and a PC – Signal convert function You can convert the analog input signal to the digital signal and output it from the DV IN/OUT jack on this camcorder. You can capture images and sound from an analog video unit connecting a PC which has the i.LINK (DV) jack to your camcorder. S VIDEO (not supplied) OUT S VIDEO VIDEO AUDIO DV connecting cable (not supplied) : Signal flow (1) Set the POWER switch to VCR. (2) Press MENU to display the menu.
Recording video or TV programs Using the A/V connecting cable You can record a tape from another VCR or a TV program from a TV that has video/ audio outputs. Use your camcorder as a recorder. 5 REC Editing (1) Insert a blank tape (or a tape you want to record over) into your camcorder. If you want to record a tape from the VCR, insert a recorded tape into the VCR. (2) Set the POWER switch to VCR on your camcorder. (3) Set DISPLAY in to LCD in the menu settings (p. 104).
Recording video or TV programs If your VCR is a monaural type Connect with a VCR using the audio cable (monaural y stereo) (not supplied). Connect using an S video cable (not supplied) to obtain high-quality pictures With this connection, you do not need to connect the yellow (video) plug of the A/V connecting cable. Connect an S video cable (not supplied) to the S video jacks of both your camcorder and the VCR. This connection produces higher quality DVCAM/DV format pictures.
Recording video or TV programs Using an i.LINK cable (DV connecting cable) Simply connect the i.LINK cable (DV connecting cable) (not supplied) to DV IN/OUT and to DV IN/OUT of the DV products. With digital-to-digital connection, video and audio signals are transmitted in digital form for high-quality editing. 5 REC Editing (1) Insert a blank tape (or a tape you want to record over) into your camcorder, and insert the recorded tape into the VCR. (2) Set the POWER switch to VCR.
Recording video or TV programs You can connect only one VCR using the i.LINK cable (DV connecting cable) When you dub a picture in digital form The color of the display may be uneven. However this does not affect the dubbed picture. If you record a still picture in playback pause mode via the DV IN/OUT jack The recorded picture becomes rough. And when you play back the picture using your camcorder, the picture may jitter.
Audio dubbing You can record an audio sound to add to the original sound on a tape by connecting audio equipment or a microphone. If you connect audio equipment, you can add sound to your recorded tape by specifying the starting and ending points. The original sound will not be erased. You can also use the Remote Commander for this operation.
Audio dubbing Dubbing with the AUDIO CH1/CH2 jacks Audio equipment (not supplied) LINE OUT L R AUDIO CH1/CH2 : Signal flow AUDIO L AUDIO R Do not connect the video (yellow) plug. Notes • You can dub a sound only on a tape recorded in Fs32K mode of the DVCAM format.
Audio dubbing Adding an audio sound on a recorded tape (1) Insert the recorded tape into your camcorder. (2) Set the POWER switch to VCR on your camcorder. (3) Locate the recording start point by pressing N. Then press X at the point where you want to start recording to set your camcorder to the playback pause mode. (4) Press AUDIO DUB. The green X indicator appears on the LCD screen or in the viewfinder. (5) Press X and start playing back the audio you want to record at the same time.
Audio dubbing Notes •New sound cannot be recorded on a tape already recorded in Fs48K mode (p. 109). •New sound cannot be recorded on a tape already recorded in the DV format. •You cannot add audio with the DV IN/OUT jack. If you make all the connections The audio input to be recorded will take precedence over others in the following order. •AUDIO CH1/CH2 jacks •INPUT1/INPUT2 connectors If an i.
Setting time values The camcorder uses two types of time values: time code values and user bits. The time value is displayed on the LCD screen, in the viewfinder, or on the display window. The time code and user bits can be set only in DVCAM mode. The user bits are convenient when using multiple cameras at the same event. When you record the picture, time code data will be recorded automatically.
Setting time values (10) Turn the SEL/PUSH EXEC dial to select SET, then press the dial. (11) Turn the SEL/PUSH EXEC dial to select TC FORMAT, then press the dial. (12) Turn the SEL/PUSH EXEC dial to select the frame mode, then press the dial. AUTO: Automatically sets the mode in accordance with the inserted cassette. DF: Selects the drop-frame mode. NDF: Selects the non-drop-frame mode. For more information on the drop-frame/non-drop-frame mode, see “Dropframe mode” on page 91.
Setting time values Drop-frame mode In the NTSC standard, the time code value is based on 30 frames per second, but the exact video frame frequency is in fact 29.97 frames per second and the real time, or 18 frames per 10 minutes. Drop-frame mode corrects for this by skipping two frame counts at the beginning of every minute which is not a multiple of ten. In non-drop-frame mode, however, no frame counts are omitted, and there is a gradual deviation of the time code from real time.
Setting time values Setting the user bits value You can set the user bits as eight-digit hexadecimal values (base 16) to have the date, time, scene number, and other information inserted into the time code. (1) (2) (3) (4) (5) (6) Set the POWER switch to VCR or CAMERA. Press MENU to display the menu. Turn the SEL/PUSH EXEC dial to select TC, then press the dial. Turn the SEL/PUSH EXEC dial to select UB PRESET, then press the dial. Turn the SEL/PUSH EXEC dial to select PRESET, then press the dial.
Setting time values Switching the time value TC/U-BIT Editing Press TC/U-BIT. Each time you press TC/U-BIT, the time value changes between the time code and user bits. TC: Displays the time code. This is indicated as “00:00:00:00” or “00:00.00:00”. U-BIT: Displays user bits. This is indicated as “00 00 00 00”.
Superimposing a title If you use a tape with cassette memory, you can superimpose the title while recording or after recording. When you play back the tape, the title is displayed for five seconds from the point where you superimposed it. You can select one of eight preset titles and two custom titles (p. 98). You can also select the color, size and position of titles. SCENE5 (1) Press TITLE to display the title menu in standby, recording, playback, or playback pause mode.
Superimposing a title 1 PRESET TITLE SCENE1 SCENE2 SCENE3 SCENE4 SCENE5 SCENE6 SCENE7 SCENE8 TITLE [T I TLE] : END 2 PRESET TITLE SCENE1 SCENE2 SCENE3 SCENE4 SCENE5 SCENE6 SCENE7 SCENE8 PRESET TITLE SCENE1 SCENE2 SCENE3 SCENE4 SCENE5 SCENE6 SCENE7 SCENE8 RETURN [T I TLE] : END 3 [T I TLE] : END TITLE SCENE5 [T I TLE] : END 4 SIZE [EXEC] : SAVE [T I TLE] : END SMALL SIZE Editing PRESET TITLE SCENE1 SCENE2 SCENE3 SCENE4 SCENE5 SCENE6 SCENE7 SCENE8 RETURN TITLE LARGE SCENE5 SCENE5 [EXEC]
Superimposing a title Title setting •The title color changes as follows: WHITE y YELLOW y VIOLET y RED y CYAN y GREEN y BLUE •The title size changes as follows: SMALL y LARGE You cannot input more than 12 characters in LARGE size. •If you select the title size “SMALL,” you have nine choices for the title position. If you select the title size “LARGE,” you have eight choices for the title position. If the “ FULL” mark appears The cassette memory is full.
Superimposing a title Erasing a title (1) (2) (3) (4) 1 MENU POWER VCR 2 CM SET CM SEARCH TAPE T I TLE T I TLE DSPL T I TLEERASE I TEM ERASE ERASE ALL 6,7 CM SET CM SEARCH TAPE T I TLE I TLE DSPL [MENU] T : END T I TLEERASE I TEM ERASE ERASE ALL RETURN T I TLE ERASE 1 SCENE1 SCENE2 [MENU]2 : END 3 SCENE3 4 SCENE4 5 SCENE5 6 SCENE6 [MENU] : END MEMORY OFF CAMERA (CHG) 3-5 Editing Set the POWER switch to VCR or CAMERA. Press MENU to display the menu. , then press the dial.
Making your own titles You can make up to two titles and store them in cassette memory. Each title can have up to 20 characters. (1) Press TITLE in the standby, playback, or playback pause mode. (2) Turn the SEL/PUSH EXEC dial to select , then press the dial. (3) Turn the SEL/PUSH EXEC dial to select CUSTOM1 SET or CUSTOM2 SET, then press the dial. (4) Turn the SEL/PUSH EXEC dial to select the column of the desired character, then press the dial.
Making your own titles To change a title you have stored In step 3, select CUSTOM1 SET or CUSTOM2 SET, depending on which title you want to change, then press the SEL/PUSH EXEC dial. Turn the SEL/PUSH EXEC dial to select [C], then press the dial to delete the title. The last character is erased. Enter a new title as desired. To erase a character Turn the SEL/PUSH EXEC dial to select [C], then press the dial. The last character is erased. To enter a space Select [ ], then select the blank part.
Labeling a cassette If you use a tape with cassette memory, you can label a cassette. The label can consist of up to 10 characters and is stored in cassette memory. When you insert the labeled cassette and set the POWER switch to VCR, CAMERA, or MEMORY, the label is displayed for about five seconds. (1) (2) (3) (4) (5) (6) (7) (8) (9) 2 MENU POWER VCR 3 Insert the cassette you want to label. Set the POWER switch to VCR or CAMERA. Press MENU to display the menu. , then press the dial.
Labeling a cassette To change the label you have made Insert the cassette to change the label, and operate in the same way as you do to make a new label. If you set the write-protect tab of the tape to lock You cannot label the tape. Slide the write-protect tab to release the write protection. If you have superimposed titles in the cassette When the label is displayed, up to four titles also appear. When the “-----” indicator has fewer than 10 spaces The cassette memory is full.
Erasing the cassette memory data You can erase data stored in cassette memory, each item’s data can be erased separately. You can also erase all items’ data once. Erasing each item’s data separately (1) (2) (3) (4) (5) Set the POWER switch to VCR or CAMERA. Press MENU to display the menu display. , then press the dial. Turn the SEL/PUSH EXEC dial to select Turn the SEL/PUSH EXEC dial to select ITEM ERASE, then press the dial.
Erasing the cassette memory data Erasing all the data in cassette memory (1) (2) (3) (4) (5) Set the POWER switch to VCR or CAMERA. Press MENU to display the menu display. , then press the dial. Turn the SEL/PUSH EXEC dial to select Turn the SEL/PUSH EXEC dial to select ERASE ALL, then press the dial. Turn the SEL/PUSH EXEC dial to select OK, then press the dial. “OK” changes to “EXECUTE.” (6) Press the SEL/PUSH EXEC dial.
— Customizing Your Camcorder — Changing the menu settings To change the mode settings in the menu settings, select the menu items with the SEL/ PUSH EXEC dial. The default settings can be partially changed. First, select the icon, then the menu item and then the mode. (1) In the standby, VCR, or MEMORY mode, press MENU. (2) Turn the SEL/PUSH EXEC dial to select the desired icon, then press the dial to set it. (3) Turn the SEL/PUSH EXEC dial to select the desired item, then press the dial to set it.
Changing the menu settings To make the menu display disappear Press MENU. Menu items are displayed as the following icons: TC/UB SET MANUAL SET CAMERA SET VCR SET LCD/VF SET MEMORY SET CM SET TAPE SET SETUP MENU OTHERS z is the default setting. Menu items differ depending on the position of the POWER switch. The LCD screen or viewfinder screen shows only the items you can operate at the moment. Icon/item TC PRESET Mode — Meaning Presets/resets the time code (p. 89).
Changing the menu settings Icon/item AUTO SHTR Mode z ON OFF PROG. SCAN z OFF ON SETUP D ZOOM z 0% 7.5 % z OFF 24× 48× 16:9WIDE z OFF ON STEADYSHOT z ON OFF FRAME REC INT. REC WIND z OFF ON ON z OFF SET CH1 CH2 Meaning To automatically adjust the electronic shutter speed. To fix the electronic shutter speed. Records still/moving pictures in the interlace format. Records still/moving pictures in progressive mode. Records with the SETUP 0 % system. Records with the SETUP 7.5 % system.
Changing the menu settings Icon/item CH SELECT Mode z CH1, CH2 CH1 CH2 AUDIO MIX — POWER switch Meaning To play back the CHs 1/2 audios from each VCR channel. However, if you play back the audios via the camcorder’s speaker, the audios are mixed. To play back the CH1 audio from both channels 1/2. To play back the CH2 audio from both channels 1/2. To adjust the balance between the channels VCR 1/2 (CH1/2) and channels 3/4 (CH3/4) (p. 87). CH1 2 CH3 4 VCR LCD B. L.
Changing the menu settings Icon/item Mode CONTINUOUS z OFF ON MULTI SCRN QUALITY z SUPER FINE FINE STANDARD PRINT MARK z OFF ON PROTECT z OFF ON SLIDE SHOW — DELETE ALL FORMAT — z RETURN OK PHOTO SAVE — Meaning Not to record continuously. To record four images continuously (p. 119). To record nine images continuously (p. 119). To record still images in the super fine image quality mode, using a “Memory Stick” (p. 116).
Changing the menu settings Icon/item CM SEARCH Mode z ON OFF TAPE TITLE — TITLE DSPL TITLEERASE z ON OFF — ITEM ERASE — ERASE ALL — z DVCAM DV SP AUDIO MODE z FS32K FS48K POWER switch VCR VCR CAMERA To display the title you have superimposed. VCR Not to display the title. To erase the title you have superimposed VCR CAMERA (p. 97). To erase each item’s data in cassette VCR CAMERA memory (p. 102). To erase all the data in cassette memory VCR CAMERA (p. 103). VCR To record in the DVCAM format.
Changing the menu settings Icon/item qREMAIN Mode z AUTO ON DATA CODE z DATE/CAM AUDIO SET DATE z ON OFF — CLOCK SET — LTR SIZE z NORMAL MIC NR 2× LOGO INS — WORLD TIME — 110 Meaning To display the remaining tape indication: • for about eight seconds after your camcorder is turned on and calculates the remaining amount of tape • for about eight seconds after a cassette is inserted and your camcorder calculates the remaining amount of tape • for about eight seconds after N is pressed in VCR m
Changing the menu settings Icon/item BEEP Mode MELODY POWER switch VCR CAMERA MEMORY VCR CAMERA MEMORY VCR CAMERA MEMORY CAMERA CAMERA MEMORY Customizing Your Camcorder Meaning To chime a melody in normal operations, and beep a warning sound for five seconds. z NORMAL To beep in the following situations: turning on the power, pressing the start/ stop button, and when a warning message appears. OFF To cancel the melody, beep, and shutter click sound.
Resetting the date and time The date and time are set at the factory. Set the time according to the local time in your country. If you do not use your camcorder for about four months, the date and time settings may be released because the vanadium-lithium battery installed in your camcorder will have been discharged (p. 157). First, set the year, then the month, the day, the hour and then the minute. (1) (2) (3) (4) (5) Press MENU to display the menu in the standby mode.
— “Memory Stick” Operations — Using a “Memory Stick” – introduction You can record and play back still images on the “Memory Stick” supplied with your camcorder. You can easily play back, record or delete still images. You can exchange image data with other equipment such as a personal computer etc., using the Memory Stick Reader/Writer supplied with your camcorder or a PC card adaptor for Memory Stick (not supplied). On file format (JPEG) Your camcorder compresses image data in JPEG format (extension .
Using a “Memory Stick” – introduction Notes on image data compatibility •Image data files recorded on a “Memory Stick” by your camcorder conform to the Design Rules for Camera File Systems universal standard (DCF98 standard) established by the JEIDA (Japan Electronic Industry Development Association). You cannot play back on your camcorder still images recorded on other equipment (DCRTRV890E/TRV900/TRV900E or DSC-D700/D770) that does not conform to this universal standard.
Using a “Memory Stick” – introduction Inserting a “Memory Stick” Insert the “Memory Stick” with the Sony logo pointing toward the LCD panel and the b mark pointing inward. Access lamp Push the “Memory Stick” inward, then release your finger. The “Memory Stick” comes out a little. “Memory Stick” Operations To eject a “Memory Stick” Note The “Memory Stick” may pop out depending on the way you push it. When the access lamp is lit or flashing Never shake or strike your camcorder.
Using a “Memory Stick” – introduction Selecting the image quality mode You can select the image quality mode in still picture recording. The default setting is SUPER FINE. (1) Set the POWER switch to VCR or MEMORY. Make sure that the LOCK switch is set to the right (unlock) position. (2) Press MENU to display the menu. , then press the dial. (3) Turn the SEL/PUSH EXEC dial to select (4) Turn the SEL/PUSH EXEC dial to select QUALITY, then press the dial.
Using a “Memory Stick” – introduction Differences in image quality mode Recorded images are compressed in JPEG format before being stored in memory. The memory capacity allotted to each image varies depending on the image quality mode selected. Details are shown in the table below. Image quality mode SUPER FINE FINE STANDARD Memory capacity Approx. 190 KB Approx. 100 KB Approx. 60 KB Note on the image quality mode indicator This is only displayed during recording.
Recording still images on a “Memory Stick” – Memory Photo recording You can record still images on a “Memory Stick.” Before operation Insert a “Memory Stick” into your camcorder. (1) Set the POWER switch to MEMORY. Make sure that the LOCK switch is set to the right (unlock) position. (2) Keep pressing PHOTO lightly until the desired still picture appears. The green z mark stops flashing, then lights up.
Recording still images on a “Memory Stick” – Memory Photo recording While you are recording a still image You can neither turn off the power nor press PHOTO. When you press PHOTO on the Remote Commander Your camcorder immediately records the image that is on the screen when you press the button. Recording images continuously You can record still images continuously. Select one of the two modes described below before recording. Continuous mode [a] You can record four still images continuously.
Recording still images on a “Memory Stick” – Memory Photo recording (1) Set the POWER switch to MEMORY. Make sure that the LOCK switch is set to the right (unlock) position. (2) Press MENU to display the menu. (3) Turn the SEL/PUSH EXEC dial to select , then press the dial. (4) Turn the SEL/PUSH EXEC dial to select CONTINUOUS, then press the dial. (5) Turn the SEL/PUSH EXEC dial to select the desired setting, then press the dial.
Superimposing a still image in a “Memory Stick” on a moving picture – MEMORY MIX You can superimpose a still image you have recorded on a “Memory Stick” on the top of the moving picture you are recording. M. CHROM (Memory chromakey) You can swap a blue area of a still image such as an illustration or a frame with a moving picture. M. LUMI (Memory luminancekey) You can swap a brighter area of a still image such as a handwritten illustration or title with a moving picture.
Superimposing a still image in a “Memory Stick” on a moving picture – MEMORY MIX Before operation Insert a recorded “Memory Stick” and a tape to be recorded into your camcorder. (1) Set the POWER switch to CAMERA. (2) Press MEMORY MIX in standby mode. The last recorded or last composed image appears on the lower part of the screen as a thumbnail image. (3) Press MEMORY+/– or +/– on the Remote Commander to select the still image you want to superimpose.
Superimposing a still image in a “Memory Stick” on a moving picture – MEMORY MIX Items to be adjusted M. CHROM M. LUMI C. CHROM M.
Recording an image from a tape as a still image Your camcorder can read moving picture data recorded on a tape and record it as a still image on a “Memory Stick.” Your camcorder can also take in moving picture data through the input connector and record it as a still image on a “Memory Stick.” Before operation Insert a recorded tape and a “Memory Stick” into your camcorder. (1) Set the POWER switch to VCR. (2) Press N. The picture recorded on the tape is played back.
Recording an image from a tape as a still image Titles that are already recorded on tapes You cannot record the titles on a “Memory Stick.” When you press PHOTO on the Remote Commander Your camcorder immediately records the image that is on the screen when you press the button. Recording a still image from other equipment (1) Set the POWER switch to VCR and set DISPLAY in to LCD in the menu settings. (2) Play back the recorded tape, or turn the TV on to see the desired program.
Recording an image from a tape as a still image When recording the image through the DV IN/OUT jack DV IN/OUT DV S VIDEO LANC DV IN/OUT : Signal flow i.
Copying still images from a tape – Photo save Using the search function, you can automatically take in only still images from tapes and record them on a “Memory Stick” in sequence. Before operation •Insert a recorded tape into your camcorder and rewind the tape. •Insert a “Memory Stick” into your camcorder. (1) (2) (3) (4) Set the POWER switch to VCR. Press MENU to display the menu. , then press the dial.
Copying still images from a tape – Photo save To cancel copying Press MENU. When the memory of the “Memory Stick” is full “MEMORY FULL” appears on the LCD screen or in the viewfinder, and the copying stops. Insert another “Memory Stick” and repeat the procedure from step 2. When the access lamp is lit or flashing Never shake or strike your camcorder. Also, do not turn the power off, eject the “Memory Stick” or remove the battery pack. Otherwise, the image data breakdown may occur.
Viewing a still picture – Memory Photo playback You can play back still images recorded on a “Memory Stick.” You can also play back six images at a time by selecting the index screen. Before operation Insert a “Memory Stick” into your camcorder. (1) Set the POWER switch to VCR or MEMORY. Make sure that the LOCK switch is set to the right (unlock) position. (2) Press MEMORY PLAY. The last recorded image is displayed. (3) Press MEMORY +/– or +/– on the Remote Commander to select the desired still image.
Viewing a still picture – Memory Photo playback Screen indicators during still image playback 100–0002 6 / 15 MEMORY PLAY Image number/ Total number of recorded images Print mark Protect indicator Data file name On data file name •When the hyphen is indicated between the directory and the file number, this data file name means that this file corresponds to the DCF98 standard.
Viewing a still picture – Memory Photo playback A red B mark appears above the image that is displayed before changing to the index screen mode. MEMORY – : to display the previous six images MEMORY + : to display the following six images 7 8 9 10 11 12 [b] 100–0019 12 / 19 [a] [a] File name [b] B mark Press MEMORY +/– to move the B mark to the image you want to display on full screen, then press MEMORY PLAY.
Copying an image recorded on a “Memory Stick” to tapes You can copy still images or titles recorded on a “Memory Stick” and record them to a tape. Before operation Insert a tape for recording and a “Memory Stick” for playback into your camcorder. (1) Set the POWER switch to VCR. (2) Using the video control buttons, search for a point where you want to record the desired still image. Set the tape to playback pause mode. (3) Press z REC and the button on its right simultaneously on your camcorder.
Copying an image recorded on a “Memory Stick” to tapes Note on the index screen You cannot record the index screen. Image data modified with personal computers or shot with other equipment You may not be able to copy them with your camcorder. If you press DISPLAY in standby or recording mode You can see memory playback and the file name indicators in addition to the indicators pertinent to tapes, such as the time code indicator. When the auto logo insert function is activated You cannot use this function.
Playing back images continuously – SLIDE SHOW You can automatically play back images in sequence. This function is useful especially when checking recorded images or during a presentation. Before operation Insert a “Memory Stick” into your camcorder. (1) Set the POWER switch to MEMORY. Make sure that the LOCK switch is set to the right (unlock) position. (2) Press MENU to display the menu. , then press the dial.
Preventing accidental erasure – Image protection To prevent accidental erasure of important images, you can protect selected images. Before operation Insert a “Memory Stick” into your camcorder. (1) Set the POWER switch to MEMORY or VCR. Make sure that the LOCK switch is set to the right (unlock) position. (2) Play back the image you want to protect (p. 129). (3) Press MENU to display the menu. , then press the dial.
Deleting images You can delete images stored in a “Memory Stick.” Deleting selected images Before operation Insert a “Memory Stick” into your camcorder. (1) Set the POWER switch to MEMORY or VCR. Make sure that the LOCK switch is set to the right (unlock) position. (2) Play back the image you want to delete (p. 129). (3) Press MEMORY DELETE. “DELETE?” appears on the LCD screen or in the viewfinder. (4) Press MEMORY DELETE again. The selected image is deleted.
Deleting images Deleting all the images You can delete all the unprotected images in a “Memory Stick.” Before operation Insert a “Memory Stick” into your camcorder. (1) Set the POWER switch to MEMORY. Make sure that the LOCK switch is set to the right (unlock) position. (2) Press MENU to display the menu. (3) Turn the SEL/PUSH EXEC dial to select , then press the dial. (4) Turn the SEL/PUSH EXEC dial to select DELETE ALL, then press the dial.
Deleting images To cancel deleting all the images in the “Memory Stick” Select RETURN in step 5, then press the SEL/PUSH EXEC dial.
Writing a print mark – Print mark You can specify the recorded still image to be printed out. This function is useful for printing out still images later. Your camcorder conforms with the DPOF (Digital Print Order Format) standard for specifying the still images to print out. Before operation Insert a “Memory Stick” into your camcorder. (1) Set the POWER switch to MEMORY or VCR. Make sure that the LOCK switch is set to the right (unlock) position. (2) Play back the image to be printed out (p. 129).
— Additional Information — Compatibility of DVCAM and DV formats DVCAM format is developed as a more reliable and higher end format than consumer DV format. Here explained are the differences, compatibility, and limitations on editing about DVCAM and DV formats.
Compatibility of DVCAM and DV formats Compatibility on editing using DV connectors When this digital camcorder is connected to other DVCAM or DV video equipment using DV connectors, the recording format of edited tapes is defined according to recorder’s format as described below.
Usable cassettes Selecting cassette types You can use the mini DVCAM cassette* and mini DV cassette* in this DV, 8 mm, Hi8, Digital 8, VHS, camcorder. You cannot use any other S-VHS, VHSC, S-VHSC, Betamax or ED Betamax cassette. * There are two types of mini DVCAM/mini DV cassettes: with cassette memory and without cassette memory. Tapes with cassette memory have (Cassette Memory) mark. mark to enjoy your camcorder fully.
Usable cassettes Audio mode Fs32K (12-bit) mode: The original sound can be recorded in channels 1 and 2, and the new sound in channels 3 and 4 in 32 kHz. The balance between channels 1/2 and channels 3/4 can be adjusted by selecting AUDIO MIX in the menu settings during playback and audio dubbing. Both sounds can be played back. You can monitor the sound during audio dubbing. Fs48K (16-bit) mode: A new sound cannot be recorded but the original sound can be recorded in high quality using two channels.
About i.LINK Your camcorder is equipped with the DV input/output connector based on i.LINK (IEEE1394) standard. This section explains the specifications and features of i.LINK. What is i.LINK? i.LINK is a digital serial interface designed to integrate the devices equipped with i.LINK connector. By connecting i.LINK devices, i.LINK allows your device to: – Transmit and receive data such as digital audio and digital video signals in two ways – Control other i.
Troubleshooting If you run into any problem using your camcorder, use the following table to troubleshoot the problem. If the problem persists, disconnect the power source and contact your Sony dealer or local authorized Sony service facility. If “C:ss:ss” appears on the LCD screen, display window or in the viewfinder, the self-diagnosis display function has worked. See page 151. In the recording mode Symptom START/STOP does not operate. The image on the viewfinder screen is not clear.
Troubleshooting Symptom Some tiny white spots appear on the LCD screen or in the viewfinder. The click of the shutter does not sound. The image is not bright even if you use the video flash light. Cause and/or Corrective Actions •When the shutter speed is too low. •BEEP is set to OFF in the menu settings. c Set it to MELODY or NORMAL. (p. 104) •The ND FILTER selector is set to 1 or 2. c Set it to OFF. (p. 46) •The manual adjustment is not suitable for the situations. (The indicator flashes.
Troubleshooting Symptom Displaying the recorded date, date search function does not work. The new sound now being added, or that has been added to the recorded tape is not heard. The title is not displayed. The sound is muted or images do not appear when monitoring images through TV. Cause and/or Corrective Actions • The tape has no cassette memory. c Use a tape with cassette memory. (p. 67, 142) • CM SEARCH is set to OFF in the menu settings. c Set it to ON. (p.
Troubleshooting Symptom The cassette cannot be removed from the holder. The % and Z indicators flash and no functions except for cassette ejection work. indicator does not appear when using a tape with cassette memory. Remaining tape indicator is not displayed. Cause and/or Corrective Actions •The power source is disconnected. c Connect it firmly. (p. 11, 14) •The battery is dead. c Use a charged battery pack. (p. 10, 11) •Moisture condensation has occurred.
Troubleshooting Symptom The photo save function does not work. Cause and/or Corrective Actions • The write-protect tab on the “Memory Stick” is set to LOCK. c Set the tab to write. (p. 113) • The battery pack is dead. c Install a charged battery pack or use the AC power adaptor instead of the battery pack. (p. 10, 14) Others Symptom The title is not recorded. While editing using the i.LINK cable (DV connecting cable), recording picture cannot be monitored. Digital program editing does not function.
Troubleshooting Symptom The Remote Commander supplied with your camcorder does not work. The input picture does not appear on the LCD screen or in the viewfinder when your camcorder is connected to outputs on the TV or VCR. The melody or beep sounds for five seconds. When charging the battery pack, no indicator appears or the indicator flashes in the display window. You cannot charge the battery pack.
Self-diagnosis display Your camcorder has a self-diagnosis display function. This function displays the current condition of your camcorder as a 5-digit code (a combination of a letter and figures) on the LCD screen, display window, or in the viewfinder. If a 5-digit code is displayed, check the following code chart. The last two digits (indicated by ss) will differ depending on the state of your camcorder.
Warning indicators and messages If indicators and messages appear on the LCD screen or in the viewfinder, check the following: See the page in parentheses “( )” for more information. Warning indicators E The battery is dead or nearly dead Slow flashing: •The battery is nearly dead. Depending on conditions, the E indicator may flash, even if there are five to 10 minutes remaining. Fast flashing: •The battery is dead (p. 11). •The battery is completely dead.
Warning indicators and messages 100-0001 “(Warning indicators) Memory Stick” file error* Slow flashing: •File is broken. •File has no compatibility. “Memory Stick” format error* Fast flashing: •There are two directories or more. •Data is broken. •“Memory Stick” is not formatted correctly (p. 108). Warning messages * You hear the melody or beep sound. **x and the message appear alternately. Additional Information •CLOCK SET Reset the date and time (p. 112).
Using your camcorder abroad Using your camcorder abroad You can use your camcorder in any country or area with the AC power adaptor supplied with your camcorder within 100 V to 240 V AC, 50/60 Hz. When charging the battery pack, use a commercially available AC plug adaptor [a], if necessary, depending on the design of the wall outlet [b]. AC-L10A/L10B/L10C [a] [b] Your camcorder is an NTSC system-based camcorder.
Maintenance information and precautions Moisture condensation If your camcorder is brought directly from a cold place to a warm place, moisture may condense inside your camcorder, on the surface of the tape, or on the lens. In this condition, the tape may stick to the head drum and be damaged or your camcorder may not operate correctly. If there is moisture inside your camcorder, the beep sounds and the % indicator flashes.
Maintenance information and precautions Removing Dust from Inside the Viewfinder Before cleaning, remove the sticker below the viewfinder lens adjustment lever. (1) While holding down the hook 1, slide the eyecup in the direction of the arrow and remove it out 2. (2) Clean the surface with a commercially available blower. 1 2 To reattach the eyecup Do step 1 above sliding the eyecup in the reverse direction of the arrow.
Maintenance information and precautions Charging the vanadium-lithium battery in your camcorder Your camcorder is supplied with a vanadium-lithium battery installed so as to retain the date and time, etc., regardless of the setting of the POWER switch. The vanadiumlithium battery is always charged as long as you are using your camcorder. The battery, however, will get discharged gradually if you do not use your camcorder.
Maintenance information and precautions •Do not let sand get into your camcorder. When you use your camcorder on a sandy beach or in a dusty place, protect it from the sand or dust. Sand or dust may cause your camcorder to malfunction, and sometimes this malfunction cannot be repaired. AC power adaptor •Unplug the unit from the wall outlet when you are not using the unit for a long time. To disconnect the power cord, pull it out by the plug. Never pull the power cord itself.
Maintenance information and precautions If batteries are leaking •Wipe off the liquid in the battery compartment carefully before replacing the batteries. •If you touch the liquid, wash it off with water. •If the liquid get into your eyes, wash your eyes with a lot of water and then consult a doctor. If any problem occurs, unplug your camcorder and contact your nearest Sony dealer.
Specifications Video camera recorder System Video recording system 2 rotary heads Helical scanning system Audio recording system Rotary heads, PCM system Quantization: Fs32 kHz (12 bits, channels 1/2, channels 3/4), Fs48 kHz (16 bits, channels 1/2) Video signal NTSC color, EIA standards Usable cassette Mini DVCAM cassette with the mark printed Mini DV cassette with the mark printed Tape speed DVCAM format: Approx. 28.218 mm/s DV format SP mode: Approx. 18.
— Quick Reference — Identifying the parts and controls Camcorder 1 9 2 0 3 qa 4 qs 5 qd 6 qf 7 qg 8 9 END SEARCH button (p. 25) 2 Zoom ring (p. 21) 0 EDITSEARCH buttons (p. 25) 3 Focus ring (p. 58) qa IRIS dial (p. 43) 4 ND FILTER selector (p. 46) qs IRIS button (p. 43) 5 Focus selector (p. 58) qd Display window (p. 168) 6 PUSH AUTO button (p. 58) qf OPEN button (p. 16, 26) 7 FADER button (p. 38) qg SPOT LIGHT button (p. 24) Quick Reference 1 INDEX MARK button (p.
Identifying the parts and controls qh qj wh qk wj ql wk wl w; wa DISPLAY ws DATA CODE wd TITLE wf TC/U-BIT PLAY DIGITAL EFFECT MEMORY INDEX DELETE e; MEMORY MIX ea MENU ed ef wg qh Speaker wh Battery pack (p. 10) qj LCD screen (p. 18) wj ZEBRA selector (p. 47) qk LCD BRIGHT buttons (p. 19) wk RESET button (p. 150) ql VOLUME buttons (p. 26) wl MEMORY INDEX button (p. 130) w; MEMORY PLAY button (p. 129) e; MEMORY DELETE button (p. 136) wa DISPLAY button (p.
Identifying the parts and controls eg SLOW STOP REC REW AUDIO DUB PLAY FF eh PAUSE ej ek el r; ra ej INPUT1 connector (p. 9) ek REC START/STOP (p. 16) el Lens r; Lens hood fixing screw ra Lens hood You can attach a wide teleconversion lens (not supplied) by removing the lens hood. eh INPUT2 connector (p. 54) Quick Reference eg Video control buttons (p.
Identifying the parts and controls rs rf rg rh rd REC CH SELECT CH1•CH2 CH1 INPUT LEVEL LINE MIC MIC ATT INPUT1 INPUT LEVEL +48V ON OFF LINE MIC +48V ON OFF MIC ATT rj INPUT2 rk rs Remote sensor rd Camera recording lamp (p. 16) rf INPUT1 REC CH SELECT switch (p. 9) rg INPUT1 INPUT LEVEL selector (p. 9) rh INPUT1 +48 V switch (p. 9) rj INPUT2 +48 V switch (p. 9) rk INPUT2 INPUT LEVEL selector (p.
Identifying the parts and controls rl y; t; ya ta ts td ys tf yd tg yf th yg tj yh tk yj tl yk tl “Memory Stick” slot (p. 115) t; Power zoom lever (p. 21) y; Cassette lid (p. 15) ta PHOTO button (p. 32, 118) ya Hood cap (p. 16) ts BATT (battery) RELEASE lever (p. 10) ys PUSH button (p. 15) td GAIN button (p. 44) yd Grip strap tf AUTO LOCK selector (p. 42) yf LOCK switch (p. 16) tg WHT BAL button (p. 50) yg POWER switch (p. 16) th AE SHIFT button (p.
Identifying the parts and controls yl uk u; ua ul us ud i; uf ia ug is uh id uj if ig yl Carrying handle uk Accessory shoe u; Remote sensor ul Microphone (p. 9) ua Camera recording lamp (p. 16) i; S VIDEO jack (p. 31, 33, 72, 81, 125) us CUSTOM PRESET button (p. 56) ia VIDEO jack (p. 31, 33, 72, 81, 125) ud Viewfinder lens adjustment lever (p. 20) is AUDIO CH1/CH2 jack (p. 31, 72, 81, 86) id uf Hook for removing the viewfinder (p. 156) ug EJECT switch (p. 15) DV IN/OUT jack (p.
Identifying the parts and controls Remote Commander The buttons that have the same name on the Remote Commander as on your camcorder function identically to the buttons on your camcorder. 1 2 3 4 5 6 9 0 qa qs 7 8 qd 9 DATA CODE button (p. 28) 2 ZERO SET MEMORY button This button does not function. qs ./> buttons (p. 64, 66, 67, 69) 3 PHOTO button (p. 32, 118) 0 START/STOP button (p. 16) qa Power zoom button (p. 21) qd AUDIO DUB button (p.
Identifying the parts and controls To prepare the Remote Commander Insert two size AA (R6) batteries by matching the + and – polarities on the batteries to the + – marks inside the battery compartment. Notes on the Remote Commander •Point the remote sensor away from strong light sources such as direct sunlight or overhead lighting. Otherwise, the Remote Commander may not function properly. •Your camcorder works in the commander mode VTR 2.
Identifying the parts and controls Operation indicators 1 2 3 4 5 6 7 8 9 0 qa qs qd qf qg 120min W ST I LL 16 : 9W I DE STBY T AUTO 60 ATW F11 0dB JUL ND1 4 2000 2 Remaining battery time indicator (p. 22) 3 Zoom indicator (p. 21)/Data file name indicator (p. 113) 4 Digital effect indicator (p. 39)/FADER indicator (p. 37)/MEMORY MIX indicator (p. 121) 5 16:9WIDE indicator (p. 36)/PROG. SCAN indicator (p. 34) 6 Warning indicators (p. 152) 7 Custom preset indicator (p. 56) 8 Data code indicator (p.
Quick Function Guide Functions to adjust exposure (in the recording mode) •Shooting backlit subjects •In spotlight, such as at the theater or a formal event BACK LIGHT (p. 23) Spotlight mode (p. 24) Functions to give images more impact (in the recording mode) •Smooth transition between scenes •Taking a still picture •Digital processing of images •Superimposing a title FADER (p. 37) PHOTO (p. 32, 118) DIGITAL EFFECT (p. 39) TITLE (p.
Index A, B A/V connecting cable .................................. 31, 72, 81 Accessory shoe .................... 166 AC power adaptor ................ 11 Adjusting shutter speed ...... 45 Adjusting viewfinder ........... 20 AE SHIFT ............................... 49 Audio dubbing ...................... 85 AUDIO LEVEL ..................... 53 AUDIO MIX ........................ 107 Audio mode ......................... 109 AUTO SHTR ........................ 106 BACK LIGHT ........................
Sony Corporation Printed in Japan