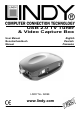
USB 2.0 TV Tuner & Video Capture Box User Manual Benutzerhandbuch Manuel English Deutsch Francaise LINDY No. 32898 www.lindy.
English Manual Deutsches Benutzerhandbuch Kapitel 1 Einleitung Kapitel 2 Hardware-Konfiguration Kapitel 3 Installation von Treiber und Anwendung Kapitel 4 WinDVR 3 Software Kapitel 5 Kanalvorschau Kapitel 6 Problembeseitigung Manuel de l’utilisateur francaise Veuillez trouver la version française de ce manuel en téléchargement sur notre site Internet www.lindy.
Table of Contents Introduction........................................................................................................... 1 Features................................................................................................................. 1 Technical Specifications...................................................................................... 2 System Requirements .......................................................................................... 2 Package Checklist ....
Instruction Manual Introduction The LINDY USB 2.0 TV Tuner & Video Capture Box is a compact, external TV Box, which features a built-in TV Tuner and video decoder. It turns your computer into an all-in-one TV reception and video capture device, allowing you to watch and record TV, and capture still and full motion video.
Instruction Manual Technical Specifications Supports RF input for the following TV systems: o o o o o PAL B&G PAL D&K PAL I SECAM L SECAM D&K Connections: o o o Video Line In: Audio Line In: Audio Line Out: 4 Pin Mini-DIN S-Video and RCA Composite Video RCA Stereo Audio Phone jack connector Interface: USB 2.0 High Speed, Type B Status LEDs: Power and Link Power Connector: +5V DC System Requirements PC with 2 available USB ports as detailed below – o o USB 2.
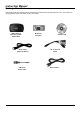
Instruction Manual Package Checklist Check and identify the supplied contents match the items below before operating the hub. If any of the items are missing please contact your dealer as soon as possible. LINDY USB 2.0 TV Tuner & Video Capture Box IR Remote Controller Software CD AV Connection Cable Audio Cable (Stereo to Stereo) USB to DC Power Cable USB 2.
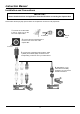
Instruction Manual Installation and Connections IMPORTANT: Please install the driver and application from the CD before connecting the Capture Box! Please follow the step-by-step process below to complete the connection of all peripherals - 1. Connect the TV RF Cable to the TV Tuner Port on the rear of the Capture Box TV RF Cable TV Tuner Port 2. Connect the AV Combined jack to the AV In Port on the rear of the Capture Box AV In Port 3.
Instruction Manual Audio Line Out Port 5. Connect one end of the Audio Cable to the Audio Line Out Port on the side of the Capture Box. Connect the other end to the Line In Port on your PC To PC’s Line In Port Speaker Output 6. Make sure your PC has speakers connected! 7. Connect the USB 2.0 cable to the USB Out Port on the Capture Box and to an available USB 2.0 Port on your PC USB Out Port 9. Use the SNAP button to take a snapshot picture SNAP button 8.
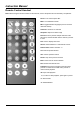
Instruction Manual Remote Control Handset Note: Before using the remote controller for the first time, remove the plastic tab from the battery compartment.
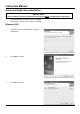
Instruction Manual Driver and Application Installation IMPORTANT: Please installensure the driver and application from the CD before connecting the Capture Box! Before installation the following – Windows 2000: Service Pack 4 or above is installed Windows XP: Service Pack 1 or above is installed Windows 2000 1. Insert the CD into the drive, installation will start automatically 2. Click ‘Next’ to continue 3.
Instruction Manual 4. Once the driver installation is complete, WinDVR software installation will begin, click ‘Next’ to continue 5. Click ‘Yes’ to agree to the Licence Agreement 6.
Instruction Manual 7. Click ‘Next’ to continue setup 8. Click ‘Next’ again to continue 9.
Instruction Manual 10. Select ‘Yes, I want to restart my computer now’ and click ‘Finish’ 11. The USB Audio/Video Device Driver will automatically continue, click ‘Next’ 12.
Instruction Manual 13. Select ‘Yes, I want to restart the computer now’ and click ‘OK’ 14. Once the computer has restarted you can connect the Capture Box - the hardware will be detected 15.
Instruction Manual Windows XP 1. Insert the CD into the drive, installation will start automatically click ‘Next’ to continue 2. Click ‘Next’ to continue 3.
Instruction Manual 4. Click ‘Yes’ to the Licence Agreement 5. Enter your details, the product serial number can be found on the CD envelope, click ‘Next’ to continue 6.
Instruction Manual 7. Click ‘Next’ to install the application 8. We recommend you install the Help file, click ‘Next’ 9.
Instruction Manual 10. Click ‘Finish’ to complete the driver installation 11. Click ‘Finish’ at the next screen 12.
Instruction Manual 13. When the computer has restarted you can install the Capture Box. Windows will detect new hardware and display the ‘Found New Hardware Wizard’. Click ‘Next’ 14. Windows will search for the drivers, you may see this screen. Select the latest version and click ‘Next’ 15.
Instruction Manual WinDVR 3 Software To launch WinDVR 3, double-click the InterVideo WinDVR3 icon on your desktop – Features TV Viewing Functions o o o o o o o o o o EPG (Electronic Programming Guide) TV Control Initialisation Wizard Viewing Aspect Ratio VPS and Channel List Video Colour control Mute Unlocked Channels TV Standards Channel Surfing Non-Overlay Support On VGA Recording Functions o o o o o MPEG 1 & 2 Support MPEG 1 & 2 at different resolutions Recording level control VCD and DVD compatible
Instruction Manual Control Panel The WinDVR 3 Control Panel provides easy access to all of the most commonly used functions of the program. For ease of use, the Control Panel is designed to look like the controls of a VCR. Please be aware that not all Control Panel options are available at all times, and some may be greyed out, or inaccessible, depending on the hardware setup and TV services available.
Instruction Manual Sub-Control Panels The secondary panels of the main Control Panel provide additional options specific to the device and/or mode you are currently working in. You can click the panel button to open the panel menu from which you can select one of two panels – TV or General.
Instruction Manual Right-Click Menu At any time whilst running DVR 3, you can place the cursor on the display window and right-click your mouse to display a pop-up text menu. The commands on this menu are the same as those on the WinDVR 3 Control Panel, along with some extra options.
Instruction Manual Channel Preview The multi-channel preview function can display 16 TV channels at the same time. 1. Press Preview on the remote control. The screen will display multi channels (the default is 16) 2. Press Preview again to restore the screen – Press Preview button Press Preview button again 3. To select a channel in multi-channel preview mode, just ‘left-click’ with your mouse on the chosen channel. 4. ‘Left-click’ again to zoom in and view the channel in normal size. 5.
Instruction Manual Troubleshooting Poor quality TV/Video pictures i. Try adjusting the TV antenna for better reception. Make sure all cables are connected correctly. Intermittent or no remote control function i. ii. iii. Ensure there is a clear path between the remote control handset and the remote sensor on the Capture Box.
Benutzerhandbuch DEUTSCH Kapitel 1 Einleitung LINDY USB 2.0 TV Tuner & Video Capture Box ist ein Gerät zum externen Anschluss an einen PC, eine Antenne bzw. einen TV-Kabelanschluss sowie andere Videoquellen mit SVHS oder Composite Video (CV Ausgang. Es verfügt über eine USB 2.0 Schnittstelle zum Anschluss an den PC. Es kann während des Betriebs des Rechner angeschlossen werden (hot swap).
Benutzerhandbuch DEUTSCH ■ Zeitversetzte Wiedergabe: Sie können zur gleichen Zeit aufnehmen und wiedergeben. Sie haben so die Möglichkeit ein Programm aufzuzeichnen, die Wiedergabe anzuhalten und aus dem Raum gehen, und wenn Sie wieder zurückkommen, den Teil betrachten, den Sie verpasst haben, während der Rest des Programms weiter aufgenommen wird. Sie können die Reklameeinblendungen schnell überspringen, so dass Sie mit der Live-Übertragung wieder gleichziehen.
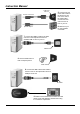
Benutzerhandbuch DEUTSCH Kapitel 2 Hardware-Konfiguration Bitte folgen Sie den folgenden Anweisungen, um alles für die Installation vorzubereiten. Diese Schritte helfen Ihnen, alles vorzubereiten und um Ihre LINDY USB 2.0 TV Tuner & Video Capture Box genießen zu können. 2.1 Produktbeschreibung Rückseite Antenne oder TV Kabel S-Video SVHS LINDY USB 2.
Benutzerhandbuch DEUTSCH (2) Schließen Sie das Audio- und Videokabel mit dem schwarzen Kombinationsstecker am Audio- und Videoeingang der LINDY USB 2.0 TV Tuner & Video Capture Box an. Die andere Seite des Audio- and Videokabels verbinden Sie mit den Audio- und Videoausgängen des Composite Video Zuspielers.
Benutzerhandbuch DEUTSCH (7) Wenn Sie das aktuell wiedergegebene Videosignal unmittelbar aufzeichnen wollen, brauchen Sie nur auf den Schnappschussbutton an der Seite der LINDY USB 2.0 TV Tuner & Video Capture Box zu drücken. Aufnahme- / Schnappschussbutton (8) Achten Sie darauf, dass die Infrarot Fernbedienung auf die Sensoren gerichtet ist, bevor Sie die LINDY USB 2.0 TV Tuner & Video Capture Box mit der Fernbedienung steuern. LED Sensoren IR Fernbedienung 2.
Benutzerhandbuch DEUTSCH Kapitel 3 Installation von Treiber und Anwendung Für Windows 2000: Verbessern Sie das System auf Service Pack 4 oder höher. Für Windows XP: Verbessern Sie auf Service Pack 1 oder höher. Diese CD enthält Treiber und Anwendung. Für Win XP, Win 2000: Installieren Sie zuerst den Treiber und die Anwendung und schließen Sie erst dann die LINDY USB 2.0 TV Tuner & Video Capture Box am Computer an. 3.
Benutzerhandbuch DEUTSCH (5) Klicken Sie auf Ja. (6) Geben Sie „Namen“, „Firma“ und „Seriennummer“ ein. (Die Seriennummer befindet sich auf der Hülle der CD.) (7) Klicken Sie auf Durchsuchen und wählen Sie den Ordner, in dem Setup die Dateien installieren soll. Klicken Sie dann auf Weiter. (8) Klicken Sie auf Weiter. (9) Klicken Sie auf Weiter. (10) Wählen Sie Ja und drücken Sie auf Beenden. Dies wird jedoch Ihren Computer jetzt noch nicht neu starten, die Treiberinstallation wird fortgesetzt.
Benutzerhandbuch DEUTSCH (11) Klicken Sie auf Weiter. (12) Klicken Sie auf Fertig stellen. (13) Wählen Sie Ja und drücken Sie auf OK. Ihr Computer startet dann automatisch neu. (14) Klicken Sie auf Ja um diesen Bildschirm zu verlassen und die Installation abzuschließen.
Benutzerhandbuch DEUTSCH 3.2 Installation unter Windows XP Bitte legen Sie die Treiber CD der LINDY USB 2.0 TV Tuner & Video Capture Box in das CD-ROM Laufwerk ein. Die Installation startet automatisch. (1) Klicken Sie auf Weiter. (2) Wählen Sie den Ordner aus, in dem Setup die Dateien installieren soll. Klicken Sie dann auf Weiter. (3) Klicken Sie auf Weiter. (4) Klicken Sie auf Ja.
Benutzerhandbuch DEUTSCH (5) Geben Sie „Namen“, „Firma“ und „Seriennummer“ ein. (Die Seriennummer befindet sich auf der Hülle der CD.) (6) Klicken Sie auf Durchsuchen und wählen Sie den Ordner, in dem Setup die Dateien installieren soll. Klicken Sie dann auf Weiter. (7) Klicken Sie auf Weiter. (8) Klicken Sie auf Weiter. (9) Klicken Sie auf Weiter. (10) Klicken Sie auf Weiter.
Benutzerhandbuch DEUTSCH (11) Wählen Sie „Ich stimme zu“ und klicken Sie dann auf Weiter. (12) Klicken Sie auf Fertig stellen. (13) Klicken Sie auf Fertig stellen. (14) Wählen Sie Ja und klicken Sie dann auf OK. Ihr Computer startet dann automatisch neu. (15) Schließen Sie nach dem Neustart die LINDY USB 2.0 TV Tuner & Video Capture Box an und das USB Gerät wird automatisch gefunden.
Benutzerhandbuch DEUTSCH (16) Legen Sie die CD der LINDY USB 2.0 TV Tuner & Video Capture Box ins CD-ROM Laufwerk ein und drücken Sie dann auf Weiter. Die Installation beginnt automatisch. (17) Drücken Sie auf „Installation fortsetzen“. (18) Klicken Sie auf Fertig stellen. (19) Die Installation der der LINDY USB 2.0 TV Tuner & Video Capture Box Hardware ist abgeschlossen. Sie können sie jetzt verwenden.
Benutzerhandbuch DEUTSCH Kapitel 4 WinDVR 3 Software Mit WinDVR 3 können Sie mit Ihrem Computer automatisch all Ihre Lieblingssendungen aufzeichnen, so dass Sie sie sehen können wann immer Sie möchten. Sie können Ihren Computer auch als digitalen Videorekorder DVR / persönlichen Videorekorder PVR einsetzten, um gleichzeitig fernzusehen und aufzuzeichnen! Sie müssen Ihren Computer dabei nicht im Auge behalten.
Benutzerhandbuch DEUTSCH Hauptbereich des Programmfensters: Kanal hoch – geht zum nächst höheren verfügbaren Kanal. Kanal runter – geht zum nächst niedrigeren verfügbaren Kanal. Aufnahme – startet den Fernsehmitschnitt und kodiert ihn im MPEG-2 Format. Vorheriger Kanal – kehrt zum zuletzt ausgewählten Kanal zurück. Wiedergabe – startet die Wiedergabe eines aufgezeichneten Programms. Stopp – Beendet die aktuelle Aktion (z.B. Aufnahme, Wiedergabe, Zeitversetzung, etc.
Benutzerhandbuch DEUTSCH Bildschirmausgabebereich: Der Ausgabebereich des Programmfensters zeigt den Status der laufenden Prozesse und der ausgewählten Konfiguration an. Je nach Aufgabenbereich, z.B. TV- / Videosignal oder Programmwiedergabe, kann das Erscheinungsbild anders sein. TV- / Videosignal Reihenfolge: Hilfe, Minimieren, Maximieren und WinDVR verlassen. Wiedergabe des aktuellen Prozesses, z.B. entweder TV- / Videosignal oder Aufnahmemodus. Anzeige der ausgewählten Videoquelle.
Benutzerhandbuch DEUTSCH Allgemeines Panel Videofenster- Hiermit stellen Sie das Standardvideofenster ein: Normal, Immer An und Arbeitsplatzvideo Seitenverhältnis – Hiermit stellen Sie das Standardseitenverhältnis des Videofensters ein. On Screen Display (OSD) – Aktiviert das Kommandofunktionsmenü auf dem Bildschirm. Setup – Öffnet das Setup-Fenster von WinDVR 4.
Benutzerhandbuch DEUTSCH Bildschirmgröße-Öffnet das Untermenü für die Bildschirmgröße: 320 x 240-Stellt das Wiedergabefenster auf diese Pixelgröße ein. 640 x 480-Stellt das Wiedergabefenster auf diese Pixelgröße ein. Zoomen und Verschieben-Vergrößern und Verschieben eines Ausschnitts. OSD-Aktiviert und deaktiviert das On-Screen Display.
Benutzerhandbuch DEUTSCH Kapitel 6 Problembeseitigung Problem 1: TV oder Videobild sind gestört. Lösung: Überprüfen Sie, ob alle Kabel richtig angeschlossen sind oder justieren Sie die Fernsehantenne neu. Problem 2: Fernbedienung funktioniert nur manchmal oder überhaupt nicht. Lösung: a) Vergewissern Sie sich, dass die Sichtlinie zwischen der Fernbedienung und dem Sensor / Empfänger der Fernbedienungssignale der LINDY USB 2.0 TV Tuner & Video Capture Box nicht blockiert wird.
Radio Frequency Energy, Certifications Shielded cables must be used with this equipment to maintain compliance with radio frequency energy emission regulations and ensure a suitably high level of immunity to electromagnetic disturbances. FCC Warning This equipment has been tested and found to comply with the limits for a Class B Digital device, pursuant to part 15 of the FCC Rules. These limits are designed to provide reasonable protection against harmful interference in a residential installation.