USB 2.0 Docking Station Pro User Manual English LINDY No. 42985 www.lindy.
Introduction Thank you for purchasing the LINDY USB 2.0 Notebook Docking Station Pro. This Docking Station is a versatile expansion unit which allows you to conveniently connect your Notebook computer to all manner of desktop peripherals. Features 2 Port, High-Speed USB 2.0 Hub, backwards compatible with USB 1.1 USB 2.0/1.
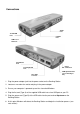
Connections Serial Port 10/100 LAN Port Parallel Port USB 2.0/1.1 Link Port PS/2 Mouse Port PS/2 Keyboard Port Two USB 2.0 Ports Power connection USB Upstream Port (for connecting to PC) 1. Plug the power adapter jack into the power socket on the Docking Station 2. Locate an unused mains outlet and plug in the power adapter 3. Ensure your computer is powered up and has launched Windows 4. Plug the flat end (Type A) of the supplied USB cable into a free USB port on your PC 5.
Software Installation The driver installation process is only required when you connect the docking station for the very first time. Please make sure that your computer is powered on and connected to the Docking Station’s Upstream port. Please note the examples illustrated are for Windows ME and XP. For Windows 98SE and 2000, the installation procedures are similar. Important: Please make sure the supplied driver CD-ROM is placed in the CD drive before continuing. Windows ME – Installation Procedure 1.
3. Windows will search the CD for each relevant driver (in this case the USB 2.0 Fast Ethernet Adapter). Once the driver has been found and automatically installed the following window will appear: Click Finish to proceed. 4. If, at this point, Windows asks you to restart your computer click No: 5. Now, repeat steps 1 to 4 for each element that requires driver installation.
. The Choose Destination Location window will appear. Click Next to continue or Browse to select a different location: 8. Select the folder where you want the PC-Linq icon to be listed and click Next: 9.
10. After Windows has finished installing all the software you may be asked to restart your computer. Click Yes: Windows ME – Verifying Installation To verify the correct installation of the drivers you need to view Device Manager. Right click the My Computer icon on your Windows desktop and select Properties from the drop-down list. Select the Device Manager tab and double click the sections marked Universal Serial Bus Controllers, Ports (COM & LPT) and Network Adapters.
Windows XP – Installation Procedure 1. After connecting the Docking Station to the computer the following window will appear: Select Install the software automatically and click Next to continue. 2. If at anytime during the installation, you see a Windows Logo testing screen, click Continue Anyway: 3. Windows will search the CD for each relevant driver (in this case the Generic USB Hub). Once the driver has been found and automatically installed the following window will appear: Click Finish to continue.
4. Now, repeat steps 1 to 3 for each element that requires driver installation. Windows will continue to prompt for user intervention as detailed above until all the relevant drivers have been installed - simply follow the on-screen instructions! 5. When Windows detects and begins to install the drivers for the USB Bridge Cable the PC Linq software installation screen will also appear. Click Next: 6. The Choose Destination Location window will appear.
7. Select the folder where you want the PC-Linq icon to be listed and click Next: 8. The PC-Linq icon will be added to the desktop: Windows XP – Verifying Installation To verify the correct installation of the drivers you need to view Device Manager. Right click the My Computer icon on your Windows desktop and select Properties from the drop-down list. Select the Hardware tab, then and click on the Device Manager button.
Using the Serial and Parallel Ports Serial Port: If you connect a serial device (e.g. modem) to the docking station you must perform the Add New Hardware function from the Windows Control Panel and manually install the device. The USB to Serial interface used by the docking station is designed to work with modems or serial devices capable of handling ‘virtual ports’.
2. In the Printer Tasks box, click on Add a printer: 3. The Add Printer Wizard window will appear.
4. The Local or Network printer window appears. Select Local printer attached to this computer: 5. Now you need to select the Docking Station’s printer port. Click the option button next to Use the following port and scroll down to highlight USB001 (Virtual printer port for USB). Click Next: 6. At the next window select your printer from the list and click Next. If you have the driver disk for the printer select Have disk...
7. You can assign your printer a name here. Click Next: 8. Select Do not share this printer and click Next: 9. If you want to print a test page, select Yes.
10. To complete the printer installation click Finish. PC to PC data link Using the docking station’s Transfer port and the supplied PC Linq software you can connect two PCs together for data transfer. To set up the PC data link function (PC Linq), you need two PC’s, each with a USB port, and an additional USB Type A to B cable (sold separately). One PC is connected to the docking station’s Upstream (Local) port; the other to the Docking Station’s Transfer (Remote) port.
4. PC Linq will display two Explorer type windows – one for each connected PC: 5.
LINDY No. 42985 FCC This device complies with part 15 of the FCC Rules. Operation is subject to the following two conditions: 1. This device may not cause harmful interference, and 2. This device must accept any interference received, including interference that may cause undesired operation CE This equipment is in compliance with the requirements of the following regulations: EN 55 022: CLASS B www.lindy.