
Installation Instructions


page 7
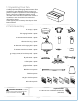
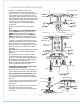
9. Light Kit Assembly (Optional).
fitter plate
fitter plate
light kit fitter
motor housing
motor housing
motor housing
metal plate
molex connections
glass shade
fitter plate
bulb
molex
connections
lock washer
hex nut
light kit fitter
plastic cap
switch
housing cap
threaded
rod
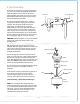
Remove 1 screw from motor plate on
underside of motor housing and partially
loosen the other 2 screws. Align slotted holes in
center of fitter plate with loosened screws in
motor plate, allowing molex connections from
motor housing to come through hole in middle
of fitter plate. Twist fitter plate to lock. Re-insert
screw that was previously removed and
securely tighten all 3 screws with a Phillips
screwdriver.
Remove 4 screws from outer edge of fitter
plate.
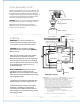
If you wish to use your fan WITH the light kit,
connect WHITE wire from light kit fitter to
WHITE wire from motor housing. Connect
BLACK wire from light kit fitter to BLACK (or
BLUE) wire from motor housing. Be sure that
the molex connections snap together securely.
Carefully arrange wiring within the fitter plate.
Align holes in light kit fitter with holes in fitter
plate. Re-install screws that were previously
removed and then securely tighten all 4 screws.
Install 3 candelabra base 40 watt max. bulbs
(included).
Important: When replacing bulbs, please allow
bulbs and glass shades to cool down before
touching.
Align grooves on glass shade with nodules
inside of shade fitter and push up gently on
glass shade. Twist glass shade completely to the
RIGHT (clockwise) until glass shade no longer
turns. Repeat for each glass shade.
Pull down VERY GENTLY on each glass shade to
make sure that glass shades are secure.
CAUTION: Do NOT overtighten glass shade
as glass may crack or break.
Please proceed to Section 10 on the following
page to complete installation with the light kit.
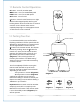
If you do NOT wish to use the light kit, remove
hex nut, lock washer, metal plate and switch
housing cap from threaded rod at top of light
kit fitter.
Locate plastic cap in one of the hardware packs
and place firmly in hole in middle of switch
housing cap.
Align holes in swich housing cap with holes in
fitter plate. Re-install screws that were
previously removed and then securely tighten
all 4 screws.