
Installation Instructions


page 8
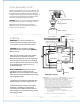
10. Automated Learning Process./Activating Code.
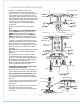
TRANSMITTER
(front)
dimmer
switch
dip
switches
1
TRANSMITTER
(back)
battery
battery
cover
CAUTION: The remote control transmitter can be
programmed to multiple receivers or fans. If this is
not desired, turn wall switch off to any other
programmable receiver or fan.
This remote control transmitter is equipped
with 16 code combinations to prevent possible
interference from or to other remote units such
as garage door openers, car alarms or security
systems. If you find that your fan and light go
on and off without using your remote control,
simply change the combination code in your
remote control (transmitter and wall control).
To set the code, perform these steps:
Remove battery cover from back side of
transmitter.
Use a ballpoint pen or a small screwdriver to
set the code switches 1 through 4 for the
transmitter.
Note: Since this fan comes with incandescent
bulbs, the dimmer switch (labeled D and X) has
been pre-set to the "ON" position (D). If you do
not wish to have dimming capability, please
move the switch to the "OFF" position (X).
Install 9-volt battery (sold seperately) in
transmitter.
IMPORTANT: To prevent damage to
transmitter, remove the battery if not used for
long periods.
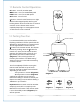
Restore electrical power. Within 30 seconds of
turning on the wall control, press and hold the
"OFF" button on the front of the transmitter for
5 seconds or until the lights on the fan blink
twice. Test the fan and light functions to
confirm the learning process is complete--see
Section 12.
Replace the battery cover.