
Installation Guide


page 7
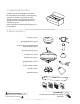
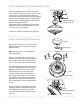
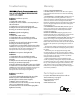
thumb
screws
9. Blade Assembly.
motor housing
blade arm
blade
blade attachment
screws and washers
lock washers
blade arm screws
plastic
motor
lock
Time Saver: Washers for blade screws can be
set on each blade screw prior to installing
blades.
Locate 15 blade attachment screws and
washers in one of the hardware packs. Hold
blade arm up to blade and align holes. Insert 3
blade attachment screws (along with washers)
with fingers first and then tighten screws
securely with a Phillips screwdriver. Repeat for
the remaining blades.
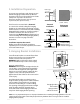
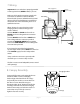
Remove blade arm screws and lock washers
from fan motor and set aside. Then, if applicable,
remove plastic motor locks and discard. Align
blade arm holes with motor screw holes and
attach blade arm with lock washers and blade
arm screws. Before securing screws
permanently, repeat with remaining blade arms.
Securely tighten all screws.
Note: Tighten blade arm screws twice a year.
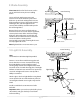
10. Light Kit Assembly.
switch
housing
plate
glass shade
light kit fitter
male plug
bulb
Note:
Fan cannot be used without light kit provided.
Remove 1 screw from switch housing plate and
loosen the other 2 screws. Connect female plug
from light kit fitter to male plug from motor
housing. Align slotted holes in light kit fitter with
loosened screws in switch housing plate. Twist light
kit fitter to lock. Re-insert screw that was previously
removed and tighten all screws securely with a
Phillips screwdriver.
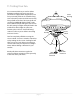
Attach 3 glass shades to light kit fitter using thumb
screws provided in one of the hardware packs. Do
not overtighten thumb screws as glass may crack or
break.
Install 3 candelabra base 60 watt max. bulbs
included.
Important: When you need to replace bulbs, please
allow bulb(s) and glass shade(s) to cool down
before touching.
motor housing
female plug