
Installation Guide


U815340 C 2 of 10
LED IMPORTANT SAFETY INSTRUCTIONS
INSTALLATION INSTRUCTIONS
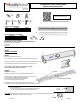
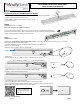
KEYHOLE
JUNCTION BOX MOUNTING
A
B
C
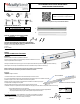
REQUIRED TOOLS:
https://www.acuitybrands.com/products/detail/1098952
INCLUDED FIXTURE COMPONENTS:
A
B
SUPPLIED HARDWARE KIT COMPONENTS:
ADDITIONAL SUPPLIES MAY BE NEEDED
DEPENDING ON THE TYPE OF CEILING FIXTURE IS BEING MOUNTED TO:
Drywall or Masonry Anchors and Screws
Wood Screws
Toggle Bolts
INSTALLATION:
Step One:
TURN OFF THE POWER!
Step Two:
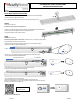
Remove lens and hardware kit from fixture -
Press in middle of lens (A) on one end to lower lens below locating feature in endcap.
Slide lens into endcap (B) to create gap between lens and endcap on opposite end of fixture (C)
Use exposed gap to gently reach under lens and pull away from fixture to remove (D).
Set lens aside in a location where it will not fall or become damaged.
Remove bag with hardware kit from inside of fixture.
Step Three:
Prepare for fixture mounting -
The fixture must be centered over, and mounted to, the electrical junction box.
If additional support is required, mounting locations at ends of fixture are provided.
Have someone assist in holding the fixture against the ceiling.
With fixture junction box mounting holes lined up with junction
box, mark the end mounting locations on the ceiling.
Use appropriate hardware for the ceiling type that fixture is being mounted to.
Typical installation onto a drywall ceiling will use drywall anchors rated to hold at least 20 lbs.
For all installs - partially thread screws (provided with junction box or 2x 8-32x1” screws provided in hardware kit) into junction box.
Leave head of screw approximately 1/4" away from box (do not tighten).
PART
DESCRIPTION
QUANTITY
A
LED LUMINAIRE HOUSING
1
B
LED DIFFUSION LENS
1
DESCRIPTION
QUANTITY
WIRE NUT
3
8-32 x 1” SCREW
2
2-3/4” box
knockouts
* For 2-3/4” electrical box only:
Use screwdriver to knock out covers in housing for additional mounting slots.
Pliers may be necessary to bend knockout several times to remove.
D
Scan QR code for product page
and additional information