
Installation Guide


U815340 C 3 of 10
LED IMPORTANT SAFETY INSTRUCTIONS
INSTALLATION INSTRUCTIONS
E
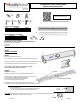
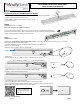
Step Four:
Make electrical connections in junction box -
DO NOT MAKE CONNECTIONS IN FIXTURE
Connect the hot and neutral (black and white) wires from the junction box to the corresponding wire
colors from the fixture, using the provided wire nuts.
Also, connect the ground wire (green) from the fixture to the circuit ground using a wire nut.
Step Five:
Attach fixture to junction box -
Position wires and connections up into junction box.
Lift fixture up and align larger opening of keyhole with heads of partially threaded screws from Step Three.
Rotate fixture clockwise and tighten screws to secure housing to junction box.
Use appropriate fasteners at ends of fixture if required.
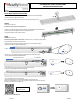
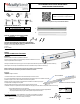
Step Six:
Reassemble lens to housing -
Start with lens parallel to fixture as shown below. With the end of lens 3-4 inches away from the endcap.
Support middle of lens up against fixture with one hand.
- Begin at the end of fixture with lens-endcap gap, place lens groove around flange of housing (A).
Apply pressure to keep this edge pressed against flange.
Parallel
- Next, flex first 1-2 feet of the other long edge of lens under flange and inside the housing (B).
Lens can withstand significant bending without breaking.
| lens edge remains outside | lens edge inside |
- Then, pull gently on lens (C) to clip lens groove around flange of housing (D).
If lens pops out, please repeat this step from the beginning.
- Finally; slide lens towards, and under, endcap (E).
This should seat the lens groove around the housing flange down the length of the lens.
Adjust any un-seated sections of lens groove to housing along the length of the fixture on both sides of lens.
Center lens under endcaps so that no gaps exist.
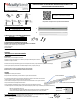
http://lithonia.com/FML4Winstall
A
B
C
D
Scan QR code for lens
installation video