Sara’s Victorian Mansion Tools Needed: •Cordless Drill (12V or higher) •Tape measure •#2 square drive bit •Square utility knife w/ blade & hook blade •Hammer •Speed Square •6’ step ladder ® Little Cottage Co. PO Box 455 Berlin, OH 44610 330-893-4212 www.cottagekits.com © 2007-2008 Little Cottage Co.
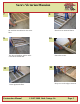
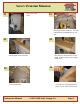
Sara’s Victorian Mansion Be sure to follow the manual closely. If you do not follow you will have problems later in assembly. 1 2 Use a combination of both this manual and the diagrams showing the panel placement and sheeting. 3 4 Lay bay window side of the floor section on top of these 4x4’s. Note how the 4x4s are positioned against shipping blocks. Center 4x4 is to be aligned with the marked area. Lay (2) 4x4x16 and (1) 4x4x14 pressure treated runners as shown...
Sara’s Victorian Mansion 8 7 Place these on 4x4s and fasten. We send this assembled for the center floor. 9 10 The edge of this floor will be on the center of the middle 4x4. Fasten the section. 12 11 Fasten against the floor. Construction Manual Keep even on the edge of the 4x4. © 2007-2008 Little Cottage Co.
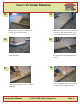
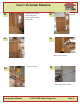
Sara’s Victorian Mansion 14 13 Make sure it is even on the ends before fastening. Then add plywood to the center after fastening turret section. Add the turret sections of the floor to the rest of the floor and 4x4’s. 15 16 Finish fastening. Lay panel A 2x6 with gingerbread as shown. 18 17 Fasten 2x6 to panel A. Note where to keep even. Construction Manual Set up panel A. Be sure to keep the bottom of the siding pushed in. © 2007-2008 Little Cottage Co.
Sara’s Victorian Mansion 20 19 Fasten panle A. Install panle B as shown. Fasten in the front then the back. 21 22 Align top edge to mark and fasten. Install panel C. 24 23 Note how the bottoms fit together. Construction Manual Fasten them in the center like this. © 2007-2008 Little Cottage Co.
Sara’s Victorian Mansion 26 25 Install panel D. Make sure distance is 2.5” as shown. Fasten tops and bottoms as shown. This will make it sturdy. 27 28 Fasten 2x6 with gingerbread to panel E. Install panel. Fasten panel D to panel E where it is marked. 30 29 Fasten bottom of the siding to the floor. Be sure to do this all around. Construction Manual Fasten panel F. © 2007-2008 Little Cottage Co.
Sara’s Victorian Mansion Keep even in the front. 31 32 Fasten into the bay windows. This will tremendously strengthen the bay window. 33 34 Note where to keep teh truss for the gable. It does not go over the gingerbread trim. Add the gable to the front side. 36 35 Fasten in the front. Construction Manual Fasten the 2x6 with gingerbread to panel H. Note where to keep even. © 2007-2008 Little Cottage Co.
Sara’s Victorian Mansion 38 37 Fasten to panel E. Fasten at the bottom. 39 Fasten the bottom of the siding to the floor. 40 Install panel I. Keep even as shown in the picture. 42 41 Install panel J. Keep 2x3s even at the bottom. Construction Manual Fasten at the front side. © 2007-2008 Little Cottage Co.
Sara’s Victorian Mansion 44 43 Do the same thing on the top. This will draw these together and strengthen. Use 2.5” screws to pull panels together. 45 46 Do this same thing for panels K thru N. Be sure to follow teh diagram and install in the correct pattern. Otherwise the gingerbread will not match as well. 47 Install panel O. 48 Leave 2.5” for the next wall. If this does not match, check to amke sure there are no extra gaps in the turret. Construction Manual © 2007-2008 Little Cottage Co.
Sara’s Victorian Mansion 49 Install the 2x3 on the end of panel O as shown in this and the next picture. 51 Install panel P. 50 52 Keep even as shown. 53 Fasten as shown. 54 Fasten trim on the outside. Construction Manual © 2007-2008 Little Cottage Co.
Sara’s Victorian Mansion 55 Install panel Q. on the 10x18 this panel will be slightly larger. 56 57 Install panel R. 58 Panel Q. Install panel S. 60 59 Make sure there is 34” in between the 2x3s for the door opening. Otherwise the door will fit too tightly. You may have to loosen the walls and move slightly to get this measurement at the bottom. Construction Manual Fasten 2x3’s as shown to panel T. Be sure to keep even and all the way to the top. © 2007-2008 Little Cottage Co.
Sara’s Victorian Mansion Slide these and panel T into place. 61 Fasten underneath teh truss as shown. 63 Make sure to keep even. 62 64 Fasten the 2x6 with gingerbread to the top of panels Q & R. 66 65 Keep even as shown. Construction Manual Install the “loft holding the pieces” in the marked places... © 2007-2008 Little Cottage Co.
Sara’s Victorian Mansion 68 67 ...continue all around the turret. Push loft over the wall as shown. 69 70 Place on top of loft holding pieces. Do not fasten til later. Install braces as shown to stabilize walls til trusses and sheeting is installed. 72 71 Fasten the turret rafters to the turret center block. Construction Manual Fasten in the order they are numbered. © 2007-2008 Little Cottage Co.
Sara’s Victorian Mansion 74 73 This is how the turret will look once it is assembled. 75 76 Install gusset on the other side. Assemble trusses for the bayside window part of the house. Be sure to keep the top even. Use black screws for this. Be sure to fasten the correct tops together. 78 77 Assemble trusses for the turret side of the house. Construction Manual Fasten truss in premarked spots. This shows the truss being fastened to the side of panel I. © 2007-2008 Little Cottage Co.
Sara’s Victorian Mansion 80 79 This shows the broad section of truss installation. Continue installing trusses in premarked spots. 81 82 Fasten trusses underneath through the 2x6 as shown. Assemble T-bar for the bayside. 84 83 For the 10x18 Mansion you will add 4 angled pieces to hold the roof as shown in pictures number 85 & 86. In the 8x16 this roof sheeting is held by a Vchannel roof brace. Construction Manual Install rear truss onto T-bar, in premarked spots. © 2007-2008 Little Cottage Co.
Sara’s Victorian Mansion 85 86 87 88 This shows how the truss will look when fastening to the top of teh turret. Install turret trusses that were previously assembled. 90 89 Assembled the turret T-bar. Construction Manual Install the turret T-bar and rear truss. © 2007-2008 Little Cottage Co.
Sara’s Victorian Mansion 92 91 Install Panel U, the porch deck as shown. 93 Fasten the deck as shown. 94 This shows the preplaced piece on which the porch roof will rest. 96 95 Set the Porch roof panel V in place. Construction Manual This shows how the porch roof fits on top. © 2007-2008 Little Cottage Co.
Sara’s Victorian Mansion 98 97 Fasten the back side. The top back of the porch will match up to the premarked spots. 99 100 Assemble panels W and X together. Install these on the porch roof. 102 101 Fasten siding in the back side. Construction Manual Fasten the sheeting to these pieces. © 2007-2008 Little Cottage Co.
Sara’s Victorian Mansion 104 103 Install the first piece of sheeting on the bayside. Refer to sheeting exhibit for sizes. make sure the truss measurements on the top match what was premarked on the bottom. 105 Note how there is a small gap between the sheeting and the 2x2. 106 Start sheeting turret as shown. Continue this all the way around the turret. 108 107 Install this piece. Construction Manual This shows an inside out view of the piece.
Sara’s Victorian Mansion 110 109 Install oblong sheet. install back piece. 111 112 Fasten small OSB strip along the bottom backside of the turret side. Install this sheet of OSB. Make sure the truss measurements at the top match those at the bottom. 114 113 Install the next piece of sheeting. Construction Manual Install small strip of OSB on the front above porch. © 2007-2008 Little Cottage Co.
Sara’s Victorian Mansion 116 115 Install this small sheet. Install sheet above this small strip. 117 118 Install this sheet on the bay window side Install sheet above this. 120 119 Hold V-channel into place. The 10x18 will have 4 additional braces for the roof (it is a larger roof). Construction Manual While someone is holding them in place fasten them with 1.25” black headed screws. Do this with all 4 sizes of V-channel. © 2007-2008 Little Cottage Co.
Sara’s Victorian Mansion 122 121 Remove braces since walls are now stabilized with the trusses and sheeting. Now fasten the loft underneath all the way around. 124 123 Install loft railing. Be sure to add plenty of screws to hold in place. Fasten the railing at the top as shown. 126 125 Fasten the 2x6 in between the trusses, keep to the top toward gusset. Fasten the loft railing post onto the 2x6 and the railing. Construction Manual © 2007-2008 Little Cottage Co.
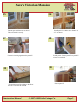
Sara’s Victorian Mansion 127 128 Install dripedge all around the edge of the building. Note the hand is resting on the dripedge. Install the loft ladder. 130 129 Next place starter strip of shingles. (refer to shingle package on how to cut). You basically cut off teh tabs and use the back side of a shingle. Place piece of flashing #1 as shown. 132 131 Run several courses of shingles. Next place ice guard as shown. take off backing and stick in place.
Sara’s Victorian Mansion 133 134 Install shingles over these. Leave small place between shingles so that water is not trapped. Continue fastening shingles. 136 135 Snap a chalk line down the center of each valley. Place shingles in this area to fit. Continue installing shingles from either side. 138 137 Shingles all the way sround the turret. Construction Manual © 2007-2008 Little Cottage Co.
Sara’s Victorian Mansion 139 140 Place starter strip on bay window side. Place piece of flashing #3 as shown and place starter strip over it. 142 141 Fasten two courses of shingles over this. Allow shingles to go over the valley. 144 143 Place flashing piece #4 in place. Construction Manual Shingle over the flashing. © 2007-2008 Little Cottage Co.
Sara’s Victorian Mansion 145 146 Continue with shingles. Continue on both bay window and turret side. 148 147 Fasten flashing #6 Place and fasten flashing #5 on porch roof by turret side. 150 149 Fasten flashing #7 Construction Manual Place starter strip. © 2007-2008 Little Cottage Co.
Sara’s Victorian Mansion 151 152 Fit shingle around teh corner. Run shingles to the top. Snap chalk line down the center of the valley. Install shingles on dormer (cut to fit). 154 153 Cut some ridge caps for porch dormer. We recommend cutting them to 8” size so that they look the right size for the roof. 155 Fasten ridge cap to top as shown in these 3 pictures. 156 Place starter strip and fasten shingles on bay window side. Install all the way to the top.
Sara’s Victorian Mansion 157 158 Install shingles on back turret side. Run shingles up the small side over teh valley. Then chalk the center and cut long side shingles to match. 160 159 Cut shingle to fit over. Note using the hook knife. Continue installing and cutting ridge cap to fit. 162 161 This shows another piece. Construction Manual Cut a piece like this to go out to the other ridge line. © 2007-2008 Little Cottage Co.
Sara’s Victorian Mansion 163 164 Continue this all the way through turret side. You will again have another ridgeline going out to the turret. Take this out only halfway to the turret Place this piece as shown. 166 165 Place a cap on top of the turret. We recommend that you apply some caulk in any gaps. Cut ridgecap 6” for the turret. The smaller size will give it teh correct dimensions. Take these all the way to teh top.
Sara’s Victorian Mansion 169 170 When you reach teh middle you may have to trim it a little bit to fit in. Use a leftover piece of shingle tab to cover this center. 172 171 Fasten trim pieces as marked. Do this all around the building. Caulk the gaps in the bay window and turret sides. 173 174 Fasten trim pieces beside adult door. Construction Manual © 2007-2008 Little Cottage Co.
Sara’s Victorian Mansion Install adult doors. Be sure to center in between top and bottom. 175 176 Install door latch. 178 177 Fasten 3 door latches (one goes on the inside of the top door). Install turner knob to close the door. Fasten 2x4 for door and fasten barrel bolts on top and bottom. Draw a circle where the bolt will slide into. Drill a hole for it to go into. 180 179 Fasten gingerbread trim and trim around the side of teh porch.
Sara’s Victorian Mansion 181 182 Install the large fancy trim in the gable of teh bay window side. Install 2 smaller pieces on either side. 184 183 Install trim on the backside of teh turret, Also note the small trim piece that is covering teh flashing by the shingles. (you had to remove it to install the flashing). Install 3 toppers as shwon. 185 fasten teh trim on the back and sides of teh porch dormer. Construction Manual © 2007-2008 Little Cottage Co.
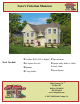
Sara’s Victorian Mansion Your Finished Product!!! Thank You for purchasing from Little Cottage Co. we know you will enjoy your playhouse for years to come! Construction Manual © 2007-2008 Little Cottage Co.