
Use and Care Manual

Need additional help? Visit www.littlegiantladders.com or call Customer Care at 1-800-453-1192
©2012 Little Giant Ladder Systems 56456 v1 4.12
Palm Button
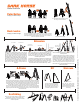
Change your ladder's shape.
LADDER OPERATION
Rock Locks
™
A-Frame
Scaffolding
90˚ Staircase
Extension
Change your ladder's height.
Push the Palm Buttons in to release the hinge locks. The Palm Buttons allow the ladder to change
from storage, A-frame to extension.
Adjust to the desired height.
The Rock Locks adjust the height of ladder. Push in on the bottom of the Rock
Lock to open, tap the Rock Lock to close. Unlock only one Rock Lock at a time
while supporting the inner ladder assembly with one hand. Do not unlock the
Rock Lock if anyone is on the ladder.
Begin from the small A-frame position. Stand to one side of the ladder; unlock both Rock Locks
on one outer section. When extending the ladder your hands must always be on the outside of
the outer section. Place one hand on the palm button and push the inner section away from you
to extend the height. Once you have reached the desired height; line up the inner ladder and
the outer ladder rungs, place your hand under the rungs then lock both Rock Locks.
Next, unlock the Rock Locks on the opposite outer section. Place one hand on the palm button
and push up on the inner section to extend the height. Once you have reached the desired
height; line up the inner ladder and the outer ladder rungs, place your hand under the rungs then
lock both Rock Locks.
From the tall A-frame position reduce
the height on one side of the ladder by
one foot. Make sure the ladder is on a
flat level surface and the short side of
the ladder is against a secure wall.
Start from the small A-frame
position, lengthen the down side
of the ladder to the desired height.
Ensure the ladder rungs are level
before using.
Remove the outer sections. Attach the trestle brackets
(sold separately). Insert the plank at desired height.
Do not stand on the plank above 3 feet. Never use either
trestle as a stepladder.
Starting from the small A-frame position; open and lock
your ladder to the extension position and lay the ladder
face up on ground. Unlock the Rock Locks and extend the
top outer section first; the top outer section must be fully
extended before the lower outer section is extended. (If
your ladder has wheels, the wheels must be placed so they
are at the top of the extension.) Once you have extended
the outer sections to the desired height, lock the Rock
Locks. Always double check the two hinge locks and four
Rock Locks to make sure they are fully locked and
engaged.
Lay the ladder down
Adjust the height
with the Rock Locks
Flip the ladder over
Push feet against
the wall
Lift up on the end
with the wheels
Open the ladder
1
1
2
3
75.5˚
4
Next, flip the ladder over to a face-down position. Place the
feet of the ladder against a solid wall to keep the ladder from
moving. Lift the other end of the ladder, and walk the ladder
hand over hand one rung at a time until you are able to lean
the ladder against the wall.
Lift the base of the ladder and carefully move the base away
from the wall until the ladder leans at a 75.5 degree angle.
The distance from the ladder's base to the base of the support
wall must be 1/4 the working length of the ladder; i.e., 1 foot
out from the wall for every 4 feet in ladder height. Ladder
must be extended approximately 3 feet above a roof line
or working surface.
To take the ladder down from the extension position, lift
the base of the ladder and carefully move it to the wall to
brace the feet of the ladder. Slowly walk the ladder down
hand over hand one rung at a time until you are able to lay
the ladder on the ground. Flip the ladder over so it faces
up. Unlock the Rock Locks and telescope each outer
section to the rung nearest to the hinges, then lock the
Rock Locks. Push in the Palm Buttons and return to the
small A-frame position.