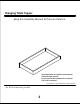
Changing Table Topper Keep this Assembly Manual for future reference. Las traducciones en español se encuentran al final de este manual. Vous trouverez des traductions en français à la fin de ce manuel. This product is not intended for commercial use. Do NOT return this product.
Do NOT return this product! Contact our friendly customer service team first for help.
WARNING FAILURE TO FOLLOW THESE WARNING AND ASSEMBLY INSTRUCTIONS COULD RESULT IN SERIOUS INJURY AND/OR DEATH. READ ALL INSTRUCTIONS BEFORE ASSEMBLING CHANGING TABLE. KEEP INSTRUCTIONS FOR FUTURE USE. FALL HAZARD ‐ TO PREVENT DEATH OR SERIOUS INJURY FROM FALLS, ALWAYS KEEP CHILD WITHIN ARM'S REACH. NEVER LEAVE CHILD UNATTENDED. * This changing table is intended for use with children weighing up to 30 pounds. * This changing table is not intended to be used without a changing pad.
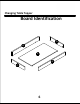
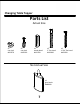
Changing Table Topper Board Identification B A Back Rail Front Rail D C Right Rail Left Rail E Bottom 5
Changing Table Topper Board Identification D B E A C 6
Changing Table Topper Parts List Actual Size x5 cam lock #A22570 x5 cam bolt #A22510 x4 wood dowel #A21790 x5 2" flat head #A23030 Not Actual Size x1 glue bottle #A99040 7 x3 1‐3/4" flat head #A13430
Changing Table Topper Before You Start Read through each step carefully and follow the proper order Separate and count all your parts and hardware Give yourself enough room for the assembly process Have the following tools: Flat Head Screwdriver, Phillips Head Screwdriver and Hammer Cam Lock Fastening System This Cam Lock Fastening System will be used throughout the assembly process.
Changing Table Topper Step 1 Caution: If using a power drill or power screwdriver for screwing, please be aware to slow down and stop when screw is tight. Failure to do so may result in stripping the screw.
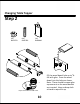
Changing Table Topper Step 2 (x4) #A21790 (x2) #A22570 (x1) #A99040 D C C Quick Assembly Tip Proper orientation of CAM LOCK 10 /D Fill the wood dowel hole up to 1 3 full with glue. Press the wood dowel into the holes as shown. Note: There should be some glue squeeze‐out as the wood dowels are inserted. Keep a damp cloth at hand to wipe this up.
Changing Table Topper Step 3 (x1) #A99040 finished edge borde acabado bord fini D E C UNLOCK LOCK A Apply 3‐4 drops of glue into the wood dowel holes in the Front Rail (A) as shown by the arrows.
Changing Table Topper Step 4 (x5) #A23030 (x1) #A99040 B B D E Apply 3‐4 drops of glue into the wood dowel holes in the Back Rail (B) as shown by the arrows then turn over to fasten to unit.
Changing Table Topper Step 5 (x3) #A13430 D A Rear edge of dresser top. B E C Position the Changing Top onto the dresser and fasten it to the rear edge of the dresser top.
Changing Table Topper MAXIMUM LOADS This unit has been designed to support the maximum loads shown. Exceeding these load limits could cause sagging, instability, product collapse, and/or serious injury. 30 lbs. 13.6 kg. Changing Pad size: 16‐1 2 in. x 32 in. This pad may be up to 1" thick. Warning: Risk of injury to persons ‐ do not place a television on this furniture. This furniture is not approved for use with a television.
Certificate of Conformity 1. This certificate applies to compliance of this product with the CPSC Ban on Lead‐Containing Paint (16 CFR 1303). Certificado de Conformidad 1. Este certificado se aplica a la conformidad de este producto con la prohibición de la CPSC sobre pintura que contiene plomo (16 CFR 1303). Certificat de Conformité 1. Ce certificat s'applique à la conformité de ce produit à l'interdiction de la CSPC relative à la peinture contenant du plomb (16 CFR 1303).
ADVERTENCIA ADVERTENCIA EL INCUMPLIMIENTO DE ESTAS INSTRUCCIONES DE ADVERTENCIA E INSTRUCCIONES DE MONTAJE PUEDE RESULTAR EN LESIONES GRAVES Y / O MUERTE. LEA TODAS LAS INSTRUCCIONES ANTES DE MONTAR LA MESA DE CAMBIO. MANTENGA LAS INSTRUCCIONES PARA USO FUTURO. PELIGRO DE LA CAÍDA ‐ PARA PREVENIR LA MUERTE O LESIONES SERIAS DE LAS CAÍDAS, SIEMPRE GUARDE EL NIÑO DENTRO DEL ALCANCE DEL BRAZO. NUNCA DEJE AL NIÑO SIN TOCAR. * Esta mesa de cambio está diseñada para ser usada con niños que pesan hasta 30 libras.
Mesa De Encima para Cambiar Consejos Útiles (página 3) ‐ Abra su artículo en el área donde usted planea utilizarlo para evitar levantar y moverlo menos ‐ Identificar, ordenar y contar las piezas antes de intentar ensamblar ‐ Las clavijas de compresión se golpean con un martillo ‐ Las diapositivas están marcadas con una R (derecha) y L (izquierda) para la colocación correcta ‐ Asegúrese de que siempre este el punto locaizado en la parte superior de bloqueador de leva este volteadohacia borde exterior ‐ Util
Mesa De Encima para Cambiar Paso 1 PRECAUCIÓN: Si utiliza un taladro o destornillador eléctrico para atornillar, tenga en cuenta para frenar y detener al tornillo esté apretado. No hacerlo puede resultar en remover el tornillo. Paso 2 Llenar 1/3 parte de los agujeros con pegamento donde insertara las clavijas de madera. Presione las clavijas de madera en los agujeros come se muestra en la ilustración. Nota: Habrá pegamento fluyendo hacia fuera mientras que presiona las clavijas de madera en los agujeros.
Mesa De Encima para Cambiar CARGA MAXIMA Esta unidad ha sido diseñada para soportar la carga máxima anotada. El exceder estos límites puede causar inestabilidad, colapsarse y/o causar serias lesiones. 30 lbs. 13.6 kg. Tamaño del cojÍn: 16‐1 2 in. x 32 in. Este cojín puede ser hasta de 1 pulgada de grueso. ADVERTENCIA: Riesgo de lesiones a las personas ‐ no coloque un televisor sobre muebles. Este mueble no está aprobado para su uso con un televisor.
AVERTISSEMENT AVERTISSEMENT LE NON‐RESPECT DE CES INSTRUCTIONS D'AVERTISSEMENT ET D'ASSEMBLAGE PEUT ENTRAÎNER DES BLESSURES GRAVES ET / OU LA MORT. LIRE TOUTES LES INSTRUCTIONS AVANT D'ASSEMBLER LA TABLE À LANGER. CONSERVEZ LES INSTRUCTIONS POUR UNE UTILISATION FUTURE. DANGER DE CHUTE ‐ POUR PRÉVENIR LA MORT OU LES BLESSURES GRAVES DES CHUTES, TOUJOURS GARDER L'ENFANT DANS LA PORTÉE DU BRAS. NE LAISSEZ JAMAIS L' ENFANT SANS SURVEILLANCE.
Dessus de table à langer Astuces Utiles (page 3) ‐Ouvrez votre article dans la zone que vous prévoyez de le garder pour moins de levage lourd ‐Identifier, trier et compter les pièces avant d'essayer d'assembler ‐Les goujons de compression sont taraudés avec un Marteau ‐Les glissières sont marquées d'un R (droit) et d'un L (gauche) pour un bon placement ‐Assurez‐vous toujours de faire face la pointe situé sur le haut de la Serrure de Came vers le bord extérieur ‐Utiliser tous les clous fournis pour le pannea
Dessus de table à langer Étape 1 Attention: Si vous utilisez une perçeuse électrique ou un tournevis électrique pour le vissage, s'il vous plaît être conscient pour ralentir et arrêter lorsque la vis est serrée. Le non‐respect de cette consigne peut entraîner le décapage de la vis. Étape 2 Remplir les trous des chevilles en bois jusqu'au tier avec de la colle. Pressez la cheville en bois dans les trous comme montré.
Dessus de table à langer CHARGES MAXIMALES Ce meuble a été conçu pour supporter les charges maximales indiquées. En excédant ces limites de charge, le meuble pourrait devenir instable, s’effondrer, et/ou causer des blessures graves. 30 lbs. 13.6 kg. Format du coussin à langer: 16‐1 2 in. x 32 in. Ce coussin peut avoir jusqu'à 2.54 cm (1 pouce) d'épaisseur. AVERTISSEMENT : Risque de blessure corporelle ‐ ne pas placer une télévision sur ce meuble.