
Instructions / Assembly

www.ihomeangel.com Page: - 3 - / 3
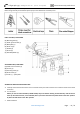
Step A1: Unscrew the knob nuts (H) from back plate(G) then gently remove mounting plate (E).
Step A2: Carefully pass wires from outlet box through mounting plate (E).
By measuring, determine the correct distance of drilling hole for anchor (B) knocked into wall, then drill holes and
gently knock the anchors into wall until them are level to the wall.
Attach the mounting plate (E) to outlet box with mounting screws (C) and wood screws(D).
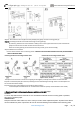
Step A3: Make wire connections
Connect wires as below wires connecting shown. TAKE NOTE OF YOUR WIRE COLOR OF FIXTURE ,NEVER CONNECT
WIRE TO GROUND WIRE
Connect ground wire according to below chart Connect wires according to below chart
Twist plastic wire connector until wires are tightly joined together, carefully tuck all wires into the outlet box
Step A4: Put the back plate (G) to the wall,carefully pass the threaded nipple through holes in the back plate and
secure them with knob nuts(H).
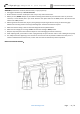
Step A5:Fix the wire lamp shade (K) to the socket (I) with screws (J).
Install bulb (Not included. Please do not exceed the maximum capacity recommended on the socket.)
4. Check everything is installed properly, then you could turn on the light. Enjoy !
CLEANING
To clean, wipe fixture with a soft cloth. Do not use abrasive materials such as scouring pads or powders,
steel wool or abrasive paper.
ORDERING PARTS
Keep this sheet for future reference, and in case you need to order replacement parts. All parts for this fixture
can be ordered from place of purchase. Be sure to use exact wording from illustration when ordering parts.
+1 850 296 2377 Working hours : Mon -
Fri 9:00 a.m. - 16:00 p.m. EST
homecustomercare@outlook.com