
Instructions / Assembly


Weareheretohelp:lampsplaza@outlook.com
Page: ‐3‐/3
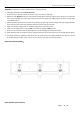
Step3:Makewireconnections
Connectwiresasbelowwiresconnectingshown.TAKENOTEOFYOURWIRECOLOROFFIXTURE,NEVERCONNECT
WIRETOGROUNDWIRE
ConnectgroundwireaccordingtobelowchartConnectwiresaccordingtobelowchart
Twistplasticwireconnectoruntilwiresaretightlyjoinedtogether,wrapeachconnectorwithapprovedelectricaltapeand
carefullytuckallwiresintotheoutletbox
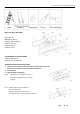
Step4:Putthebackplate(G)onthescrews
andsecurethemwithballnut(H)
Step5:
Installbulb(Notincluded.Pleasedonot
exceedthemaximumcapacityrecommended
onthesocket.)
4.
Checkeverythingalreadyisinstalledproperly,thenyoucouldturnonthelight.
CLEANING
To clean, wipe fixture with a soft cloth. Do not use abrasive materials such as scouring pads or powders, steel
wool or abrasive paper.
ORDERINGPARTS
Keep this sheet for future reference, and in case you need to order replacement parts. All parts for this fixture
can be ordered from place of purchase. Be sure to use exact wording from illustration when ordering parts.