
Use and Care Manual


Installation
5
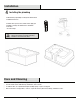
With the countertop positioned upside-down, center the
sink (A) over the cutout.
Firmly press the sink (A) onto the countertop, and immediately
wipe off excess sealant.
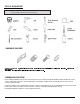
Attach the undermount clips (AA) to the threaded knurl (BB) in
the countertop using the machine screws (CC) and washers
(DD) to hold sink (A) in place.
Allow the sealant to set for 30 minutes before proceeding.
Flip the countertop right-side up, and install it onto the
cabinet.
Mounting the sink
3
A
AA
DD
CC
BB
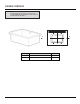
1
Installing the anchors
Using the template (B) as a guide, mark the four hole
locations for the mounting hardware on the countertop.
Using a 5/16 in. diamond bit, drill a 1/2 in. deep hole in
each location.
Clean the holes and apply quick set epoxy.
Place one threaded knurl (BB) into each hole, and allow
to cure for the amount of time required according to the
epoxy manufacturer’s directions.
professional.
NOTE:
It is recommended this be done by a
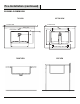
NOTE: It is recommended to practice the proper
positioning two or three times before applying sealant.
Make sure the surface to be sealed is clean, dry, soap free,
oil free, and grease free.
Apply a continuous bead of quality sealant around the top
side of the sink (A) rim near the edge.
A
2
Applying the sealant
BB