
Full Product Manual


ENGLISH
10
9
13
12
9
11
6
7
9
5
8
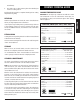
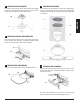
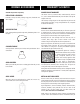
5 ATTACHING THE TOP DAMPER
Once grill is securely seated in the cart, attach the top vent (10). Align
the side notch with the thermometer at the front, and set over the
top opening. Secure with pre-attached bolt, and nut.
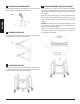
6 INSTALLING THE SIDE SHELF BRACKETS
Attach the 4x table brackets (13) to the ceramic body (9) using the
16x pre-attached bolts with their corresponding washers, locking
washers, and nuts per bracket. Please note the diagram.
7 MOUNTING THE SIDE SHELVES
Insert the 2x table hinges (12) into each of the table brackets (13).
8 POSITIONING THE GRIDS
Add the firebox (8), charcoal plate (7), and the main cooking grid (5)
inside of the ceramic body (9). Please reference the diagram below.
The upper cooking grid (6) can be placed atop the main cooking grid
(5), if required.
9 ATTACHING THE LID HANDLE
Attach the lid handle (11) to the ceramic body (9), use the 2x pre-
attached bolts with their corresponding washers, locking washers,
and nuts per bracket.
The ceramic charcoal barbecue is now ready to use. Please ensure
that unit curing instructions are read thoroughly prior to use.
9
13