
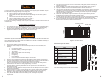
Instructions / Assembly


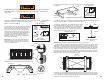
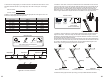

G. Installer #2: Climb into the attic using an appropriate ladder (example: multipurpose, single
ladder or extension ladder). Follow all instructions on this ladder. Access space is tight, so be
careful to not strike or catch anything in the rough opening or to disturb the temporary support
boards.
H. Both installers need to work together to position the attic ladder on the temporary support
boards. When Installer #2 is in the attic and ready to assist, Installer #1 will raise t
he attic ladder
into the rough opening. See Figure 6. Installer #1 must not climb a ladder while lifting the attic
ladder into the rough opening, or they could fall. If the ceiling height or weight of the attic ladder
makes lifting difficult or impractical, secure a rope to the attic ladder. Installer #2 can then assist
by helping raise the attic ladder into the rough opening and placing it on the temporary support
boards.
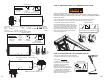
Figure 7.1
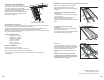
K. Before continuing, Installer #1 will measure the diagonals of t
he alumin
um frame to ensure
the attic ladder is square. Measurements A1 and A2 should match within 1/8”. See Figure 8. If
not, your attic ladder door may not close properly. If measurements do not match, adjust the attic
ladder by moving the footer end side-to-side. This may require repositioning the shims. Be sure
to keep the header / hinge end centered in the rough opening as you square the attic ladder.
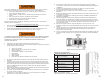
STEP 3: SECURING THE ATTIC LADDER INTO THE ROUGH
OPENING
L. Installer #2: Unfold the 14” metal straps and
bend
them over the adjoining ceiling joists. Screw them in
place with the wood screws (1/4” x 1-1/2) passing
through the 1/4” diameter hole in the metal strap and
into the wood joist. See Figures 9 and 9.1. Be sure
the straps are taught to support the weight of the
attic ladder. DO NOT lift the attic ladder off the
temporary support boards.
Materials needed in the attic:
Wood Screws
1 1/4” (2) pcs
Lag Screws
3” (11) pcs
Washers 1/4”
(6) pcs
Shims
Ladder
Multipurpose
Hex Head
7/16” Wrench
Phillips Head
Screwdriver
Drill and
1/8” drill bit
(Shims and tools not included) (Power tool alternative)
Wood Screws
1 1/4” (2) pcs
Phillips Head
Screwdriver
Materials needed:
(Not included)
(Power tool alternative)
Figure 9 Securing the metal straps
Figure 9.1
Figure 8 Squaring the attic ladder
8
7
NOTE: With the attic ladder positioned
on the temporary support boards, be
sure the plastic bushings are present
and have not moved or fallen out
before proceeding.
Figure 6 Placing the attic ladder into the Rough Opening
I. Installer #2: After the attic ladder is resting on the temporary support boards, push the aluminum
frame firmly against the header board and center it, side-to-side in the rough opening.
J. Installers #1 & #2: Place shims from below and above between the aluminum frame and the
rough opening at the footer end to keep the opposite end (header/hinge end) centered within the
rough opening and tight against the header board. See Figure 7. Shims should provide uniform
support so there is no twisting or bowing of the aluminum frame. Center shims at the (2) footer
bushing locations. See Figure 7.1. Make sure the attic ladder is resting firmly on the temporary
support boards and has not lifted.
Figure 7 Shimming the footer
No gap
Support board “B
No gap
Shim
Support board “B”
Shims
Wood screw
Wood screw
Support board
Metal strap
Aluminum
frame
Shim
A2
A1
A1 = A2
Temporary
support “B”
Temporary
support “A”