
Instructions / Assembly
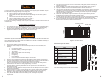
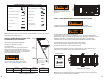


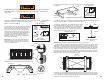
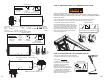
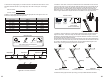
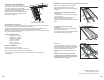
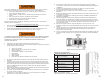

Figure 25
Figure 26
Figure 24 Lubrication points
Figure 27
16
15
ADDITIONAL STEPS / INFORMATION:
1. Trim shims to prepare frame opening for
finishing and to remove catch points and trip hazards.
2. The frame opening can now be finished.
3. Periodically lubricate (spray silicon recommended)
pivot points of the right and left folding arm
mechanisms (power arm assemblies) and every
hinge to provide smooth, long-lasting operation.
Follow arrows in Figure 24.
Recommendation for door paint:
An oil base primer coat should be applied to the door surface with roller or brush. This seals the
door material to avoid possible water damage during painting.
One option is Kilz Brand Oil-base Original Interior Primer. Apply to the entire exterior door
surface to ensure suitable protection and a uniform appearance of the topcoat.
The surface is ready for painting 1 hour after application of the primer. The Kilz primer works with
Alkyd, Oil and Water-based topcoats.
Available replacement parts:
•Aluminum feet - PK1055
•Instalation kit – PK12867
•Bottom section - PK1268
•Power arm - PK1269
•Door pull - PK1070
•Hinges - PK1059
•Springs - PR04200080
ADITIONAL COMMENTS
Why doesn’t my door close properly?
A= Go to step 3 and ensure squareness of the frame.
What if my aluminum foot sections are not flush with the floor?
A= You probably cut the section improperly. Contact Customer Service for assistance
1-800-666-2811
APPENDIX – Framing a rough opening parallel to ceiling height joist
Make a rough opening to the size as required in
Table 3 ensuring that the dimensions of the
diagonals of the frame are the same as illustrated
in Figure 25.
A. For rough opening without joist removal.
See Figure 25.
• Locate headers in front and rear of the opening as
shown in Figure 25.
• Check for squareness by making sure that
diagonal measurements are within 1/8”.
• Secure using three 16d nails into each end of the
header.
B. Rough opening with joist removal.
See Figure 26.
• Install temporary support boards spanning both
sides of joists to be removed.
• Remove joist at length to allow for double headers
to be installed on both ends of opening.
See Figure 27.
• Locate double headers at each end of opening
and secure with three 16d nails into each end of the
headers. Install stringer and check for squareness
by making sure that diagonals are within 1/8”.
Secure using three 4” nails into each end of the
stringer.
CAUTION: Consult an engineer or building
construction expert for installation that require
the removal of roof trusses or rough openings
perpendicular to the ceiling joist.
7765 National Turnpike, Unit 190
Louisville Ladder, KY 40214
Eng / Spanish (F11850-01) R1: 21/OCT/21
Header
Header
Nails
Diagonal
Measurements
54”
Headers
Stringer
Headers
Diagonal
Measurements
Nails
Temporary
Support Boards