
Owner's manual
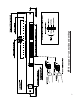
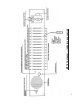
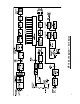
IV. OPERATION: Refer to diagram on next page.
C
heck Power: Verify that the unit is powered (1 of 16 channel selector LEDs on top of front panel
should be lit green).
Set Voltage Levels: The MP16 has 16 (3-position) switches on the rear panel. These switches set the
m
onitor to receive 3 ranges of voltage levels (77 millivolts –20dBu, 775 millivolts–0dBu or 70.7
volts–about +40dBu). To set the switches, remove the lower part of the rear panel (a sub-panel with 2
thumb screws), then use the illustration on the panel as a guide to set the switch for the channel in
question.
Adjust Settings: There is an adjustment screw at the bottom of the front panel for each channel.
Factory setting is: 775 millivolts input and the 0dB indicator just lighting.
When the signal is input, the LED array for that channel should reflect the average level.
Monitoring with Loudspeaker: The on/off switch, channel selection buttons and volume controls are
located on the front panel. To monitor sound with the loudspeaker, use the channel-selection
buttons to select the channel desired. Then turn the speaker on and set the volume, holding the volume
control button down for about 3 seconds to increase/decrease volume.
Monitoring with Headphones: Reduce the volume to the minimum level BEFORE putting on head-
phones. Then gradually increase the volume with the headphones on, holding volume control button
down for about 3 seconds to alter levels. Note: Headphones and loudspeaker can be used together.
Red LED Indicators: If red indicators on an LED array are constantly lit, check to see that the (rear
panel) level switch is correctly set and the incoming signal is not a steady tone or noise. Reset with the
adjustment screw for that channel (bottom front panel), if needed.
4