
Installation & Assembly

Montana Door Assembly and Track Installation
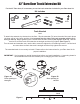
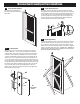
10. Insert Finishing Strips
Re-insert the 2 nishing strips
(E) into the outer channels of the
Door Stile.
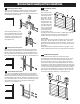
12. Install Safety Spacers
The Safety spacers (W) help to protect the door from being
bumped o of the track. With the door laying at in a safe and
secure position, place one of the two spacers approximately 2”
to the inside of one of the roller brackets. Place slightly o
center towards the front of the door. Using a drill, secure the
spacer with the screw provided. Repeat steps to install the
second spacer inside the other roller bracket.
2
INCH
2
INCH
1-1/2”
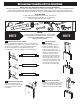
11. Install Handle
Measure up 52” from the bottom of the door and mark that
location. Measure in 1 3/4” in from the edge of the stile and
mark this spot. Drill a hole through the stile at the intersection
of these 2 marks. Place the handle (P) on the door and insert
one of the handle bolts into the top hole in the handle. Put the
washer and nut onto the backside of the door and tighten the
nut. Do not tighten fully at this point. Using a level to make sure
the handle is plumb, mark the location of the bottom hole in the
handle. Move the handle aside and drill the second hole through
the stile. Put the remaining bolt through the hole in the handle.
Put the washer and nut onto the backside of the door and
tighten the nut. Use the wrenches provided to fully tighten the
bolts and secure the handle.
2
INCH
2
INCH
1-1/2”
52”
From Bottom
of Door
1-3/4”
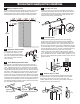
13. Install Optional K
To install the Optional K, take one of the K1 pieces, remove the
adhesive strips and press into place in the top section of the
door. Take one of the K2 pieces, remove the adhesive strips
and press into place in the bottom section of the door. Repeat
steps on the other side of the door. *Please note: Adhesive is
strong so the K will stay in place. Please be sure you would
like the K design before attaching it.
K1
K1
K2
K2
1-3/4”