
Installation & Assembly
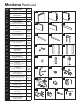
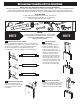

Montana Door Assembly and Track Installation
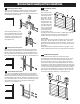
14. Measure Height for Track
In order to determine the proper Height for your Barn Door Track,
add 3” to the height of the door being installed. Locate and
mark this height on the wall (or mounting board) on the side of
the doorjamb where the door would be in the closed position.
15. Determine Track Location
On the same side where you made
your Height mark, measure 4-3/4”
over from the doorjamb and draw a
line so the 2 measurements intersect.
This will be the location of the rst
hole in the Track.
Fig. 6
17.75
INCH
17.75
INCH
17.75
INCH
17.75
INCH
4.75
INCH
H +
3 INCH
Fig. 7
1-1/2”
4-1/2”
2”
2”
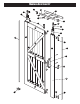
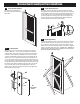
16. Insert Mounting Hardware/Track
Drill pilot hole. Insert lag bolt (X) through the rst track hole,
then place the track spacer (S) through the bolt on back of the
track. Install the lag bolt with ½” socket ratchet. Do not tighten
fully. Swing the track up and use the level to ensure the track is
straight. Mark the remaining holes in the track. Drill the remaining
pilot holes. Slide a stopper (T) onto the track for the end of the
track where you installed the rst bolt, so it is between the rst
and second holes on that end of the track. Make sure the rubber
pieces on the stoppers are facing to the inside for both stoppers.
Install the next bolt and spacer at this end of the track. Install the
remaining bolts and spacers. Go back and fully tighten the rst
bolt. Slide the remaining stopper onto the other end of the track.
Do not set either stopper at this point.
Figure 2A
Masonry Application
Figure 2B
Mounting Board/Stud Application
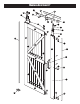
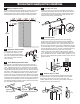
17. Place Door onto Track
Position the door over the opening and slightly tilt the bottom
of the door outward away from the wall. Set the rollers securely
onto the track. Once the door is safely mounted and is secure,
turn the 2 safety spacers 180 degrees towards the wall. This
positions them properly under the track.
18. Install Floor Guide
The Bottom Door guide (V) keeps the door from swinging
outward away from the wall. To locate the proper installation
position in the oor, slide the door into the closed position and
mark the outside edge of the door on the oor. Now place the
door into the open position and mark the inside edge of the door
on the oor. Make sure your guide location is well marked. Make
sure that whether the door is in the open or closed position that
the door NEVER leaves the Door guide. This is the proper
location for the Door guide. Set the width of the oor guide to
1-1/2”. Slide the door out of the way and place the guide on the
oor in between the 2 marks. Pre-drill holes if necessary for your
oor type. Using a drill and the screws provided, secure the Door
guide to the oor. .
2
INCH
2
INCH
1-1/2”
2
INCH
2
INCH
1-1/2”
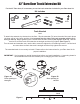
19. Set Door Stops on Track
Move the door to the closed position and slide the Door stop
to desired location. Using the provided Allen wrench, tighten
the screws in the door stop to secure it into place. Then
carefully glide the door into the fully open position and repeat
the steps for the remaining Door stop.
(T)
2
INCH
2
INCH
1-1/2”