LUCCI CLIMATE II DC CEILING FAN ⚫ ⚫ ⚫ ⚫ INSTALLATION OPERATION MAINTENANCE WARRANTY INFORMATION CAUTION READ INSTRUCTIONS CAREFULLY FOR SAFE INSTALLATION AND FAN OPERATION. V1.0 published on 01.
Climate II Installation Instructions CONGRATULATIONS ON YOUR PURCHASE Congratulations on purchasing the latest in energy saving ceiling fans. This fan runs on DC (direct current) power which gives it the benefit of being super energy efficient whilst still maintaining high volume airmovement and silent operation. Energy Saving - The DC motor is the latest technology in fan design. Its highly efficient motor saves up to 65% more energy than ceiling fans with traditional AC motors.
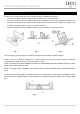
Climate II Installation Instructions PARTS LIST Unpack your fan and check the contents. You should have the following: Fig. 1 A. Mounting bracket x 1 G. B. Fan assembly with hanger cover, down rod, H. Remote transmitter with holder x 1 set (12V 23AE Battery included) Motor screw x 7 canopy cover and canopy x 1 C. Bottom cover x 1 D. Blade x 3 E. F. I. Blade holder kit x 3 Blade fiber x 3 2 |Page J.
Climate II Installation Instructions INSTALLING THE MOUNTING BRACKET If there isn’t an existing outlet box, then install one using the following instructions: • Disconnect the power by removing the fuses or turning off the circuit breakers. • Secure the outlet box (A) (not included) directly to the building structure. Use appropriate fasteners and materials (not included). The outlet box and its bracing must be able to fully support the weight of the moving fan (at least 35 lbs).
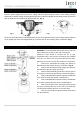
Climate II Installation Instructions HANGING THE FAN Pass the power supply wires (C) from the ceiling outlet box (B) through the center of the ceiling mounting bracket (D). Install the ceiling mounting bracket (D) on the outlet box (B) with the mounting screws (F) provided with the outlet box and washers (E) provided with fan. Fig. 6 Fig. 6 Fig. 7 Lift the fan assembly onto the mounting bracket.
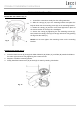
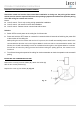
Climate II Installation Instructions FINISHING THE INSTALLATION INSTALLING THE CANOPY (Fig. 9) 1. Tuck all the connections neatly into the ceiling outlet box. 2. Slide the canopy (A) up to the mounting bracket and place the keyhole slots over the mounting screw (D) on the mounting bracket. 3. Rotate the canopy (A) until the screw head (B) locks in place at the narrow section of the key hole. See Fig. 9. 4. Secure the canopy by tightening the two mounting screws (D).
Climate II Installation Instructions LIGHT KIT INSTALLATION (Light kit sold separately) Note: Light kit must be installed by a licensed electrician. NOTE: The light kit is available for selected ceiling fan models and as an optional light kit. 1. Remove the bottom cover from shaft (A). 2. Remove the shrinkable tube (B) from light wires connector (C). 3. For light kit installation, please refer to light kit installation user guide. Fig.
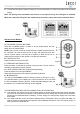
Climate II Installation Instructions USING YOUR CEILING FAN Pairing Transmitter and Receiver – when 2 or more DC ceiling fans are installed in one location When two or more fans are located near each other, you may want to have the receiver/transmitter for each fan set to a different code, so that the operation of one fan does not affect the operation of the other fan/s. The DIP switches for the transmitter (remote hand piece) are located in the battery compartment of the transmitter.
Climate II Installation Instructions ⚫ Turn ON and change the speed of ceiling fan 2 by the transmitter 2 to check the operation and successful pairing. Note: The pairing of the transmitter and receiver is not required if only one ceiling fan is installed. When more than two ceiling fans are installed near each other, please refer to the instruction above. Fig. 12 Remote Control Buttons A - FAN SPEED CONTROL BUTTONS: There are 6 available speeds.
Climate II Installation Instructions REPAIRING THE FAN RECEIVER & REMOTE PAIRING Should the remote and receiver lose control after installation or during use, the pairing of the remote and the receiver must be repaired. Below are the operating symptoms and method to repair the pairing of the DC ceiling fan remote and receiver.
Climate II Installation Instructions AFTER INSTALLATION WOBBLE: NOTE: ceiling fans tend to move during operation due to the fact that they are mounted on a rubber grommet. If the fan was mounted rigidly to the ceiling it would cause excessive vibration. Movement of a few centimetres is quite acceptable and DOES NOT suggest any problem. TO REDUCE THE FAN WOBBLE: Please check that all screws which fix the mounting bracket and down rod are secure.
Climate II Installation Instructions ENHORABUENA POR SU ADQUISICIÓN Enhorabuena por la compra de lo último en ventiladores de techo de bajo consumo. Este ventilador utiliza una corriente CC (corriente continua) para conseguir un gran ahorro de energía y proporcionar un elevado volumen de desplazamiento de aire y una operación silenciosa. Ahorro de energía - El motor CC incorpora la última tecnología en diseño de ventiladores.
Climate II Installation Instructions legislación de la FCC. Estos límites están diseñados para proporcionar una protección razonable contra interferencias en instalaciones residenciales. Este aparato genera, usa y puede irradiar energía en forma de radiofrecuencia. En caso de no ser instalado y utilizado de acuerdo con las instrucciones, podría causar interferencias en las comunicaciones de radio. LISTA DE PIEZAS Desembale el ventilador y compruebe el contenido. Debería incluirse lo siguiente: Img. 1 A.
Climate II Installation Instructions INSTALACIÓN DEL SOPORTE MURAL Si no hay una caja eléctrica ya instalada, instale una siguiendo estas instrucciones: • Corte la corriente quitando los fusibles o bajando los disyuntores. • Asegure la caja eléctrica (A) (no incluida) directamente a la estructura del edifico. Utilice los elementos y materiales de fijación apropiados (no incluidos). La caja eléctrica y su apuntalamiento deben ser capaces de soportar el peso del ventilador en movimiento (15,9 kg como mínimo).
Climate II Installation Instructions CÓMO COLGAR EL VENTILADOR Pase los cables de la corriente (C) de la caja eléctrica (B) por el centro del soporte del ventilador (D). Instale el soporte del ventilador (D) a la caja eléctrica (B) con los tornillos (F) incluidos con la caja eléctrica y las arandelas (E) incluidas con el ventilador. Img. 6 Img. 6 Img. 7 Levante el conjunto del ventilador y cuélguelo en el soporte del ventilador.
Climate II Installation Instructions CÓMO FINALIZAR LA INSTALACIÓN 1. Empaque todas las conexiones con cuidado en la caja eléctrica del techo. 2. Inserte el florón (A) hasta el soporte del ventilador y pase los tornillos (D) del soporte del ventilador por los orificios de llave. 3. Gire el florón (A) hasta que la cabeza del tornillo (B) llegue al tope de la sección más estrecha del orificio de llave (ver Img. 9). 4. Asegure el florón apretando los dos tornillos (D).
Climate II Installation Instructions INSTALACIÓN DEL KIT DE LUZ (el kit de luz se vende por separado) Nota: El kit de luz debe ser instalado por un electricista acreditado. NOTA: El kit de luz está disponible para algunos modelos de ventiladores de techo y es un kit opcional. 1. Retire la cubierta inferior del eje (A). 2. Retire el tubo retráctil (B) del conector de los cables de la luz (C). 3. Para la instalación del kit de luz, consulte el manual de instalación del kit de luz. Img.
Climate II Installation Instructions MODO DE EMPLEO DEL VENTILADOR DE TECHO Emparejamiento del transmisor y el receptor - cuando hay dos o más ventiladores de techo CC instalados en un mismo lugar Cuando hay dos o más ventiladores próximos, se recomienda ajustar el transmisor/receptor de cada ventilador con un código diferente, de manera que el funcionamiento de un ventilador no afecte el de otro.
Climate II Installation Instructions ⚫ En los 60 segundos siguientes a la conexión del receptor del ventilador de techo 2 a la corriente, pulse el botón «SET» del transmisor 2 durante 6 segundos. Durante el proceso de emparejamiento del mando a distancia y el receptor del ventilador CC, el ventilador empezará a girar automáticamente en sentido antihorario a sus revoluciones máximas durante 3 minutos.
Climate II Installation Instructions D - BOTÓN DE CONTROL DE LA LUZ: (El kit de luz se vende por separado) Pulse este botón para apagar o encender la luz. Mantenga pulsado el botón para acceder a las funciones de regulación de la luz. E – INTERRUPTOR D/ON El interruptor con el símbolo D/ON controla la función de regulación de las luces.
Climate II Installation Instructions INSTALACIÓN DEL PORTAMANDO Retire la cubierta (A) del portamando (B). Instale el portamando (B) con los dos tornillos (C) suministrados. Vuelva a poner la cubierta (A) en el portamando (B). Img. 15 Img.
Climate II Installation Instructions DESPUÉS DE LA INSTALACIÓN BAMBOLEO: NOTA: Los ventiladores de techo tienden a moverse cuando están funcionando debido a que están montados sobre una arandela de goma. Si el ventilador está montado rígidamente al techo, se podrían generar unas vibraciones excesivas. Unos pocos centímetros de movimiento es bastante aceptable y NO indica que haya un problema.