
Instructions / Assembly


Climate II Installation Instructions
5 | P a g e
FINISHING THE INSTALLATION
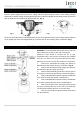
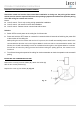
INSTALLING THE CANOPY (Fig. 9)
1. Tuck all the connections neatly into the ceiling outlet box.
2. Slide the canopy (A) up to the mounting bracket and place the
keyhole slots over the mounting screw (D) on the mounting bracket.
3. Rotate the canopy (A) until the screw head (B) locks in place at
the narrow section of the key hole. See Fig. 9.
4. Secure the canopy by tightening the two mounting screws (D).
Now, attach the canopy cover (E) to canopy and secure it by pushing
the lugs into the holes (C).
NOTE: Do not over tighten the mounting screw on the mounting
bracket.
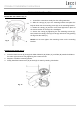
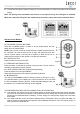
BLADE INSTALLATION (Fig.10)
1. Insert the blade screws (F) through the blade holder kit (D), blade (C), and fiber (B). Attach the blade to
the motor (A) and secure it by tightening the 2 motor screws.
2. Repeat to install the remaining blades.
3. Finally install the bottom cover (E) to shaft (G) of motor by rotating it clockwise.
Fig. 9
Fig. 10