
Specification


4
KTS18 Rev.1 01/2018
Luxier USA
Installation
B
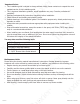
A. Shut o water supply at the valves.
Remove old faucet and clean the
mounting surface for installation of new
faucet.
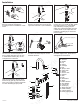
D. Install counter weight (23) onto pull
out hose (12). Connect the pull out
hose to water inlet tube (21). Be sure
to install rubber washer (22). Do not
overtighten the connection.
F. Turn on water supply to check for
leaks at all connection. Remove spray
head from the pull out hose and let the
water run for about 1 minute and check
for leaks. Reattach the spray head.
E1. Apply Teon (TPFE) tape on the shut
o valves. Thread the tape in counter-
clockwise direction.
E2. Use an adjustable wrench to tighten
the water supply hoses, please do not
overtighten the connections.
B. Insert the hoses and shank through
the hole. The faucet hole on the mount-
ing surface should be 1 1/2” in diameter.
23
12
12
21
22
D
E1
Flexible water supply line
E2
F
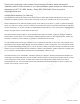
01. Temperature Indicator
02. Setscrew
03. Handle
04. Cap
05. Bonnet
06. Cartridge
07. Seat
08. Sprayer Head
09. Check Valve
10. Washer
11. Pull out Hose
12. Retainer
13. Neck
14. Body
15. EVA Washer
16. Shank
17. Rubber Washer
18. Steel Washer
19. Locking Nut
20. Screws (x2)
21. Water Inlet Tube
22. Rubber Washer
23. Counter Weight
24. Water Supply Hoses
A
16
17
19
18
20
C
C. Remove the 2 screws (20) from lock-
ing nut (19). From under the sink, install
the rubber washer (17), steel washer
(18) and locking nut (19) onto the
shank (16) Tighten the locking nut with
a basin wrench or the socket tool and
install the 2 screws (20) to secure the
faucet in place.
01
02
03
04
05
06
07
08
09
10
11
12
13
14
15
16
17
19
18
20
21
22
23
24