
Use and Care Manual


Luxier Vessel Sink Rev.1 0920162
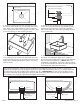
3. Attach the pop up drain to the ceramic sink as
shown. It is recommended to use plumber’s putty
with the silicon gaskets to prevent any possible
water leak. Make sure the drain is properly secured
to the vessel sink.
4. Place the assembled vessel sink through the 3
1/2” opening on the counter top and check for level
and t. Plumber’s putty can be used to level the sink.
Apply silicon adhesive around the bottom rim of the
sink as shown.
The following diagrams shows 2 typical installations with dierent types of pop-up drains. Vessel sinks
without an overow can only be paired with pop-up drains without overow (see Fig. A.) Vessel sinks with
overow must use pop-up drains with overow (Fig. B.) (*IMPORTANT: Do not secure the drain to the
sink and countertop at the same time. Doing so will cause water leak under the sink and damages to the
surrounding area. Consult a professional installer if necessary.)
5. Install the sink and connect P-trap to the drain
and check for alignment. Apply some caulking
around the base of the sink to seal any gap between
the sink and the countertop. (*NOTE: After the
installation is completed. Turn on the faucet and let
it run for few minutes and check for leaks around the
sink above and under the countertop.)
2. Once the placement has been determined. Mark
the center of the drain hole and set aside the vessel
sink. Draw a 3 1/2 inch diameter circle around the
center of the drain hole. Use a jigsaw or a power tool
to cut the opening on the mounting surface.
2.
Cutout Hole 3 1/2”
Minimum clearance
Countertop
Backsplash
vessel sink
Install the drain with plumber’s
putty and the silicon gaskets
Locking Nut
Tail Pipe
3.
4.
Backsplash
Countertop
5.
vessel sink
counter top
supporting plywood
tail pipe
drain body
brass locking nut
silicon gasket
3 1/2”
Vessel Sink / Drain Installation (non-overow)
Fig. A
vessel sink
silicon gasket
tail pipe
overow
overow
channel
brass locking nut
3 1/2”
Vessel Sink / Drain Installation (overow)
counter top
supporting plywood
Fig. B