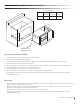
MAKE THE MOST OF YOUR L30WD-1 (Pictured) L42CC-1 Warming Drawer / Warming Drawer Cabinet CARE & USE/INSTALLATION LCS30 COCKTAIL STATION CARE & USE/INSTALLATION | 1
Important Safety Instructions WARNING: Read this manual carefully and completely before using your warming drawer to reduce the risk of: • Fire • Burn hazard, personal injury, or property damage • Unapproved installation or service This product is designed for indoor or outdoor installation. Improper installation, adjustments, alteration, service or maintenance can cause personal or property damage and may void the warranty.
Electrical Information WARNING: ELECTRICAL GROUNDING 1. 2. 3. 4. 5. 6. 7. 8. 9. 10. Warming drawer must be installed in accordance with the local electric code or, in the absence of local codes, the latest edition of the National Electrical Code ANSI/NFPA No. 70, or the Canadian Electrical Code CGA 1.6b 2005. Use only a Ground Fault Interrupter (GFI) protected circuit with this outdoor appliance. This type of outlet should be installed by a qualified electrician.
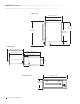
L30WD Dimensions TOP VIEW 21-1/8” (53.7 cm) 20” (50.8cm) 28-1/4” (71.8 cm) 30” (76.2 cm) 23-5/8” (60.0 cm) 4-5/8” (11.7 cm) SIDE VIEW 20-1/2” (52.1 cm) 21-1/8” (53.7 cm) 17-1/2” (44.5 cm) 20” (50.8 cm) 15/16” (0.9 cm) 9-3/4” (24.8 cm) 15/16” (0.9 cm) FRONT VIEW 30” (76.2 cm) 11-1/2” (29.
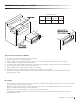
Installing the Warming Drawer - L30WD Cutout Dimensions Model W (Width) H (Height D (Depth) L30WD 28-1/2” 10” 20-1/2” W D 20 ” H 11-1/2” ” 30 Typical Island Installation L30WD-1 1. 2. 3. 4. 5. 6. 7. 8. 9. Provide a 10” x 28 ½” cutout to the front of the island. Provide support beams using metal studs. Pull the drawer out of the drawer casing to gain access on the mounting holder at the front of the casing. Insert the drawer casing into the island opening.
L42CC Dimensions TOP VIEW 26-3/16” (66.5 cm) 24-9/16” (62.4 cm) 41-3/4” (106.0 cm) SIDE VIEW 17-1/2” (44.5 cm) 40-1/8” (101.9 cm) 26-3/16” (66.5 cm) 24-9/16” (62.4 cm) 19” (48.3 cm) FRONT VIEW 41-3/4” (106.0 cm) 11-1/2” (29.2 cm) 21” (53.3 cm) 9-5/16” (23.7 cm) 25-1/2” (64.8 cm) 6 L30WD/L42CC Use/Install Manual 16” (40.
Installing the Warming Drawer w/Cabinet L42CC Cutout Dimensions Model W (Width) H (Height D (Depth) L42CC 40-1/4” 19-3/8” 24-3/4” 24 -1/2 ” 21” D H W ” 3/4 41- 120 V Electric Outlet Needed Typical Island Installation L42CC 1. 2. 3. 4. 5. 6. 7. 8. 9. Provide a 19 3/8” x 40 ¼” cutout to the front of the island. Provide support beams using metal studs. Pull the drawer out of the drawer casing to gain access on the mounting holder at the front of the casing.
Before Using Your Appliance All products are wiped clean with solvents at the factory to remove any visible signs of dirt, oil, and grease which may have remained from the manufacturing process. Before using, clean the drawer thoroughly with hot, soapy water. There may be some burn off and odors on first use of the appliance—this is normal. Temperature Controls The temperature control dial is used to select the temperature of the warming drawer.
Cleaning and Maintenance The Warming Drawer is made of welded stainless steel. It is non-rusting and non-magnetic. 1. 2. 3. 4. 5. Allow the warming drawer and its accessories to cool before cleaning. Remove steam pans and all accessories from the warming drawer. Unplug the warming drawer prior to cleaning. Clean all items including the drawer with a mild cleanser. Scrub dirt with a sponge in the direction of the grain. When cleaning the front panel, always scrub in the direction of the grain.
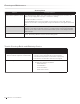
Cleaning and Maintenance Cleaning Chart Material Drawer interior (stainless steel) Recommendations Use dish detergent. Wash, rinse well and dry. For hard water spots or scales, use white vinegar. Apply with a sponge or cloth, rinse, and dry. Heat Discoloration / Corrosion: Clean with BarKeeper’s Friend® sprinked on a wet sponge or wet cloth. Apply to stainless steel surface. Rub gently and evenly in the direction of the grain. Rinse and dry.
Contacting Customer Care Please record the following information and refer to this information when contacting Lynx Customer Care. This information is found on the data plate, which is located on the right rear side panel.
Wiring Schematic White Wire Green to Ground To Heat Coil To Heat Coil NOTE: All Connections Crimped Secure.
Lynx Limited Warranty I. Limited Lifetime Warranty The stainless steel housing is warranted to be free from defects in material and workmanship when subjected to normal domestic use and service for the lifetime of the original purchaser. This warranty excludes surface corrosion, scratches, and discoloration which may occur during regular use. This warranty is limited to the replacement of the defective parts, with the owner paying all other cost including labor. II.
Lynx Common Area Limited Warranty The Lynx Limited Warranty covers residential installations only and is not-transferable to any other party. This ‘nonresidential’ warranty applies when the product is installed in a common area where more than a single party has the rightful access to its use or in locations considered beyond normal residential use such as B&Bs, and private clubs.
L30WD/L42CC Use/Install Manual 15
Lynx Grills, Inc 66201 Hwy 82 East Greenwood, MS 38930 (888) 289-5969 www,lunxgrills.