MOM FRIENDLY. DAD READY.
Shipment Damages L15ICE IF SHIPMENT ARRIVED DAMAGED: 1. VISIBLE LOSS OR DAMAGE: Be certain this is noted on freight bill or express receipt and signed by person making the delivery. 2. FILE CLAIM FOR DAMAGES IMMEDIATELY, regardless of extent of damage. 3. CONCEALED LOSS OR DAMAGE: If damage is unnoticed until merchandise is unpacked, notify transportation company or carrier immediately and file a “concealed damage” claim with them. This should be done within (15) days of date delivery is made to you.
Important Safety Instructions L15ICE WARNING: : Important safety instructions Read this manual carefully and completely before using your ice machine to reduce the risk of: 1. Fire 2. Electric Shock 3. Personal injury or property damage 4. Unapproved installation or service This product is designed for indoor or outdoor installation. Improper installation, adjustment, alteration, service or maintenance can cause personal or property damage and may void the warranty.
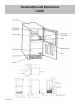
Construction and Dimensions L15ICE Lynx L15ICE 4
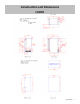
Construction and Dimensions L15ICE Lynx L15ICE 5
Installation Instructions L15ICE Excessive Weight Hazard! Approximately 117 lbs. Use two or more people to move and install your appliance. Failure to do so can result in back or other injury. ALLOW APPLIANCE TO SIT UPRIGHT FOR 24 HOURS BEFORE TURNING ON, TO ALLOW THE COMPRESSOR LUBRICANT TO DRAIN. 1. Remove Packaging Materials 2. Remove tape and glue residue from surfaces before turning on the appliance. Rub a small amount of liquid dish soap over the adhesive with your fingers.
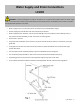
Installation Instructions L15ICE RECOMMENDED GROUNDING METHOD 1. Place the appliance in a dry and regularly ventilated place. Never place the appliance near heat emitting devices (e.g. grills, radiator, water heater or similar devices). 2. Avoid locating the ice machine where dripping is not desirable. 3. The ice machine requires no clearance on either side. But allow enough space at the rear for water supply and drain connections and at least 15” clearance at the front. A 115 Volt, 60 Hz.
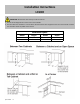
Installation Instructions L15ICE IMPORTANT: Remove the doors from your old ice machine. 1. Do not let the weight of the counter rest on the icemaker. 2. Do not build in the icemaker in a corner where the door will hit other equipment such as an oven handle or where the icemaker cannot be pulled out for service. Installation Space Lynx L15ICE 8 Model Height Width Depth L15ICE 34” (864mm) 15” (381mm) min. 24” (610mm)min.
Water Supply and Drain Connections L15ICE WARNING: To prevent damage to the freezer mechanism, do not operate this icemaker when the water supply is OFF, or if the pressure is below the recommended minimum water pressure of 10 PSIG (0.7 bar). Stop the icemaker until proper water pressure is resumed. Water supply inlet is 1/2” FPT and must be connected only to a potable water supply. A water supply line shut-off valve and drain valve must be installed.
Electrical Connections L15ICE WARNING: THIS APPLIANCE MUST BE GROUNDED. This icemaker requires a ground that meets national and local electrical code requirements. To prevent possible severe electrical shock injury to individuals or extensive damage to equipment, install a proper ground wire to this icemaker. Remove the plug from the electrical outlet before any maintenance, repairs, or cleaning is undertaken. This icemaker must be plugged into a separated power receptacle which has enough capacity.
Cleaning your Icemaker L15ICE Use nonflammable cleaners. Do not use ammonia type cleaners. Complete cleaning should be done at least once a year. More frequent cleaning may be required in some existing water conditions. 1. Unplug appliance or disconnect power. 2. Remove all substances. 3. Wash the inside walls with a solution of mild detergent in warm water or 2 tbsp. (26 mg) baking soda to 1qt (0.95 L) warm water. Alternatively, 5 oz.
Start Up and Storage L15ICE 1) Check that shipping tape(s), string and packing are removed before starting the icemaker. 2) Clean inside the storage bin and door. 3) Open the water supply line shut-off valve and plug in the icemaker. 4) Move the control switch to the ICE” position. Preparing for Long Storage (Winterizing) This should be done when the daily low temperatures fall below freezing. It is best to winterize before the low temperatures begin.
Cleaning and Care Procedures L15ICE The cleaning process will remove lime deposits from the water system. 1) Remove all ice from the evaporator and the storage bin. Note: To remove cubes on the evaporator, move the control switch to the "OFF" position and move it back to the "ICE" position after 3 minutes. The defrost cycle starts and the cubes will be removed from the evaporator. 2) Move the control switch to the "OFF" position. Close the water supply line shut-off valve.
Cleaning and Care Procedures L15ICE 12) Move the control switch to the "WASH" position to circulate clean water for about 5 minutes. 13) Move the control switch to the "OFF" position, then remove the water tank, drain it, and replace it as described in 3) through 6). 14) Repeat 12) and 13) three more times to rinse thoroughly. Sanitizing Solution Dilute 0.5 fl. oz. (14.8 ml or 1 tbs) of 5.25% sodium hypochlorite solution (chlorine bleach) with 1 gallon (3.8 l) of warm water.
Cleaning and Care Procedures L15ICE 7) Spread out the tabs on both sides to unlock the water tank, and pull it out toward you. Soak the water tank in the sanitizing solution for 10 minutes. 8) Lift off the ice chute from the front frame pipe and then from the rear frame pipe. Soak the ice chute in the sanitizing solution for 10 minutes. 9) Pull the discharge tube from the spray assembly. Remove the assembly by pulling it toward you. 10) Remove the two caps.
Cleaning and Care Procedures L15ICE 13) Position and lock the ice chute onto the front and rear frame pipes by pushing the chute down until it clicks onto both pipes. 14) Slide in the water tank along the rails at the bottom of the right and left brackets until it clicks into place. 15) Refit the suction tube onto the water tank inlet by pushing the joint to lock it securely in the direction of the arrows. A loose fitting may cause a water leak.
Cleaning and Care Procedures L15ICE 20) Mix a new batch of the sanitizing solution and slowly pour it into the water tank. 21) Move the control switch to the "WASH" position. 22) After circulating the sanitizing solution for about 15 minutes, move the control switch the "OFF" posi- tion. 23) Disconnect the suction tube by compressing both plastic tabs to unlock the joint in the direction of the black arrows and pulling the tube clear.
Maintenance L15ICE IMPORTANT The icemaker must be maintained individually, referring to the instruction manual and labels provided with the icemaker. 1) Exterior To keep the exterior clean, wipe occasionally with a clean and soft cloth. Use a damp cloth containing a neutral cleaner to wipe off all oil or dirt build-up. 2) Condenser Check the condenser once a year, and clean the coil if required by using a brush or vacuum cleaner.
Service or Assistance L15ICE When calling, please know the purchase date and the complete model and serial number of your appliance. This information will help us to better respond to your request. This information is found on the rating plate located on the back of the refrigerator. The nameplate is located on the inside right hand side panel and contains electrical and refrigeration specification. We reserve the right to make changes in specifications and design without prior notice.
Lynx™ Limited Warranty L15ICE I. Limited One-Year Warranty: Ice Machine shall be free from defects in material and workmanship under normal and proper use and maintenance as specified by Lynx and upon proper installation and start up in accordance with the instruction manual supplied with the product when subjected to normal domestic use and service, for a period of one year after original date of purchase.
Lynx™ Limited Warranty L15ICE III. Limitations & Exclusions: Lynx’s warranty applies only to the original purchaser and may not be transferred. Lynx’s warranty is in lieu of all other warranties, expressed or implied and all other obligation or liabilities related to the sale or use of its products.
Lynx Grills, Inc.
Lynx Grills, Inc. 7300 Flores Street Downey, CA 90242 For more information, please call: MOM FRIENDLY. DAD READY.TM As product improvement is an ongoing process at Lynx, we reserve the right to change specifications and design without notice.