
Installation Instructions
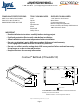

Subject to manufacturing tolerance of [+] or [-] 1/8"
Page 1
= Stud location
RH drain shown—reverse layout for LH drain.
Contour™ Bathtub (CTUxx603219)
6032 CONTOUR ™ STUD LAYOUT. Most standard bathtub walls
will t Lyons Contour™ bathtub
59-7/8”
31-7/8”
56”
20”
19”
16”
35½"
Drain C
L
Floor Cut Out (6" x 10")
60"
10"
6"
8-3/4"
15-11/16"
DO NOT RETURN PRODUCT!
FOR QUESTIONS OR CONCERNS
1-800-458-9036 lyonssupport@lyonsindustries.com
SUPPLIES YOU WILL NEED:
1-5/8" Stainless Steel Screws
Wood Shims
Construction Adhesive
Mortar Compound (Optional)
Drain & Overow Assembly with Extension
100% Silicone for Drain
TOOLS YOU WILL NEED:
Level
Square
Jig Saw
Tape Measure
Pencil
Power Drill
Safety Glasses
COMPLIANCE CERTIFICATIONS:
ANSI Z124.1 AND CAN/CSAB45
CAN/ULC S102.2 FLAME75
SMOKE DEVELOPED485 CODE
1" Flange
IMPORTANT
• Read installation instructions carefully before starting project
• Peel back protective lm to verify color before installation
• Allow bathtub to reach room temperature before installation
• Do not use plumber’s putty. Will cause product failure and void warranty.
Use a highgrade silicone caulk for all necessary locations
• Do not use sulfuric acid to unclog drain. Will cause product failure and void warranty.
Use plunger or snake to clear obstruction.
• Keep instructions for warranty information