
Installation Instructions

Page 2
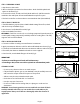
FIGURE 2. Check to assure bathtub is level.
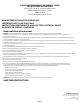
FIGURE 3. Apply construction adhesive to bathtub feet.
(Above oor rough-in feet shown)
FIGURE 4. Shim feet if needed using construction adhesive
to attach shims to bathtub feet and suboor.
FIGURE 5. Run a screw through bathtub ange at each stud
location.
A
Shims
Sub-oor
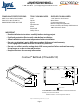
STEP 1. PREPARING ALCOVE
a. Strip alcove to bare studs.
b. Alcove should be constructed as shown above. Studs should be plumb and
square to sub-oor (Fig 1).
c. Floor must be clean, smooth, and level (check with level). Sub oor must be
installed in the stud layout. Do not install bathtub on open oor joists.
d. Cut hole in sub oor as shown above to accommodate drain (Not included).
STEP 2. TRIAL FIT BATHTUB
a. Trial t bathtub in prepared alcove. With bathtub sitting at on oor, check
with level on top of bathtub (Fig 2).
b. Use shims to level bathtub if needed (Fig 4).
c. Remove bathtub from alcove.
OPTIONAL: If sub-oor is not level, use a leveling compound (smooth mortar) or
a similar quick-setting compound specically made for leveling oors. This fully
supports and levels the bathtub.
STEP 3. INSTALLING BATHTUB
a. Connect overow assembly per manufacturer's instructions
b. Apply construction adhesive to all feet and install bathtub into alcove (Fig 3).
c. If needed, level bathtub with shims into construction adhesive under feet (Fig 4).
d. If needed, shim between bathtub and studs to create a tight t.
e. Once leveled, screw bathtub ange to all studs (Fig 5).
IMPORTANT
• Failure to screw ange to all studs will void warranty.
• If installing a door, make sure walls are plumb to accommodate jambs
CLEANING & CARE
• Do not use any abrasive cleaners or metal scrapers.
• If drywall mud or plaster gets on your bathtub, it may be carefully removed
with a wooden scraper made from a piece of scrap wood.
• Adhesive may be removed with mineral spirits.
• Ideal cleaners are Soft Scrub Gel® or Comet Gel®.
• Hair dye may stain. Do not use.
• Do not use sulfuric acid to unclog drain, use plunger or snake to clear
obstruction.
WARNING: Some cleaning products are not suitable for use. Read all labels
carefully. DO NOT USE if they say “not suitable for use with ABS, acrylic,
or polystyrene."Always rinse cleansers thoroughly within ve minutes of
application.
FIGURE 1. Check that studs are plumb with sub-oor/base.