
Specifications


6
Installation and Typical Setup
Your Flying Calf should contain this user manual, a "wall-wart"
power adapter and the Flying Calf unit itself. Please save all
packing materials in case you should ever need to ship the unit.
Plug one end of the provided power adapter into the Flying Calf's
power jack, and the other end into a wall socket or power strip.
Verify that the Flying Calf and any other devices you plan to con-
nect to the Flying Calf are powered off. Now connect your
S/PDIF and analog audio cables to the Flying Calf.
NOTE: For best results, use a good-quality S/PDIF cable. The
cable should be coaxial with 75 ohm impedance. For example, a
good quality video cable has these same characteristics.
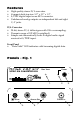
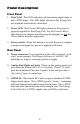
After all connections are made, power up the Flying Calf by
pressing the Power button on its front panel.
IMPORTANT: Before powering up the Flying Calf, turn off or
turn down any amplifiers (or mixers) connected to the Flying
Calf's audio outputs. Since it may take several milliseconds to
acquire and lock onto an S/PDIF signal, the Flying Calf may
emit a slight "pop" sound while powering up.
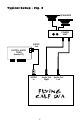
A typical configuration in which a Flying Calf would be used
includes a “Calf”, a PC-based digital I/O card, a mixer and an
amplifier/sound system. Such a configuration could be setup as
follows: 1.) the S/PDIF Out of the digital audio card connects to
the S/PDIF In of the Calf, 2.) the Analog Out of the Calf connects
to the line-level audio inputs of the mixer or amplifier/sound sys-
tem.