Electric Coil & Radiant Ranges www.GEAppliances.ca Safety Information . . . . . . . . . . . 2–5 Owner’s Manual Operating Instructions Coil Top and Radiant Top Models Clock, Timer and Convenience Outlet . . . . . . . . . . . . .15, 16 Controls . . . . . . . . . . . . . . . . . . . . . . . . . 9 - 11 Cookware . . . . . . . . . . . . . . . . . . . . . . . . . . . .7 Oven . . . . . . . . . . . . . . . . . . . . . . . . . . . .12–14 Sabbath Feature . . . . . . . . . . . . . . . .19, 20 Self-Cleaning . . .
WARNING Read all safetyinstructions before using the product Failure to follow these instructionsmayresult in fire, electric shock,serious injuryor death ANTI-TIP DEVICE To reduce the risk of tipping the range, the rangemust be secured bya properlyinstalled anti-tip bracket See installation instructions shipped with the bracket for complete details before attempting to install Operating Instructions Safety Instructions IMPORTANT SAFETY INFORMATION. READ ALL INSTRUCTIONS BEFORE USING.
WARNING GENERAL SAFETY INSTRUCTIONS Use this appliance for its intended purpose as described in thisOwner’sManual. children above a range or on the backguard of a range―children climbing on the range to reach items could be seriouslyinjured. Use onlydrypot holders―moist or damp pot holders on hot surfacesmayresult in burns fromsteam Do not let pot holders touch hot surface units or heating elements Do not use a towel or other bulkycloth in place of pot holders.
WARNING IN THE EVENT OF A FIRE, TAKE THE FOLLOWING STEPS TO PREVENT THE FIRE FROM SPREADING: Do not use water on grease fires Never pick up a flaming pan Turn the controls off Smother a flaming pan on a surface unit by. overing the pan completely. with a well-fitting lid, cookie sheet or flat tray Use a multi-purpose drychemical or foam-type fire extinguisher.
WARNING GEAppliances.
NOTE: Throughout thismanual, features and appearancemay vary fromyourmodel. About the Radiant Surface Units SURFACE COOKING WARNING: The surface units are automatically disabled during the self-clean cycle. Make sure that all surface unit controls are turned off at all times during the self-clean cycle. Any surface unit that is set to an on position, Never cook directly on the glass. Always use cookware.
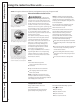
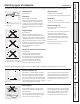
GEAppliances.ca The following information will help you choose cookware which will give good performance on glass cooktops. Stainless Steel: Glass-Ceramic: recommended usable, but not recommended Poor performance. May scratch the surface. Aluminum: Stoneware: Copper Bottom: Make sure the canner is flat on the bottom. Home Canning Tips: Be sure the canner is centered over the surface unit. Use recipes and procedures from reputable sources.
Throughout this manual, features and appearance may vary from your model. How to Set Min Operating Instructions Safety Instructions Using the surface units. Max Push the knob in and turn in either direction to the setting you want. At both OFF and Max the control clicks into position. You may hear slight clicking sounds during cooking, indicating the control is keeping the power level you set. Be sure you turn the control knob to OFF when you finish cooking.
GEAppliances.ca Throughout this manual, features and appearance may vary from your model. Safety Instructions Using the oven controls. Operating Instructions Control Graphics for JCBS250, JCBS280, JCBS630 & JCBS640 Models. Care and Cleaning Troubleshooting Tips Control Graphics for JCBP240, JCBP250, JCBP620 & JCBP630 Models.
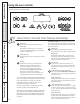
Control Graphics for JCBP270 Model. Operating Instructions Safety Instructions Using the oven controls. Oven Control, Clock and Timer Features and Settings Care and Cleaning BAKE Pad Touch this pad to select the bake function. BAKE Light Flashes while in edit mode―you can change the oven temperature at this point. Glows when the oven is in bake mode. Troubleshooting Tips START/ON Pad Touch this pad to select the timer feature. Then touch the + and – pads to adjust the timer.
GEAppliances.ca Oven Control, Clock and Timer Features and Settings OFF Pad This lights anytime the oven has been programmed using the COOK TIME or START TIME functions. Touch this pad to cancel ALL oven operations except the clock and timer. OVEN LIGHT or BROIL Pad Pad Touch this pad to turn the oven light on or off. Touch this pad to select the broil function. – Pad BROIL Light Short taps to this pad will decrease the time or temperature by small amounts.
Safety Instructions Operating Instructions Before you begin… The racks have stops, so that when placed correctly on the supports, they will stop before coming completely out, and will not tilt. When placing and removing cookware, pull the rack out until it stops. To remove a rack, pull it toward you, tilt the front end up and pull it out. The oven has5 rack positions. It also has a special lower rack position (R) for extra large items, such as a large turkey.
Preheating and Pan Placement Preheat the oven if the recipe calls for it. To preheat, set the oven at the correct temperature. Preheating is necessary for good results when baking cakes, cookies, pastry and breads. The control will beep when the oven is preheated and the display will show your set temperature. This will take approximately 15–20 minutes. Aluminum Foil Do not use aluminun foil on the bottom of the oven.
Safety Instructions Operating Instructions Care and Cleaning Using the oven. Broiling Guide The size, weight, thickness, starting temperature and your preference of doneness will affect broiling times. This guide is based on meats at refrigerator temperature. † The U.S. Department of Agriculture says “Rare beef is popular, but you should know that cooking it to only 60 °C (140 °F). means some food poisoning organisms may survive.” (Source. Safe Food Book. Your Kitchen Guide. USDA Rev. June 1985.
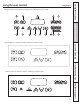
GEAppliances.ca Not all features are on all models. To Set the Clock The clock must be set to the correct time of day for the automatic oven timing functions to work properly. The time of day cannot be changed during a timed baking or self-cleaning cycle. Touch the + or – pads. Make sure the clock is set to the correct time of day. To check the time of day when the display is showing other information, simply touch the CLOCK pad. The time of day shows until another pad is touched.
Not all features are on all models. To Reset the Timer If the display is still showing the time remaining, you may change it by touching the TIMER pad, then touch the + or – pads until the time you want appears in the display. Operating Instructions Safety Instructions Using the clock, timer and convenience outlet.
GEAppliances.ca Do not lock the oven door with the latch during timed cooking. The latch is used for self-cleaning only. NOTE: Foods that spoil easily—such as milk, eggs, fish, stuffings, poultry and pork—should not be allowed to sit for more than 1 hour before or after cooking. Room temperature promotes the growth of harmful bacteria. Be sure that the oven light is off because heat from the bulb will speed harmful bacteria growth. How to Set an Immediate Start and Automatic Stop Touch the BAKE pad.
Safety Instructions Your new touch pad control has additional features that you may choose to use. The following are the features and how you may activate them. The special feature modes can only be activated while the display is showing the time of day. They remain in the control’s memory until the steps are repeated. When the display shows your choice, touch the START/ON pad. The special features will remain in memory after a power failure.
(Designed for use on the Jewish Sabbath and Holidays) GEAppliances.ca The Sabbath feature can be used for baking/roasting only. It cannot be used for broiling, self-cleaning or Delay Start cooking. NOTE: The oven light comes on automatically (on some models) when the door is opened and goes off when the door is closed. The bulb may be removed. See the Oven Light Replacement section. On models with a light switch on the control panel, the oven light may be turned on and left on.
(Designed for use on the Jewish Sabbath and Holidays) How to Exit the Sabbath Feature Touch the OFF pad. + If the oven is cooking, wait for a random delay period of approximately 30 seconds to 1 minute, until only ⊃ is in the display. Touch and hold both the BAKE and BROIL pads, at the same time, until the display shows SF. Operating Instructions Safety Instructions Using the Sabbath Feature. (on some models) Tap the CLOCK pad until ON or OFF appears in the display.
GEAppliances.ca To Adjust the Thermostat + Touch the BAKE and BROIL pads at the same time for 2 seconds until the display shows SF. Touch the BAKE pad. A two-digit number shows in the display. NOTE: This adjustment will not affect the broiling or self-cleaning temperatures. It will be retained in memory after a power failure. Operating Instructions The oven temperature can be adjusted up to (+) 17,5°C (35°F) hotter or (–) 17,5°C (35°F) cooler.
Safety Instructions Never force the latch handle. Forcing the handle will damage the door lock mechanism. The oven door must be closed and all controls set correctly for the cycle to work properly. Before a Clean Cycle For the first self-clean cycle, we recommend venting your kitchen with an open window or using a ventilation fan or hood. Remove the racks, broiler pan, broiler grid, all cookware and any aluminum foil from the oven. Wipe up heavy soil on the oven bottom.
The oven door must be closed and all controls set correctly for the cycle to work properly. How to Delay the Start of Cleaning You can set the oven control to delay-start the oven, clean for a specific length of time and then turn off automatically. Make sure the clock shows the correct time of day. Latch the door. NOTE: Never force the latch. If the oven is too hot, you will not be able to slide the latch. Allow the oven to cool. Touch the CLEAN pad. Touch the + or – pads to set the Clean Time.
Safety Instructions Care and cleaning of the range. Be sure electrical power is off and all surfaces are cool before cleaning any part of the range. If your range is removed for cleaning, servicing or any reason, be sure the anti-tip device is re-engaged properly when the range is replaced. Failure to take this precaution could result in tipping of the range and cause injury.
Safety Instructions GEAppliances.ca GEAppliances.ca Lift-Off Oven Door (on some models) The door is very heavy. Be careful when removing and lifting the door. Do not lift the door by the handle. To remove the door: Slot Pull hinge locks down to unlock. Pull the hinge locks down toward the door frame, to the unlocked position. A tool, such as a small flat-blade screwdriver, may be required. Firmly grasp both sides of the door at the top.
Safety Instructions Oven Heating Elements To clean the oven floor, gentlylift the bake element Clean with warm soapywater (on some models) Oven Racks Oven rack All oven racksmaybe cleaned byhand with an abrasive cleaner or steel wool After cleaning, rinse the racks with lean water and drywith a clean cloth Grayporcelain-coated oven racks mayremain in the oven during the self-cleaning cyclewithout being damaged The shiny, silvercolored oven racksmayremain in the oven during the self-cleaning cycle, but
Porcelain Enamel Cooktop (on radiant models) The porcelain enamel finish is sturdy but breakable if misused. This finish is acid-resistant. However, any acidic foods spilled (such as fruit juices, tomato or vinegar) should not be permitted to remain on the finish. If acids spill on the cooktop while it is hot, use a dry paper towel or cloth to wipe it up right away. When the surface has cooled, wash with soap and water. Rinse well.
Oven Vent (on coil models) On glass cooktop models, the oven is vented through an opening at the rear of the cooktop. Never cover the opening with aluminum foil or any other material. On coil cooktop models, the oven is vented through an opening under the right rear surface unit. Operating Instructions Safety Instructions Care and cleaning of the range. Painted Surfaces (on some models) Painted surfaces include the sides of the range and the sides of the door trim.
Safety Instructions Cleaning the glass cooktop. (on radiant models) GEAppliances.ca Normal Daily Use Cleaning ONLY use Ceramic Cooktop Cleaner on the glass cooktop. Other types of cleaners may not be as effective. Shake the cleaning cream well. Apply a few drops of Ceramic Cooktop Cleaner directly to the cooktop. To maintain and protect the surface of your glass cooktop, follow these steps: Use a paper towel for Ceramic Cooktops to clean the entire cooktop surface.
Metal Marks and Scratches Be careful not to slide pots and pans across your cooktop. It will leave metal markings on the cooktop surface. These marks are removable using the Ceramic Cooktop Cleaner with the Cleaning Pad for Ceramic Cooktops. If pots with a thin overlay of aluminum or copper are allowed to boil dry, the overlay may leave black discoloration on the cooktop. This should be removed immediately before heating again or the discoloration may be permanent.
GEAppliances.ca Troubleshooting Tips Save time and money! Review the charts on the following pages first and you may not need to call for service. Problem Improper cookware being used. !Use pans which are flat and match the diameter of the surface unit selected. Surface units do not work properly A fuse in your home may be blown or the circuit breaker tripped. ! Replace the fuse or reset the circuit breaker. Cooktop controls improperly set.
Safety Instructions Before you call for service… Operating Instructions Surface units not functioning properly Troubleshooting Tips Problem Care and Cleaning What To Do The surface units are not plugged in solidly. •With the controls off, check to make sure the surface unit is plugged completely into the receptacle. The surface unit controls improperly set. •Check to see the correct control is set for the surface unit you are using.
Problem • See the Broiling guide. Food being cooked in a hot pan. • Use the broiling pan and grid that came with your range. Make sure it is cool. Aluminum foil used on the broiling pan and grid has not been fitted properly and slit as recommended. • See the Using the oven section. In some areas the power (voltage) may be low. • Preheat the broil element for 10 minutes. • Broil for the longest period of time recommended in the Broiling guide.
Safety Instructions Operating Instructions Care and Cleaning Troubleshooting Tips Consumer Support Before you call for service… Troubleshooting Tips Problem Possible Causes What To Do Oven temperature too hot or too cold Oven thermostat needs adjustment. !See the Adjust the oven !"#$%&'!(!)*('+ to do +&,rself! section. Clock and timer do not work Plug on range is not completely inserted in the electrical outlet. ! Make sure electrical plug is plugged into a live, properly grounded outlet.
Possible Causes What To Do “Burning” or “oily” odor emitting from the oven vent This is normal in a new oven and will disappear in time. • To speed the process, set a self-clean cycle for a minimum of 3 hours. See the Using the self-cleaning oven section. Strong odor An odor from the insulation around the inside of the oven is normal for the first few times the oven is used. • This is temporary.
GEAppliances.com Looking For Something More? You can find these accessories and many more at www.GEAppliances.ca, or call 800.661.1616 (during normal business hours). Have your model number ready. Operating Instructions Safety Instructions Accessories.
Please place in envelope and mail to: Veuillez mettre dans une enveloppe et envoyez à : OWNERSHIP REGISTRATION P.O.
All warranty service provided by our Factory Service Centers, or an authorized Customer Care® technician. To schedule service, call 1.800.561.3344. Please have serial number and model number available when calling for service. Staple your receipt here. Proof of the original purchase date is needed to obtain service under the warranty. For The Period Of: Mabe Will Provide: One Year From the date of the original purchase Any part of the range which fails due to a defect in materials or workmanship.
Consumer Support. GE Appliances Website www.geappliances.ca Have a question or need assistance with your appliance? Visit our Website, www.geappliances.ca, 24 hours a day, any day of the year! Schedule Service 1.800.561.3344 GE repair service is close to you. To arrange service for your GE appliance, all you have to do is call.