OWNER’S MANUAL
CR-X Multimedia Monitors Important Safety Instructions 1. Read these instructions. 19. This apparatus has been equipped with a rocker-style AC mains power switch. This switch is located on the rear panel and should remain readily accessible to the user. 2. Keep these instructions. 20. The MAINS plug or an appliance coupler is used as the disconnect device, so the disconnect device shall remain readily operable. 3. Heed all warnings. 4. Follow all instructions. 21.
Features Important Safety Instructions.....................2 Contents........................................................3 Features.........................................................3 Introduction..................................................4 Getting Started.............................................4 Hookup Diagrams.........................................
CR-X Multimedia Monitors Introduction Getting Started CR-X Series Creative Reference Multimedia Monitors offer studio-quality sound with cosmetics that compliment any desk whether you’re making music, creating content, or just relaxing to your favorite tunes. The sleek design of CR-X features a brushed metal panel and a distinct outline that stands out. We realize that you can’t wait to hook up your CR-X Multimedia Monitors and try them out.
CR3-X / CR4-X / CR5-X Owner’s Manual Hookup Diagrams CR3-X / CR4-X / CR5-X The illustration above shows a typical use for CR-X Series Multimedia Monitors. Everyone needs tunes while working, right... or is it just me? In this example, simply connect the (included) cable from the computer’s 1/8" output jack to the L/R RCA inputs of the powered CR-X Series Multimedia Monitor. If you prefer to use 1/4" inputs or 1/8" stereo input instead of RCA inputs, those options are available, too.
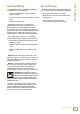
CR-X Multimedia Monitors Hookup Diagrams continued... 2x2 USB AUDIO INTERFACE R L 2.0 CR3-X / CR4-X / CR5-X CR3-X / CR4-X / CR5-X The illustration above shows another use for CR-X Series Multimedia Monitors. Perhaps you’re a home studio musician using your favorite DAW to record. In this example, a pair of 1/4" cables is connected from the audio interface’s output jacks to the 1/4" inputs on the rear panel of the powered CR-X Series Multimedia Monitor.
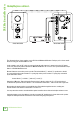
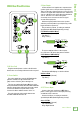
3 3. Signal Inputs 6 3 Connect the line-level signal from a computer, mixer, or other signal source to one pair of these input jacks. There are two types of input connectors to choose from: 1/4" line-level signals driven by balanced or unbalanced sources or RCA line-level signals driven by unbalanced sources. Since these are connected together electrically, do not connect more than one signal at a time to the input jacks.
CR-X Multimedia Monitors 5. Powered Speaker Position Select Switch Here you get to decide if the powered monitor is to be positioned on the left side (switch up) or right side (switch down) of the desk. One convenience is that it keeps the power cord, front and/or rear panel connections from crossing your work space. Additionally, it doesn’t discriminate between right or left-handed users. Simply set it up to suit your preference. 6.
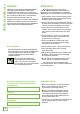
Care and Cleaning Included with the CR-X Series Multimedia Monitors are multiple accessories, including: CR-X Series multimedia monitors will provide many years of reliable service if you follow these guidelines. • 1/8" to stereo RCA cable to connect computer output to speakers • 1/8" to 1/8" cable to connect a smartphone or media player • Speaker-to-speaker cable • Avoid exposing the monitors to moisture. • Avoid exposure to extreme cold (below freezing temperatures).
CR-X Multimedia Monitors Appendix A: Service Information If you think your CR-X Multimedia Monitors have a problem, please check out the following troubleshooting tips and do your best to confirm the problem. Visit the Support section of our website (www.mackie.com/support) where you will find lots of useful information such as FAQs and other documentation. You may find the answer to the problem without having to part with your monitors.
Other Issues • Please email or call Technical Support if you are having any other issue not listed here: o mackie.com/support-contact o 1-800-898-3211 Repair For warranty service, refer to the warranty information on page 15. Non-warranty service is available at a factory-authorized service center. To locate the nearest service center, visit www.mackie.com/support/service-locator.
CR-X Multimedia Monitors Appendix B: Technical Information CR-X Series Specifications Acoustic Performance Frequency Response (–10 dB) Frequency Response (–3 dB) Maximum SPL Peak Per Pair Crossover Frequency Transducers Low Frequency High Frequency Amplifiers Rated Power Design Input / Output Input Type Input Impedance Output Type Power Requirements CR3-X and CR4-X CR5-X 12 CR-X Multimedia Monitors 70 Hz – 20 kHz [CR3-X] 60 Hz – 20 kHz [CR4-X] 50 Hz – 20 kHz [CR5-X] 80 H
Owner’s Manual CR3-X Dimensions DIMENSIONS 5.5 in / 140 mm 7.1 in / 180 mm WEIGHT (per pair) 7.8 lb 3.5 kg 8.1 in 206 mm CR4-X Dimensions DIMENSIONS 6.1 in / 155 mm 8.3 in / 210 mm WEIGHT (per pair) 10.1 lb 4.6 kg 8.9 in 225 mm CR5-X Dimensions DIMENSIONS 6.9 in / 175 mm 9.3 in / 235 mm WEIGHT (per pair) 14.9 lb 6.8 kg 10.
CR-X Multimedia Monitors 2 4 5 1 7 6 3 RCA R RCA L 3.5 INPUT TRS R TRS L AC 100-240V POWER PANEL SWITCHING POWER SUPPLY R L +5V -12V +12V +VCC GND Green OFF POWER SW ON VOLUME VOLUME DC-DC +3.3V L IN R IN ADC SDOUT SCLK LRCK MCLK POWERED SPEAKER POSITION SELECT +3.
Please keep your sales receipt in a safe place. This Limited Product Warranty (“Product Warranty”) is provided by LOUD Audio, LLC (“LOUD”) and is applicable to products purchased in the United States or Canada through a LOUD-authorized reseller or dealer. The Product Warranty will not extend to anyone other than the original purchaser of the product (hereinafter, “Customer,” “you” or “your”). Owner’s Manual Limited Warranty For products purchased outside the U.S. or Canada, please visit www.mackie.
19820 North Creek Parkway #201 Bothell, WA 98011 • USA Phone: 425.487.4333 Toll-free: 800.898.3211 Fax: 425.487.4337 www.mackie.