Thump12 • Thump15 1000W Powered Loudspeakers OWNER’S MANUAL
Thump12 • Thump15 Powered Loudspeakers Important Safety Instructions 1. 2. 3. 4. 5. 6. 7. Read these instructions. Keep these instructions. Heed all warnings. Follow all instructions. Do not use this apparatus near water. Clean only with a dry cloth. Do not block any ventilation openings. Install in accordance with the manufacturer’s instructions. 8. Do not install near any heat sources such as radiators, heat registers, stoves, or other apparatus (including amplifiers) that produce heat. 9.
Features Important Safety Instructions................................... 2 Contents.................................................................. 3 Features.................................................................. 3 Introduction............................................................. 4 How To Use This Manual.......................................... 4 Getting Started........................................................ 4 Things To Remember..............................................
Thump12 • Thump15 Powered Loudspeakers Introduction Getting Started Only Thump Powered Loudspeakers deliver the class-leading, chest-thumping low end you deserve. Each Thump loudspeaker delivers 1000 watts of power, providing the high-output you need in a package that’s tough, lightweight and portable. The following steps will help you set up the loudspeakers quickly. Designed by the world’s leader in portable live sound, Thump loudspeakers offer a 3-band EQ for dialing in the ideal sound.
Owner’s Manual Hookup Diagrams MIC MIC MIC MIC (UNBALANCED) L L TAPE IN TAPE OUT R R 1 LINE HI-Z 2 3/4 5/6 (MONO) BAL / UNBAL LINE IN 2 LINE IN 3 INSERT INSERT LINE IN 4 U U IC GAIN M IC GAIN M LEVEL SET U -20dB +50 +30dB GAIN GAIN LOW CUT 100 Hz -15 +15 U -15 +15 U MID 2.
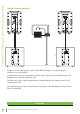
Thump12 • Thump15 Powered Loudspeakers Hookup Diagrams continued... MONITOR OUT USB R 2 L Y X MIC PR E ON BAL /UNBAL 1 Y X MIC PR E ON BAL/UNBAL Perhaps you’re a DJ playing bumpin’ tunes in the middle of the night to a crowd that’s groovin’ and dancin’ to your fine selection. In this example, a laptop is connected to the channel 1 and 2 inputs of an Onyx Blackjack and a set of headphones are connected to the phones jack.
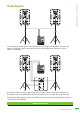
To next Thump loudspeaker input To next Thump loudspeaker input Main Outs Owner’s Manual Hookup Diagrams continued... 1402VLZ4 Mixer To next Thump loudspeaker input Thump loudspeakers may be daisy-chained via the male XLR connector labeled “THRU”. Simply plug the signal source (i.e., mixer output or microphone) into the input jack(s), and patch that loudspeaker’s thru jack to the next loudspeaker’s input jack, and so on, daisy-chaining multiple Thump loudspeakers.
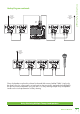
Thump12 • Thump15 Powered Loudspeakers Hookup Diagrams continued... Here’s how to set up a large club system. In this example, the L/R outputs of a DL1608 mixer are connected directly to the channel A inputs of two Thump18S subwoofers. The channel A full range outputs of these two Thump18S subwoofers are connected directly to the channel A inputs of another set of Thump18S subwoofers. Talk about beefy low end...
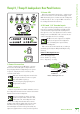
3. Power LED 7 8 9 10 6 3 5 4 11 2 1 1. Power Connection This is a standard 3-prong IEC power connector. Connect the detachable power cord (included in the packaging with the loudspeaker) to the power receptacle, and plug the other end of the power cord into an AC outlet. Make sure that the AC power is matched to the AC power indicated on the rear panel (below the IEC receptacle).
Thump12 • Thump15 Powered Loudspeakers Thump12 / Thump15 Loudspeakers: Rear Panel Features continued... 5. Thru Output 7 8 9 10 6 They are wired as follows, according to standards specified by the AES (Audio Engineering Society): Balanced XLR Output Connector 5 Pin 1 – Shield (ground) Pin 2 – Positive (+ or hot) Pin 3 – Negative (– or cold) 4 SHIELD 11 COLD 3 HOT 1 2 1 3 SHIELD COLD 2 HOT To connect a balanced line to this input, use a 1/4" Tip-Ring-Sleeve (TRS) plug.
However, if the OL LED is blinking frequently or continuously, turn down the level control on the Thump loudspeaker or turn down the signal at its source (e.g., the mixing console) until the OL LED blinks occasionally or not at all. 7. Low EQ This control provides up to 6 dB of boost or cut below 80 Hz and it is also flat at the center position (U). This frequency range represents the punch in bass drums, bass guitar, fat synth patches, and some really serious male singers. 8.
Thump12 • Thump15 Powered Loudspeakers Protection Circuitry Thermal Protection Thump loudspeakers employ a built-in limiter for less distortion at peak levels. A dynamic bass response circuit provides optimal low frequency response regardless of overall output level. Additional protection includes automatic thermal shutdown should the amp overheat. However, with Class-D amp technology, which is highly-efficient, this should never be a problem. All amplifiers produce heat.
If you think your Thump loudspeaker has a problem, please check out the following troubleshooting tips and do your best to confirm the problem. Visit the Support section of our website (www.720trees.com) where you will find lots of useful information such as FAQs and other documentation. You may find the answer to the problem without having to part with your subwoofer. Troubleshooting No power • Our favorite question: Is it plugged in? Make sure the AC outlet is live [check with a tester or lamp].
Thump12 • Thump15 Powered Loudspeakers Appendix B: Connections XLR and 1/4" Combo Input Connector Unbalanced 1/4" TS Input Connector The input on Thump loudspeakers is a combo jack that may accept balanced/unbalanced XLR and 1/4" connections. The input may handle anything from an instrument level to a high-output mic signal. Simply connect an XLR, TRS or TS connector into the channel and adjust the level accordingly. To connect an unbalanced line to this input, use a 1/4" mono (TS) phone plug.
Thump12 / Thump15 Loudspeakers Specifications Acoustic Performance Line Input Power Frequency Range (–10 dB): 50 Hz – 23 kHz [Thump12] 32 Hz – 23 kHz [Thump15] US: 100 – 120 VAC, 50 – 60 Hz 130 watts Frequency Range (–3 dB): 57 Hz – 20 kHz [Thump12] 39 Hz – 20 kHz [Thump15] EU: 220 – 240 VAC, 50 – 60 Hz 130 watts Horizontal Coverage Angle: 90º Vertical Coverage Angle: 60º AC Connector: 3-pin IEC 250 VAC, 10 A male Maximum SPL Peak: Safety Features 12
Thump12 • Thump15 Powered Loudspeakers Thump12 Loudspeaker Dimensions 23.5 in 596 mm WEIGHT 29.0 lb 13.2 kg 23.5 in 596 mm 12.4 in 314 mm 14.5 in 367 mm 6.0 in 152 mm 12.4 in 314 mm Thump15 Loudspeaker Dimensions 27.6 in 702 mm 27.6 in 702 mm 16.8 in 427 mm 15.5 in 394 mm WEIGHT 33.2 lb 15.1 kg 15.5 in 394 mm 5.
Owner’s Manual Thump12 Loudspeaker Frequency Response +10 dB 0 dB –10 dB –20 dB –30 dB 20 100 1000 10000 20000 10000 20000 Frequency (Hz) Thump15 Loudspeaker Frequency Response +10 dB 0 dB –10 dB –20 dB –30 dB 20 100 1000 Frequency (Hz) Owner’s Manual 17
Thump12 • Thump15 Powered Loudspeakers Loop Out XLR Input XLR Level Control 80 LO 100-8K MID 12K HI 3-Band Contour EQ Loudspeaker Processing Loudspeaker Processing Limiter Limiter OL LED Mute Mute Thermal Monitoring Amp Amp Thump12 • Thump15 Powered Loudspeakers LF HF Thump12 / Thump15 Loudspeakers Block Diagram
Please keep your sales receipt in a safe place. This Limited Product Warranty (“Product Warranty”) is provided by LOUD Technologies Inc. (“LOUD”) and is applicable to products purchased in the United States or Canada through a LOUD-authorized reseller or dealer. The Product Warranty will not extend to anyone other than the original purchaser of the product (hereinafter, “Customer,” “you” or “your”). For products purchased outside the U.S. or Canada, please visit www.720trees.
16220 Wood-Red Road NE Woodinville, WA 98072 • USA Phone: 425.487.4333 Toll-free: 800.898.3211 Fax: 425.487.4337 www.720trees.