USER MANUAL M-DVD4000
Contents Safety Precautions.....................................1-2 Settings........................................................ 14 General ................................................... 14 Audio........................................................ 14 Time......................................................... 14 Language................................................. 15 Video......................................................... 15 Volume.................................................
Safety Precautions Thank you for purchasing this product. Please read through these operating instructions so you will know how to operate your model properly. After you’ve finished reading the instructions, keep this manual in a safe place for future reference. Please don't change the fuse on the power cord without professional guidance, using improper fuse may cause damage to this unit or even cause fire. Only connect the unit to a 12-volt power supply with negative grounding.
Safety Precautions 1. Never disassemble or adjust the unit without any professional guidance. For details, please consult any professional car shop / dealer for inquiry. 2. If the front panel or TFT monitor is dirty, please use a clean silicone cloth and neutral detergent to wipe off the spot. Using a rough cloth and non-neutral detergent such as alcohol for cleaning may result in scratching or decoloration to the monitor. 3.
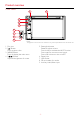
Product overview Front Panel 2 1 3 4 5 6 7 8 9 Notice: The graphic in this manual is for reference only, and may be different from the actual unit. 1. Disc slot 2. [ ] Button Press to eject a disc. 3. [MENU] Button Press to display the main menu 4. [ ] Button Adjust the brightness of screen. 5. Rotary/pushbutton Rotate to adjust volume. Press briefly to activate the MUTE function. Press again to resume normal sound. Press and hold to turn the unit OFF. 6. Reset Hole 7. USB Socket 8.
Remote overview Remote control 1. Power & Mute On/Off 2. Fast forward / Station up 3. 4. Previous / Seek down 5. Play / Pause 6. Stop 7. Fast backward / Station down 8. Preset station (1) 9. Repeat play / Preset station (2) 10. Preset station (5) 11. Preset station (6) 12. Show main menu. 13. Preset station (3) 14. Preset station (4) 15. 16. Adjust volume level. 17. Next / Seek up 18. Scan play / Preset scan Auto memory store (long press) 19. Select tuner band.
Basic Operations Detect parking brake • Connect the cable "BRAKE" to the parking brake switch to view video files on the TFT monitor. Engage the parking brake for viewing videos. • When the parking brake is not engaged, the monitor displays "Warning!!!, Video playback is disabled for your safety. Engage parking brake to watch video.", preventing the driver to watch content while driving. The rear screens are not interested in this inhibition. Mute Press [ VOL/ / ] knob to mute the volume from the unit.
Basic Operations EQ Menu The Audio Control feature allows you to easily adjust your audio system to meet the acoustical characteristics of your vehicle, which vary depending on the type of vehicle and its measurements. Proper setting of the Fader and Balance boosts the effects of the cabin equalizer. Select Preset Equalizer 1. Enter the EQ setup mode Touch the [ ] icon in the user interface and the EQ setup interface will display on the screen. 2.
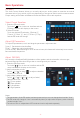
Radio Mode Tuner TFT Display 2 1. Current radio band indicator. 2. Return to home menu. 3. Current station frequency. 4. Preset stations list. 5. Shortcut. 6. Band switch. 7. Seek backward Tune backward(long press) 8. Enter frequency directly. 9. Seek forward Tune forward(long press) 10. Opening the options menu. 1 3 TA 4 5 6 11. Auto searching. 12. Enter EQ menu. 13. To turn On or Off “Clock Time” 14. Choose local or distant seeking mode. 15. To turn On or Off “TA” function. 16.
Radio Mode Preset Station The unit has 5 bands, such as FM1, FM2, FM3, AM1, AM2, and each band can store 6 stations; the unit can store 30 stations in total. Search Stations Automatically ] to search station and store 6 strongest stations in current band automatically. Touch [ Manual Store 1. Tune to a station. 2. Touch one of the channels P1 to P6 to save the select band. Recalling a Station 1. Select a band. 2. Touch an on-screen preset button (P1 to P6) to select the corresponding stored station.
Playback Mode Load a Disc You can play video, audio or images stored on the following discs: • DVD Video, DVD-R, DVD-RW • VCD • Audio CD, CD-R, CD-RW Note:Ensure that the disc contains playable content. Eject a Disc Press the [ ] key on the front panel to eject the disc. When the disc is ejected, the unit switches to the previous source.
Playback Mode DVD movie playback The car sound system can play video DVDs and VCDs. After inserting the DVD, the playback starts automatically. The DVD menu is displayed. You can navigate in the DVD menu by touching the corresponding buttons in the DVD menu on the screen. After starting the movie via the menu of the DVD, the movie is displayed. The playback menu for DVDs is hidden. NOTE: Briefly touch the screen once to display the playback menu again. The playback menu is shown. 1. Shortcut. 2.
Playback Mode Audio playback from DVD/CD, USB or SD After starting a title, the playback menu is displayed. 1. Shortcut. 2. Display the folder/file list. 3. Short press: Previous track. Long press: Fast backward. 4. Pause playback and continue playback. 5. Short press: Next track. Long press: Fast forward. 1 2 3 4 6 7 8 9 5 Tap on [ ] to display additional operating options of the playback menu. 6. Display equalizer. 7. Start and end REPEAT function.
Playback Mode Video playback from DVD/CD, USB or SD Tap on [ ] to display additional operating options of the playback menu. 6. Select playback language. 7. Display equalizer. 8. Start and end REPEAT function. Repeat mode: Repeat One > Repeat Folder > Repeat All >Repeat Off 9. Adjust the brightness, contrast, and saturation. 10. Display keypad to directly enter the number of the desired title. 11. Select playback audio channel.
Bluetooth Mode You can make or receive phone calls with Bluetooth-enabled phones through the unit. You can also listen to music from a Bluetooth-enabled device. Pair the Bluetooth-enabled Devices To connect your Bluetooth device to the unit, you need to pair the device to the unit. Pairing needs only to be done once. You can pair up to five devices. 1. Turn on the Bluetooth function on the device. ] to search for Bluetooth device with the unit. 2. Touch [ 3.
Bluetooth Mode Receive a Call By default, all incoming calls are received automaticaly. 1. If there is an incoming call, the screen will display incoming call number. 2. Touch the screen to select [ ] or [ ]. Speak into the Bluetooth microphone. NOTE: • You can select to receive calls manually by setting [Auto Answer] to [OFF] Adjust Bluetooth Settings In the options menu for Bluetooth, you can make the basic settings for the Bluetooth mode. Touch the [ ] icon. The options menu is displayed.
Settings General Settings 1. Touch [ ], if necessary. 2. Touch to highlight a setting to display/select an option. General Settings Options Radio Region USA/Asia/Japan/Europe/Europe Select one that matches your location. LW/Oirt Description Distance Radio Range Select Local to receive only stations with extremely strong signal. Local Beep On Turn-ON the beep sound. Each time you press a button, the unit beeps. Off Turn-OFF the beep sound. Calibration Start Calibrate the touch screen.
Settings Language Settings 1. Touch [ ]. 2. Touch an option repeatedly to select. Language Settings Description OSD Language Select on-screen display language. DVD Audio Select DVD audio language. Options available depending on DVD disc. DVD Subtitle Select DVD subtitle language. Options available depending on DVD disc. DVD Menu Select DVD menu language. Options available depending on DVD disc. Video Settings 1. Touch [ ]. 2. Touch an option repeatedly to select.
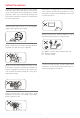
Settings Calibration When the touch operation is not sensitive or valid, you should calibrate the touch screen using the calibration setting function. Adjust the response positions of the touch panel as followings: 1. Touch [ Start ] to enter. 2. Touch [ Cancel ] to exit. 3. Press and hold the center of [ + ] for 2 seconds, the [ + ] will move automatically. 4. Aim at center of [ + ], follow the path as shown in the figure. Once steps 1-5 are complete, touch [ OK ] to exit calibrating mode.
Other Modes Auxiliary inputs Aux 1 Aux 1 is used for playback of audio/video from an external device connected to the unit through a 3.5mm jack located on the front panel. Aux 2 Aux 2 is used for playback of audio/video from an external device connected through RCA connectors located on the back of the unit. You can connect an external audio/video device to the unit. 1. Connect the external device with the supplied AV cable. 2. Touch the upper left corner to display the main menu. 3.
Specifications General Reference Supply Voltage.......................................................................................................... 12V Operating Voltage Range.............................................................................................. 10.5 - 15.8V Max Operating Current.................................................................................................................... 15A Grounding System.................................................................
Specifications Supported Formats: • USB or memory file format: FAT16,FAT32 • Mp3 bit rate(date rate): 32-320 Kbps and variable bit rate • Directory nesting up to a maximum of 8 levels • Number of albums/folders: maximum 99 • Number of tracks/titles: maximum 999 • ID3 tag v2.0 or later • File name in Unicode UTF8(maximum length:128 bytes) Unsupported Formates: • Empty albums:an empty album is an album that does not contain MP3 files,and is not be shown in the display. • Unsupported file formats are skipped.
Troubleshooting What appears to be trouble is not always serious. Please check the following points before calling a service center. Problem Cause Corrective action General Unit can not power on No/low audio output Poor sound quality or distortion Unit resets itself when engine is off Unit fuse blown. Install new fuse with correct rating. Car battery fuse blown. Install new fuse with correct rating. Illegal operation Reset the unit. Improper audio output connection. Check wiring and correct.
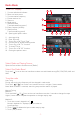
Wire Connections Microphone input MIC Radio Antenna CAMERA IN AV-Input Left GND BRAKE REVERSE AV-Input Rght VIDEO Input GND LINE Output RL GND VIDEO OUT SWC 1 SWC 2 SUB Output 2 LINE Output RR RR+ FR+ FL+ RL+ RR- FR- FL- RL- SUB Output 1 LINE Output FR NC NC LINE Output FL ACC (Ignition) Illumination GND (Ground) BATT (+12Volt) P. Antenna (+12Volt out 100mA) - 22 - NC P.
Declaration of Conformity There are no restrictions of use. The manufacturer Aldinet S.p.A declares that the type of radio equipment - Multimedia Navigation Receiver, model M-DVD4000, brand Macrom - complies with the 2014/53 / EU Directive. The full text of the EU Declaration of conformity is available at the following internet address: www.macrom.it or at Aldinet S.p.A. Viale Colombo, 8 - 20090 Trezzano S/N (MI) Italy Made in China by Aldinet S.p.A.