E nglish ALDINET S.P.A. VIALE C.
Welcome Thank you for buying the Roof Mount LCD Monitor with DVD player. Please read this manual carefully before using the Roof Mount LCD Monitor with DVD player in order to get the most out of all the features and functions. Keep this manual in a safe place, as it can be a valuable tool in helping you to understand all the features and functions. Contents Safety information.........................................................................1 DVD player features ......................................
or servicing of the display by persons without training and experience in electronic equipment and automotive accessories may be dangerous and could expose you to the risk of electric shock or other hazards. Be careful not to drain the car battery while using the unit with the car engine stopped. To avoid draining the battery, it is suggested that the vehicle engine always is running while using the unit. Do not disassemble or alter the unit in any way.
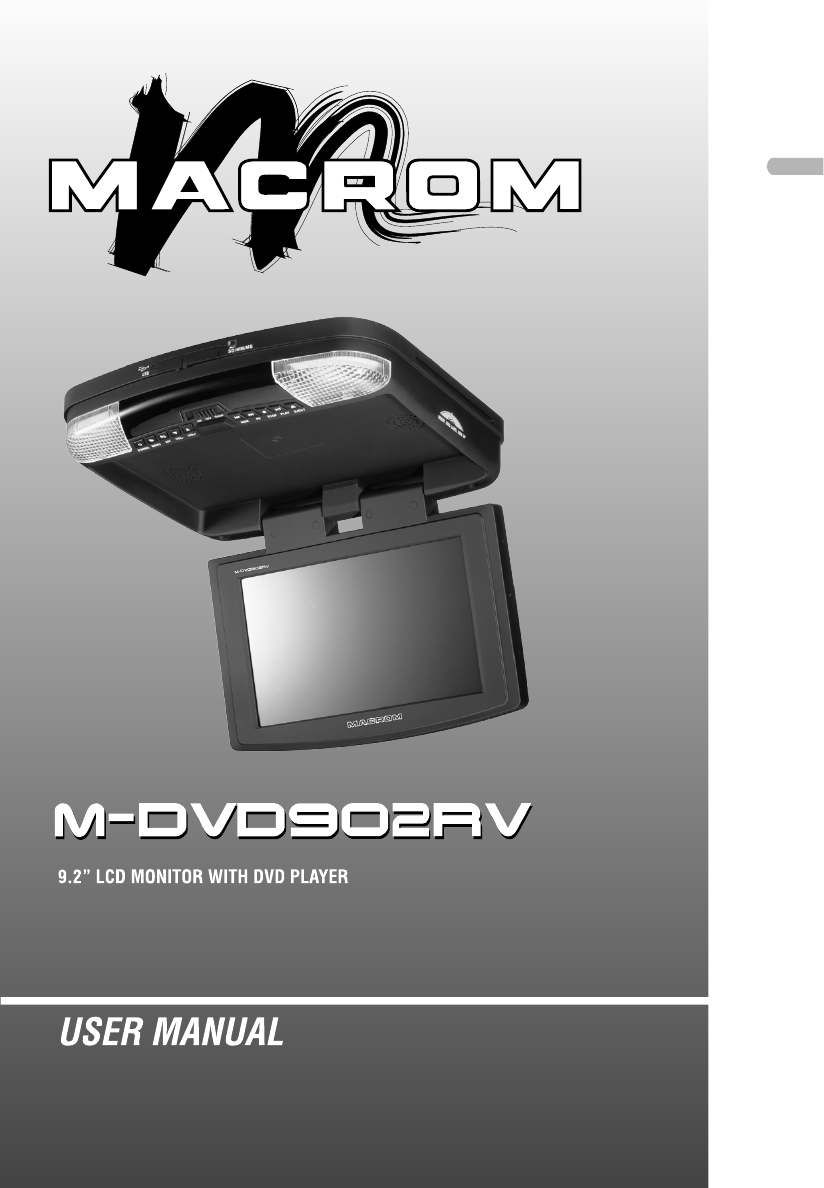
DVD player features This player is a Roof Mount 9.2" TFT-LCD Color Display with DVD player that can be used as a stand-alone display, or can be integrated into a mobile multimedia system. This player has the following features: 9.
Multi-angle Function A DVD video that is filmed from multiple angle which allows you choosing to view from different perspectives. Subtitle Function A DVD video can record subtitles for up to 32 languages to choose from. DISC PLAYBACK This DVD player can play the following formats. About CD Extra discs A CD Extra disc is a disc in which a total of two sessions have been recorded. The first session is Audio session and the second session is the Data session.
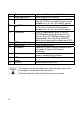
DISPLAY Item 1 2 3 4 5 6 7 8 Name Dome Light Reset button Function or Control Provides an interior light for the vehicle. Press with a pencil or other narrow-tipped tool to rest the player. Power button Press to turn on or turn off the player Menu button Press to open the TFT menu. Press again to select a menu item. SRC input source Press to select the video input mode (DVD-IN button /USB/ SD/ MMC/ MS, AV IN1, AV IN2,). (When the units sets in DVD mode, press it can change USB/SD/MMC/MS mode.
Item 9 10 11 12 13 14 15 16 17 18 Name Panel open button (SKIP-) button Function or Control Press to open the LCD panel. Press to skip the previous chapter on DVD or track on CD; Press and hold it to fast reverse playback at 2x, 4x, 8x, 16x and 32x speeds.
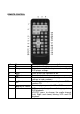
REMOTE CONTROL Item 1 2 Name Power Setup 3 4 5 Mute Eject 0-9 6 7 8 Previous Play or Pause Audio Function or control Press to turn the player on or off. Press to access the setup menu to modify the DVD player settings. Press to turn the sound on or off. Press to eject the disc. Press to enter numbers directly, such as for settings or track numbers. Press to go to the previous chapter on DVD or track on CD. Press to play or pause the CD or DVD.
Item 9 10 11 12 13 14 15 16 17 18 19 20 21 22 23 24 25 26 8 Name Function or control Arrow and ENTER Press to navigate in a menu and change setting values. buttons Press to fast reverse playback at 2x, 4x, 8x,16x FR and 32x speeds. Press to play chapters or tracks in random order. Random Press to repeat playback from point A to point B. A-B Press to select the video input mode (DVD-IN SRC /USB/ SD/ MMC/ MS, AV IN1, AV IN2,). (When the units sets in DVD mode, press it can change USB/SD/MMC/MS mode.
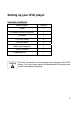
Setting up your DVD player PACKAGE CONTENTS Name of parts Quantity Player 1 IR remote control with battery 1 AV cable 1 ST4.2x16 screw 6 CM 4x8 screw 4 Metal mounting plate 1 User’s manual 1 Rubber gasket 1 Use only the contents of this package to install and use the DVD player. Use of any accessories not provided with this player may result in damage to the player.
Installing your DVD player Note: Do not attempt to install or service your player by yourself. Installation or servicing of the player by persons without training and experience in electronic equipment and automotive accessories may be dangerous and could expose you to the risk of electric shock or other hazards.
1. Battery + lead (Yellow) To connect the positive terminal of the car battery. 2. ACC Power Lead (Red) To ACC power lead powered when engine key position is ACC. 3. Ground Lead (Black) Connect the lead to a good chassis ground on the car. Make sure the connection is made to bare metal and is securely fastened using the sheet metal screw provided. 4. Door wire This wire connects the door sensor of car. Then the dome light can be switched by opening or closing door. 5.
To install the player 1. Make sure that what kind of power system your car is. Please slide to “-” at the left position if your Vehicle’s power supply system is negative; Please slide to “+” at the right position if your vehicle’s power supply system is positive. Notes: 1.Please slide it to a side fully. 2. Do not slide this switch after Place it at a position. Otherwise, it’ll be damaged. 2. To prevent short circuits, remove the key from the ignition and disconnect he terminal of battery. 3.
9. Attach the DVD player to the metal mounting plate using the CM 4x8 screws. Four CM4*8 screws 10. Reconnect the terminal of the battery. Notes: Do remember to connect the red wire to the ACC of the ignition switch. Or the battery charge might be drained off prematurely. If the fuse is opened, first make sure that the cables have not caused a short circuit, and then replace the old fuse with a new one of the same ratings.
Using your DVD player Adjusting the DVD player To open the DVD player 1. Press Open Button to unlock the LCD panel. OPEN BUTTON 2. Swing the DVD player downward to the desired angle. Caution The LCD display opens to a maximum angle of 150° degrees. Do not attempt to open it further. 150° To close the DVD player λ Swing the LCD panel upward until you hear the lock click. close CAUTION 14 Make sure that cords and other items do not get caught in the panel when you close it.
Using remote control 1. Pull out the battery holder. Follow the arrow 1 slide it to the right toward the battery while at the same time pull the battery holder away from the remote control. 2. Place the battery. Place the new lithium battery with the (+) side up. (The type of battery: Crd2025) 3. Push the holder back. Using the finger to push in the holder back until the locking sound is heard. 4. Aim the IR Remote Control directly at the DVD player, then press any button.
Replacing the battery If the remote control does not function, or if the operating range becomes reduced, replace the old battery with new one. Note Dispose used battery properly. Do not misuse battery by shorting the positive + and - negative terminal or put into fire which may cause the battery to explode. Battery and battery holder can be a choking hazard. Keep the remote control away from young children.
Turning off the player button again, the player will be turned off. Press the 1. If there is a disc media in the player, it will continue playback from last position the next time you turn the player on. 2. DVD Disc cannot be ejected if player is switched off. Playing a disc 1. If the input source isn’t already set to DVD-IN, press SRC button to change the input source to DVD-IN 2. Insert a disc to DVD into the disc slot on the right of the player.
Changing the audio language during Playback (Multi Audio) 1. Press AUDIO button to change audio track during DVD playback. The current audio language number, the total number of available audio channels (languages) and current language are displayed. 2. If there are multiple languages are available, press AUDIO button again to cycle through the available languages. The audio display disappears automatically if AUDIO button is not pressed again within 3 seconds.
To repeat a custom segment: 1. During playback, press A-B to set the starting point “A”. 2. Press A-B again to set the ending point “B”. The player plays the segment between point A and point B repeatedly. 3. To cancel the repeat playback and resume normal playback, press A-B again. Changing Viewing Angle during Playback (Multi-Angle) To change viewing angle: 1. Press ANGLE button to cycle through available viewing Angles during DVD playback.
Playing MP3 CDs MP3 is a format for storing digital audio. An audio track is compressed into the MP3 format with little loss of audio quality, while taking up much less disc space. This player can play CD-R/RW disc that contain music MP3 files. When a MP3 disc is inserted into the player, the menu screen appears automatically. You can use the menu screen to select the folders and tracks you want, or the player plays the tracks in the order they were burned onto the disc.
3. Press the up or down button on the remote control to select a file, then press ENTER to play the file. to move to the next file. 4. Press the Or press the to move to the previous file. 5. Press the < button to go to the previous folder or to page up, or press the > button to page down. To repeat a file or folder of an MP3 disc: During MP3 playback, press the REPEAT button to cycle through the available settings: Repeat single---Repeats the current file.
Connecting to the USB storage 1. Inserting the USB storage into the USB socket of the main unit. 2. When the unit sets in DVD mode, pressing SRC on the remote control for more than one second to change the mode from DVD to USB, then the main unit will read the contents of USB storage automatically. Connecting to the memory card (SD/MMC/MS) 1. Inserting the memory card into the memory socket of the main unit. 2.
System setup Changing the picture quality and setting the frequency of FM transmitter Accessing the menu To adjust the picture, use the menu button to select the features you would like to adjust. Adjustment selections are as follows. 1. Press and hold MENU on the remote control for more than one second. The Operation Menu opens. 2.
Using FM transmitter To use the FM transmitter for audio: 1. Press and hold MENU on the remote control for more than one second. The Operation MENU opens. 2. Press MENU repeatedly to select FMT Freq, then press the < and > buttons to change the frequency. 3. Exit the menu. Tune a nearby FM radio (such as your car stereo or FM radio headphones) to the frequency you set in Step 2. Audio from the player is received by the FM radio. Using the OSD menu Press SETUP on the remote control, the OSD menu opens.
Preference page TV TYPE: Selects the TV system .You can select from following: ·PAL ·AUTO ·NTSC AUDIO: Selects the audio track language. You can select from following: ·ENGLISH·FRENCH·SPANISH·GERMAN·CHINESE ·RUSSIAN·THAI SUBTITLE: Selects the language of the subtitles displayed on the screen. You can select from following: ·ENGLISH·FRENCH·SPANISH·GERMAN·CHINESE ·RUSSIAN·THAI ·OFF DISC MENU: Selects the language of the current disc.
Customizing DVD settings To set the general setup page: 1 Press SETUP button on the remote control. The DVD setup menu opens. 2 Press < or > to select General setup page, then the list opens. 3 Press the ∧ or ∨ to select the desired setting item. The items include TV DISPLAY, ANGLE MARK, OSD LANG, CAPTIONS, SCREEN SAVER and LOGO TYPE. 4 Press ENTER to open the list, then press ∧ or ∨ to choose the setting values. 5 Press ENTER to confirm. 6 Press SETUP to exit the setup menu.
Troubleshooting If operation freezes, the screen goes black or the unit should otherwise not function properly, try turning the unit on and off. If the unit does not respond, press the reset switch on the Front Panel. Problem Cause Disc inserted incorrectly Player does not play disc Disc format is not supported Disc is dirty or scratched The player suddenly stopped working Player error or the screen went black Solution Reinsert the disc with the label side up (facing the ceiling). Check the disc format.
Problem Cause Solution 1. This is the characteristics of LCD display in low temperature, it will restore to normal brightness after starting the display for few minutes. 2.Adjust the brightness setting. The picture on the screen is dark. 1. The equipment locates at a low temperature area. 2. Brightness is set too low. No sound can be heard from the IR wireless headphones. 1. Headphones are not 1.Turn on the headphones. turn on. 2. The battery in the 2.Replace or recharge the batteries.
Maintaining Handling discs To keep a disc clean, do not touch the play side (non-label side) of the disc. Do not attach paper or tape to the disc. Keep the disc away from direct sunlight or heat source. Store the disc in a disc case after playback. Cleaning discs Before playback, wipe the disc outwards from the center with clean cloth. LCD Panel Maintenance Wipe off any dust gently with a soft, dry cloth. The surface is easily scratched; do not rub it with hard objects.