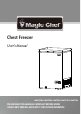
Chest Freezer User's Manual HMCF35W4/HMCF5W4/HMCF5B4/HMCF7W4/HMCF7B4 PLEASE READ THIS MANUAL CAREFULLY BEFORE USING YOUR CHEST FREEZER AND KEEP IT FOR FUTURE REFERENCE.
Product Registration Thank you for purchasing a Magic Chef product. The first step to protect your new product is to complete the product registration on our website: www.mcappliance.com/register. The benefits of registering your product include the following: 1. Registering your product will allow us to contact you regarding a safety notification or product update. 2. Registering your product will allow for more efficient warranty service processing when warranty service is required. 3.
IMPORTANT SAFETY INSTRUCTIONS To reduce the risk of fire, electrical shock, or injury follow these basic precautions when using your refrigerator. 1) 2) 3) 4) 5) 6) 7) 8) 9) 10) 11) 12) 13) WARNING----Keep ventilation openings, in the appliance enclosure or in the built-in structure, clear of obstruction. WARNING----Do not use mechanical devices or other means to accelerate the defrosting process, other than those recommended by the manufacturer.
TABLE OF CONTENTS NAMES OF THE PARTS 2 IMPORTANT SAFETY INSTRUCTIONS 3 INSTALLATION INSTRUCTIONS . BEFORE USING YOUR FREEZER 3 INSTALLING YOUR FREEZER 3-4 ELECTRICAL CONNECTION 4 OPERATING YOUR FREEZER TEMPERATURE CONTROL .. 5 DEFROSTING YOUR FREEZER . .. 5 - 6 . THE FREEZER COMPARTMENT 6 CARE AND MAINTENANCE CLEANING YOUR FREEZER 7 . 7 VACATION TIME MOVING YOUR FREEZER 7 . 7 ENERGY SAVING TIPS TROUBLESHOOTING GUIDE .
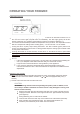
NAMES OF THE PARTS 1 2 3 9 4 5 6 7 8 6. Temperature control panel 7. Cabinet 8. Drainage hole 9. Interior divider (Only for 5/7 Cu. Ft.) 1. Recessed door handle 2. LED light (Only for 5/7 Cu. Ft.) 3. Basket 4. Power cord 5. Shutter WARNING : Never touch the interior of the Freezer Chamber or frozen foods in the compartment with wet hands as this could result in frost bite.
IMPORTANT SAFETY INSTRUCTIONS To reduce the risk of fire, electrical shock, or injury when using your freezer, follow these basic precautions: WARNING Read all instructions before using the freezer. DANGER or WARNING: Risk of child entrapment. To avoid the possibility of child entrapment, please take the following precautions: Remove the freezer top and DO NOT remove the internal basket. Before you throw away your old freezer: Take off the top.
Plug the freezer into dedicated, properly installed-grounded wall outlet. Do not, under any circumstances, cut or remove the third (ground) prong from the power cord. Any questions concerning power and/or grounding should be directed toward a certified electrician or an authorized service center. This unit is not designed to be installed in an RV or used with an inverter.
OPERATING YOUR FREEZER Temperature Control Once your freezer is in its proper place, plug the power cord into an electrical socket to turn on the unit. The “Power” light (red) will come on immediately. The “Run” light (green) will be lit if freezer compressor is in operation (if temperature control is set anywhere between 1-7) Your freezer will automatically maintain the temperature level you select. The temperature control dial has 7 temperature settings and a 0 setting (OFF).
Clean the interior of the freezer. Replace the plug on the inside floor. Plug the unit in and wait for the “Power” light to be lit (red light on). Adjust the temperature control knob to “7”. The “Run” indicator (green) should light up. Allow the cabinet to cool for one hour. Return food to the freezer. Adjust the temperature control knob to set the freezer to preferred temperature. HELPFUL HINT: Defrosting usually takes a few hours. Leaving the door open will help speed the process.
CARE AND MAINTENANCE Cleaning Your Freezer Upon installation of your new appliance, it is recommended that it be cleaned thoroughly. Unplug the freezer; remove the food and storage basket. Wash the inside with a damp warm cloth soaked in lukewarm water and baking soda solution. The solution should be about 2 tablespoons of baking soda to a quart of water. Wash the storage basket with a mild detergent solution. Be sure to keep the door gasket (seal) clean to keep the unit running efficiently.
TROUBLESHOOTING GUIDE You can solve many common freezer problems easily, saving you the cost of a possible service call. Try the suggestions below to see if you can solve the problem before calling for service. PROBLEM Freezer does not operate. POSSIBLE CAUSE Not plugged in. The circuit breaker tripped or a blown fuse. The room temperature is hotter than normal. A large amount of food has been added to the freezer. The door is opened too often. The door is not closed completely.
Moisture forms on inside freezer walls. Moisture forms on outside of freezer. The door will not close properly. See “Installation Instructions”. Weather is hot and humid, which increases internal rate of frost build-up. This is normal. Door is slightly open. Door is kept open too long, or is opened too frequently. Open the door less often. The door is not sealed properly. Door is slightly open, causing cold air from inside the freezer to meet warm moist air from outside.
Limited Warranty MC Appliance Corporation warrants each new Chest Freezer to be free from defects in material and workmanship, and agrees to remedy any such defect or to furnish a new part(s), at the company’s option, for any part(s) of the unit that have failed during the warranty period. Parts and labor expenses are covered on this unit for a period of one year from the date of purchase. A copy of the dated sales receipt or invoice is required to receive warranty service by an authorized service agent.
CNA International, Inc. d/b/a MC Appliance Corporation. All rights reserved. Magic Chef® logo is a registered trademark of CNA International, Inc. www.mcappliance.