PCI Expansion System User's Guide 13 Slot PCI Expansion Model: P13R P13RR 9/26/2006 2:20 PM
Copyright © 2006 Mobility Electronics, Inc. This publication is protected by Federal Copyright Law, with all rights reserved. No part of this publication may be copied, photocopied, reproduced, stored in a retrieval system, translated, transmitted or transcribed, in any form or by any means manual, electric, electronic, electro-magnetic, mechanical, optical or otherwise, in whole or in part without prior written consent from Mobility Electronics, Inc.
M A G M A Table of Contents PREFACE ............................................................................................... I What’s in this Guide ................................................................................ i Advisories ...............................................................................................ii Safety Instructions...................................................................................ii When Working Inside a Computer ............................
M A G M A CHAPTER 6 TROUBLESHOOTING................................................ 19 Locate the Problem .............................................................................. 19 My Computer Can’t Find the PCI Expansion System ................................. 20 When Nothing Works .................................................................................. 21 My Computer Hangs During Power Up............................................... 22 My PCI Card Doesn’t Work ......................
M A G M A Preface What’s in this Guide This Expansion Chassis User Guide is designed to accompany a Magma Host Card Installation Guide. This guide provides easy instructions to install your expansion system, verify the installation was completed correctly, and troubleshoot the installation, if necessary. The corresponding Host Card Installation Guide provides similar information for your Magma host card.
M A G M A Advisories Five types of advisories are used throughout this manual to provide helpful information, or to alert you to the potential for hardware damage or personal injury. They are Note, Important, Caution, Warning, and Danger. The following is an example of each type of advisory. NOTE Used to amplify or explain a comment related to procedural steps or text.
M A G M A ♦ Always use caution when handling/operating the computer. Only qualified, experienced, authorized electronics personnel should access the interior of the computer. The power supplies produce high voltages and energy hazards, which can cause bodily harm. ♦ Use extreme caution when installing or removing components. Refer to the installation instructions in this manual for precautions and procedures. If you have any questions, please contact Mobility Technical Support.
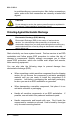
M A G M A to avoid bending any connector pins. Also, before connecting a cable, make sure both connectors are correctly oriented and aligned. CAUTION Do not attempt to service the system yourself except as explained in this manual. Follow installation instructions closely. Protecting Against Electrostatic Discharge Electrostatic Discharge (ESD) Warning Electrostatic Discharge (ESD) is the enemy of semiconductor devices.
M A G M A Chapter 1 Introduction General Specifications MAGMA's 13 Slot Rack-mount PCI Expansion System is a generalpurpose bus expansion system for the Peripheral Component Interconnect (PCI) local bus. The expansion bus is fully compliant with the PCI Local Bus Specification. The PCI expansion system consists of an expansion bus cable (a shielded, high-speed cable), an expansion interface card, an expansion motherboard and a rack-mount enclosure with a power supply.
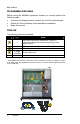
M A G M A Pre-Installation Information Before using the MAGMA expansion chassis you should perform the following steps: • • • Inventory the shipping carton contents for all of the required parts Gather all of the necessary tools required for installation Read this manual Parts List The following parts are provided: Qty Item 1 Rack-mount enclosure containing a 13 slot PCI expansion motherboard and auto-switching power supply (400W) 1 1 PCI expansion cable (1-meter or 1.
M A G M A Tools Required for Installation In order to complete the installation of the MAGMA expansion system you will need a Phillips-head screwdriver.
M A G M A Chapter 2 Hardware Installation The following steps will guide you in completing the hardware installation of your MAGMA 13 Slot CardBus to PCI Expansion System. Electrostatic Discharge (ESD) Warning All PCI cards are susceptible to electrostatic discharge. When moving PCI cards, it is best to carry the cards in anti-static packaging. If you need to set a PCI card down, be sure to place it inside or on top of an anti-static surface.
M A G M A Before you Begin The power supply is auto-switching. This means that it will automatically switch to match whatever source power you are using. Since all products ship with a US Standard 115V power cord, you will need to use a power cord adapter for non-US Standard 115V power sources. Install Expansion Interface Card The first step is to install the PCI Expansion Interface Card. Four (4) screws retain the cover on the expansion chassis. Remove them to open the enclosure.
M A G M A Attach PCI Expansion and Power Cable Carefully position the MAGMA expansion chassis so that the supplied PCI expansion cable will conveniently reach from the connector of the Host Card (PCI, PCIe, CardBus, eCard/54, or eCard/34) to the connector on the back of the chassis. Attach one end of the PCI expansion cable to the Host Card and secure it using the captive thumbscrews on the cable. See the Host Card Installation Guide for more information on connecting the cable to the card.
M A G M A Recheck the Installation Check your installation before powering up the MAGMA expansion chassis for the first time. Although the power supply has an over voltage protection device built into it, it may not "trip" in time to fully protect a device that has been improperly connected, or whose power cable has been damaged. Applying Power Correctly Starting Up: You must apply power to the MAGMA expansion chassis BEFORE you power up your computer.
M A G M A CHAPTER 3 Verify Installation The MAGMA Host Card is not visible to the Windows’ Device Manager or the Apple System Profiler until the Expansion System has been successfully connected and properly powered on. Therefore, you will need to connect your Expansion System to the host computer and turn them both on before you can verify the MAGMA Expansion Chassis installation. See your Host Card Installation Guide for information on how to connect your Host Card.
M A G M A To see if your installation is completed: Click on the ‘+’ sign to the left of the ACPI (BIOS) to open it. This is typically found at the top of the Device Manager Window. Click on the ‘+’ sign to the left of the PCI Bus to see all PCI Bus connections. Click the ‘+’ sign to the left of the line containing the words “Express Root” or something similar. You should now see the PCI Standard PCI-to-PCI bridge immediately below it.
M A G M A Mac OS X When using Mac OS X no additional software or drivers are needed. As long as you are using Mac OS X Version 10.2.2 or newer, the operating system should automatically recognize the MAGMA expansion chassis. Select “About This Mac” under the Apple Icon Then click the “More Info” button.
M A G M A MAC OS 10.3.x & 10.4.x Next, click on the PCI Card item. You should see a pci-bridge device listed under PCI as shown below: Mac OS 10.3.x & 10.4.x Any PCI Cards you install in the expansion chassis will appear behind the pci-bridge device. MAC OS 10.2.x Next, click on the Devices tab. You should see a pcibridge device listed under PCI as shown below: Any PCI Cards you install in the expansion chassis will appear behind the pci-bridge device. Mac OS 10.2.
M A G M A Chapter 4 Install 3rd Party PCI Cards This chapter provides information on how to install 3rd Party PCI cards into your MAGMA expansion chassis. More details on the installation of individual cards are provided by the card’s manufacturer. This chapter is provided as a simple guide to help you install your PCI cards in the chassis. For the purpose of installation, the MAGMA expansion chassis functions exactly as a standard desktop computer chassis.
M A G M A Next, slide the enclosure cover backwards, disengaging it from the guides at the front of the enclosure, by firmly grasping the rear cover lip over the card I/O area and pulling the cover backward about ½” and then lifting the cover off. CAUTION When replacing the enclosure cover, be sure that the front edge guides on the cover engage the inner lip of the enclosure.
M A G M A rd Generally, when installing 3 Party PCI cards in your MAGMA expansion chassis, it should make no difference which PCI slot you place your cards in, unless specified by the card manufacturer. If you have PCI cards that need priority assignments, slot ordering in your PCI Expansion chassis begins with Slot 4. Install PCI cards following PCI card manufacturer’s recommendations. Some PCI card manufacturers recommend that you install their software driver(s) prior to installing the hardware.
M A G M A Install Hard Drive(s) Installing Hard Drives Installing up to seven (7) hard drives into your 7Slot chassis, or four (4) in your 13-Slot Chassis, is simple using one or two optional Drive Cages (PN: RDRIVECAGE), available from MAGMA. Each cage can hold up to four (4) 3.5” hard drives. The cages mount into the hard drive area in the chassis in the previous graphic.
M A G M A Finishing Touches After your system is working properly, replace any empty slots with slot covers, and replace the host computer cover and the expansion chassis cover. Rack Installations Installing your new Expansion System chassis into an equipment rack has never been easier. Simply attach one of MAGMA’s optional Rack-mount slide kits (PN: RSLIDES-XX) to allow you to mount the chassis in a computer rack and then simply slide the chassis in and out whenever you need to do work on, or in, it.
M A G M A Chapter 5 Chassis Maintenance Like all computer systems, you will need to perform some routine maintenance tasks. Some of these include making sure that the air vents in the chassis are clear of obstructions and that the cooling air from the fans flows freely. You will also need to check the foam filter behind the front panel to ensure it is clean, thus allowing for unrestricted air flow to the fans.
M A G M A In order to ensure the safety and efficiency of your expansion system, it is recommended that you keep a spare power supply module on hand – just in case. Protect yourself, keep a spare. Order your spare power supply module from Mobility – PN 4000022-01.
M A G M A Chapter 6 Troubleshooting Locate the Problem If you are having trouble with the MAGMA expansion system, verify that all cards are seated properly and all cables are connected properly. Be sure you followed the instructions in earlier sections of this User Guide. Always remember to power On and Off correctly when rechecking and testing your installation. If you are still having problems, try these simple troubleshooting steps.
M A G M A My Computer Can’t Find the PCI Expansion System If the expansion system is not visible in your Windows Device Manager or your Apple System Profiler at all, you will need to turn off your computer (first) and then the MAGMA expansion chassis (second) and test all cords and cables to ensure you have everything connected correctly.
M A G M A When Nothing Works The following troubleshooting steps will help you when the computer or chassis won’t turn on or “nothing seems to work” correctly: rd Review Chapters 3 (Verify Installation) and 4 (Install 3 Party PCI Cards) as necessary to verify that you have a valid installation of the MAGMA expansion system and that you have rd correctly installed your 3 Party PCI card(s) and their associated drivers (as required).
M A G M A My Computer Hangs During Power Up If your computer “hangs” while being turned on and you can’t even start, follow these simple steps to try to fix this problem: 1. Shut off the computer (first) and then the MAGMA expansion system and verify that all cards and cables are installed correctly. Reapply power first to the expansion system and then to the computer. 2. rd If it still hangs, remove all 3 Party PCI cards and try booting up without any cards installed. a.
M A G M A My PCI Card Doesn’t Work Follow these simple troubleshooting steps to resolve typical 3rd Party PCI card problems: The following additional steps might also help when the above troubleshooting steps for fail to resolve your problem: 1. Shut down the computer followed by the MAGMA expansion chassis 2. Remove the PCI card displaying a problem 3. Replace the “problem card” with a simple PCI card, such as an Ethernet card that has drivers built into the operating system.
M A G M A Windows 5. Next, open the Device Manager (View by Connection selection). If the is gone, the problem is with the 3rd Party PCI card or the card drivers. You should go to the Windows Error Codes section of this chapter to learn how to troubleshoot using error codes. is still visible, the problem may be with the MAGMA If the expansion system. Please contact Mobility Technical Support for further guidance and/or a replacement product.
M A G M A Windows Error Codes If you are having a problem with one of your devices, and the Device status box shows a Windows Error Code, refer to the following list of error codes for guidance: Error Code Description/Action rd This code indicates that there is a problem with the 3 Party PCI Card driver. 10 If necessary, contact the PCI Card’s manufacturer for updated PNP compatible drivers. If all else fails, contact Mobility Technical Support for further assistance.
M A G M A Error Code Description/Action 28 (PCI Card) The driver for the PCI Card is not installed on your system. Reinstall the PCI Card driver following the manufacturer’s instructions. If that fails to fix the problem, call the card manufacturer for new drivers. The PCI host card or expansion chassis are not working correctly. Reinstall the PCI host card into the computer’s PCI slot and recheck all cable connections. If the error code remains, try another PCI slot.
M A G M A Chapter 7 How to Get More Help Frequently Asked Questions (FAQ) You can visit the MAGMA Technical Support FAQ pages on the Internet at: www.magma.com/support/ Contacting Technical Support Our support department can be reached by fax at (858) 530-2733 or by phone at (858) 530-2511. Support is available Monday through Friday, 8:00 AM to 5:00 PM PT.
M A G M A MAGMA Debug Utility Occasionally, Mobility Technical Support may request Windows users to produce and email a MAGMA debug log file to help them resolve your problem. This file should be emailed to support@magma.com. This file should have a “.log” file extension. To create the *.log file, follow these instructions: 1. 2. 3. 4. 5. Locate a file called dbgview.exe on the MAGMA CDROM. Double-click on the file dbgview.
M A G M A PCIScope Software Utility PCIScope is a powerful tool for Windows users. It was designed by a Germany company called APSoft. This software utility is a valuable resource to explore, examine and debug the PCI subsystem of your computer. It was made to fit the requirements of the most demanding users, especially engineers, programmers, and system administrators, and to integrate all advanced functions and tools into one product. Please visit www.tssc.
M A G M A You should save this data as a file on your computer. Please include your name and date as part of the file name with an extension of “.bpd.” Then email this file to support@magma.com if you are experiencing configuration problems.
M A G M A Returning Merchandise to MAGMA If factory service is required, a Service Representative will give you a Return Merchandise Authorization (RMA) number. Put this number and your return address on the shipping label when you return the item(s) for service. MAGMA will return any product that is not accompanied by an RMA number. Please note that MAGMA WILL NOT accept COD packages, so be sure to return the product freight and duties-paid.
M A G M A Appendix A Bus Hierarchy Bus Hierarchy The following figure is representative of the PCI Bus hierarchies for the Magma Expansion System. This figure pictorially conveys the overall PCI bus topology of the 13-Slot System. In this example, the Magma st Host Card is the 1 PCI Bus. This PCI Bus is never visible to the Windows Device Manager or the Apple Profiler. The connecting cable to nd rd the Backplane is the 2 PCI bus, and the PCI Slots represent the 3 and 4th Buses on the 13-Slot Backplane.
M A G M A In general, it is not possible to predict the actual Bus numbers. We only know how they increment starting from the Magma Host Card. The key point in the figure of the PCI Bus topology is that the connecting cable between the Host Interface Card and the backplane is actually a PCI bus itself.
M A G M A Appendix B Need More Slots? Multiple PCI Expansion System Configurations The PCI Local Bus Specification defines the PCI bus as a hierarchical bus, where PCI to PCI Bridges (PPBs) may be used to add "levels" to the PCI bus hierarchy. Because hierarchies are organized systems arranged into different levels, you can take advantage of this automatic organizing and layering to expand the number of available PCI slots beyond the number available in your computer’s motherboard.
M A G M A 2. The 4 and 7 Slot Magma Expansion Systems each add two (2) PCI to PCI Bridges to the PCI Local Bus. The 13 Slot adds three (3) PCI to PCI Bridges to the PCI Local Bus. The 6 Slot adds one (1) bridge. These bridges are the communication paths between the PCI cards and the computer resources. Most computers allow multiple bridges (and thus PCI buses) to be correctly configured.
PCI Expansion Host Card t Configura ti o Ou n- n 4, 7, 13 Slot Chassis Fa M A G M A PCI Expansion Host Card 4, 7, 13 Slot Chassis Magma Expansion Cable Proprietary Expansion Cable 4, 7, 13 Slot Chassis PCI Expansion Host Card Proprietary Expansion Cable The Fan-Out Configuration is the recommended solution. It typically provides optimum performance on most systems because there are fewer PCI bridges between the Computer CPU and the PCI cards.
M A G M A The following image shows the Apple Profiler display when a MAC has 2 Expansion Systems connected in a “Fan-Out” configuration MAC System Profiler with 2 PCI to PCI Expansion Systems Installed in a “Fan-Out Configuration. Daisy-Chaining Recognizing the typical insignificance of the performance variance between the “Fan-Out” and “Daisy-Chaining” configurations, the primary reason for using this one would be limitations on physical space.
M A G M A Verify your configuration Before you start installing your PCI cards (refer to Chapter 4 Install Cards and Drives for more information), you should confirm that everything is in proper working order. Refer to Chapter 3 Verify Installation for guidance in verifying the proper installation of your Expansion System. Notice that each Daisy-Chained unit appears in the Device Manager in the reverse order of its place in the configuration.
M A G M A Obviously, you will need to keep an eye on your system performance and make any adjustments that may be required, either to PCI card location or to Expansion System configuration, to obtain maximum performance. PCI Card Conflicts If you determine that one PCI card is interfering with the operation of another card, first try reorganizing the cards on the motherboard. Moving the cards around can change the order in which the cards are configured by the system during power-on.
M A G M A rd Problems with 3 Party cards might only be traceable once you have identified the expansion system containing the problem card. Remember, it may be necessary to identify the PCI Slot that the Host Interface Card is in before you can properly identify the correct expansion chassis and ultimately the card. Obviously, this is only an issue if you have multiples of the same type of card installed.
M A G M A Finding the Problem Card Windows If you need help to determine which PCI card, or which expansion chassis, has the problem, you can “right-click” on the card with the and check the information contained in the “Location:” field. Look for the “Error Code” in the box in the center of the Properties Window and then go to the Windows Error Code section for information on how to resolve this issue.
M A G M A APPENDIX C Compliance FCC NOTE: This equipment has been tested and found to comply with the limits for a Class A digital device, pursuant to part 15 of the FCC Rules. These limits are designed to provide reasonable protection against harmful interference when the equipment is operated in a commercial environment.
M A G M A Appendix C Compliance 1
Mobility California, Inc. PCI Expansion Products 9918 Via Pasar, San Diego, CA 92126, USA Phone (858) 530-2511 • Fax (858) 530-2733 Email: support@magma.com • www.magma.