OWNER'S MANUAL LS6000, LS6300 AM/FM Stereo Receiver and Auto Stop Cassette Player Designed for In-Wall Installation of All Recreational Vehicles, Motor Homes and Mobile Housings 12 Volts DC ® A Registered Trademark of Magnadyne Corporation
INTRODUCTION Please read all of the information in this booklet before using this unit to insure that you fully understand the capabilities of this unit. WARNING! To prevent fire or electrical shock hazard, do not expose this product to rain or moisture, or remove cover or bottom screws. No user serviceable parts inside. Refer servicing to qualified service personnel.
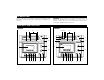
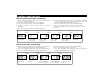
CONTROLS AND FUNCTIONS 1. On / Off Button Press this button in to turn the unit on. Press again to turn the unit off. 9. Stop / Eject Button When this button is pressed, tape play will stop and the cassette carriage door will open to allow you to remove the tape. 2. AM / FM / AUX Function Knob After turning the unit on, select the desired playing mode with this knob. 10. Pause Button Pressing this button will stop the tape until the button is released. 3.
CONTROLS AND FUNCTIONS 16. CD Input Plug one end of a CD jumper cable into this receptacle and plug the other end into the "line out" receptacle or "headphone" receptacle of your portable CD player FM Stereo Operation The unit will automatically switch from FM mono to FM stereo when the signal strength increases to a stereo level. If the signal should become weak on stereo reception, the unit will switch back to the mono mode.
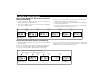
CONTROLS AND FUNCTIONS How to Set the Date and Time (LS6300 Only) 1. With the normal time display showing, press the mode button 4 times. (The month will display) 2. Press the set button until the correct month appears. 3. Press the mode button again. (The day will display) 4. Press the set button until the correct day of the week is displayed. 5. Press the mode button. (The hours will be displayed) 6. Press the set button until the correct hour is displayed making sure to set AM or PM correctly.
CONTROLS AND FUNCTIONS How to Turn On/Off the Alarm Clock and Hour Chime (LS6300 Only) 3. Press the set button again. (The hour chime indicator will be displayed at the button of the display area) 4. Press the set button again. (The alarm indicator will disappear and the alarm will be off) 5. Press the set button again. (The hour chime indicator will disappear and the hour chime will be off) 1. With the normal time display showing, press the mode button. (The time display will begin to flash) 2.
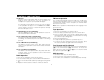
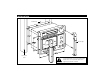
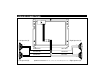
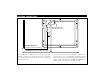
INSTALLATION Wall Panel ING TUN AM 54 0 88 70 0 96 60 0 92 80 0 10 00 1200 10 4 1600 1400 8 10 KHZ MHZ CD 10 0 IN EO STER FM ® LS6 000 SPE AK SPE ON ER AKE RB RAD A AN IO B FM D AUX AM F /OF VOL UM E HIGH End Caps LOW OP O ST AUT E ANC BAL ORT NSP TRA CT E JE FT / SO P/ TOR STOCT MO VO E JE SER . DC F.F RE W E TON SE PAU R HIG H L LO W Y PL A Structural Stud ! 7 Caution: Do not install radio without rear cover installed. No user-serviceable parts inside.
POWER / AUX CONNECTIONS This unit for use only with a 12 volt DC power source with a negative ground.
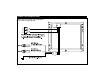
SPEAKER CONNECTIONS Left Speaker (A) Right Speaker (A) + + _ _ BROWN Wire GRAY Wire ORANGE Wire WHITE Wire _ _ GREEN Wire BLUE Wire + Left Speaker (B) + Speaker Connections: Do not confuse the A and B speaker sets 9 Right Speaker (B)
ANTENNA CONNECTIONS External Automotive Type Antenna Socket Either or External Automotive Type Antenna (Not Provided) DP36AXT In-Wall Antenna (Not Provided) If an automotive antenna is not available or is undesired, we recommend the use of a Magnadyne DP36AXT di-pole antenna substitute. Plug the male plug from the DP36AXT into the female receptacle of the LS6000 or LS6300 unit and allow the cable of the antenna to lay inside the wall.
SAFETY INSTRUCTIONS Read Instructions: All the safety and operating instructions should be read before the appliance is operated. Damage Requiring Service: The appliance should be serviced by qualified service personnel when: A. The power supply cord or the plug has been damaged; or B. Objects have fallen, or liquid has spilled into the appliance; or C. The appliance has been exposed to rain; or D. The appliance does not appear to operate normally or exhibits a marked change in performance; or E.
OPERATION AND MAINTENANCE WARRANTY Maintenance ONE (1) YEAR LIMITED WARRANTY The playback head is a very important part of the tape playback system. If it becomes dirty, the sound quality will deteriorate resulting is loss of fidelity (high frequency reproduction). The head should be cleaned every 20 hours of use. (Approximately) 1. Press the eject button and open the cassette door. 2. Clean the playback head with a cotton applicator (Q-tip) and alcohol.